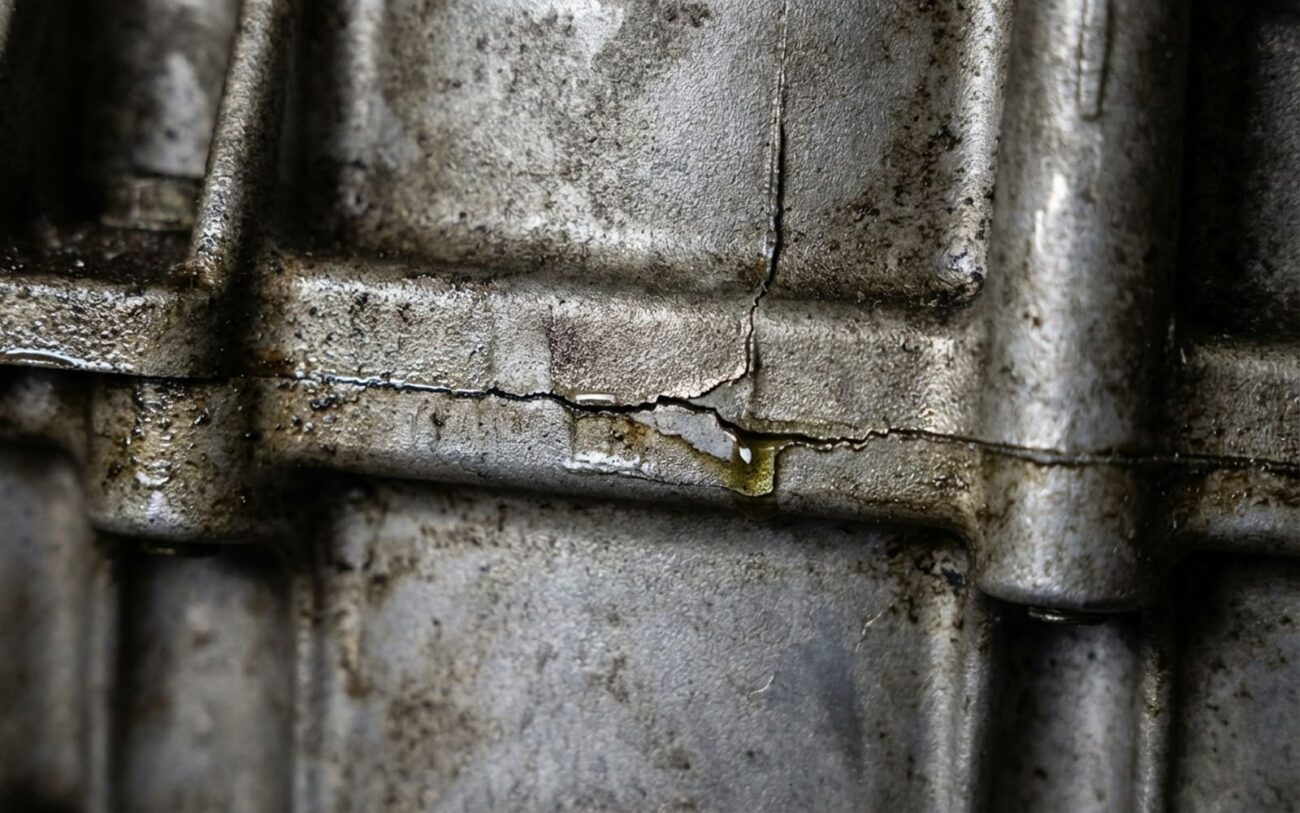
Look, a cracked engine block is about as bad as it gets for an engine. It’s serious, no doubt. But in my 25+ years spinning wrenches, I’ve seen a lot more folks think they had a cracked block than actually have one. More often than not, it’s a blown head gasket, a warped cylinder head, or even just a leaky freeze plug. Don’t get me wrong, blocks do crack, and when they do, you’re in for a world of hurt. The real trick is knowing the actual symptoms so you don’t jump to conclusions and waste time and money chasing the wrong problem.
Critical Warning: If you see coolant and oil mixing, or exhaust gas in your cooling system, you need to stop driving immediately.
This isn’t a “drive it home carefully” situation. Coolant in your oil quickly destroys bearings, leading to a spun bearing or a completely seized engine. And exhaust gas in the coolant means you’re building pressure and losing cooling capacity fast. Continuing to drive will turn a bad problem into an engine-replacement problem. For more on what happens, check out what spun bearings do.
What I Look For: The Real Symptoms of a Cracked Block
Alright, so what are the actual red flags that point to a cracked block? These are the things that make me sit up and pay close attention.
The “Chocolate Milkshake” (Internal Fluid Mixing)
This is probably the most unmistakable sign: coolant and oil mixing internally. You pull the dipstick, and instead of golden-brown oil, you see a milky, chocolate-milkshake-like mess. Check the coolant reservoir, and you might spot an oily film, a rainbow sheen, or even sludge. Now, a blown head gasket or a cracked cylinder head can cause this too, absolutely. But if those check out, then you’re likely looking at a crack or porosity in the block itself that’s breached an internal oil or coolant passage. This means big trouble.
External Leaks (From the Casting Itself)
Another big one is an external leak coming directly from the engine block’s casting. I’m not talking about a leaky hose, a bad gasket, or a freeze plug. I mean you see coolant or oil weeping right out of the raw aluminum or cast iron of the block. This is especially critical if it’s near the bellhousing (where the transmission bolts up) or along the cylinder walls. If oil is seeping from the block’s surface, not from the oil pan or valve cover, that’s a problem. These aren’t just seal issues; they’re signs the block’s integrity is compromised.
Combustion Gas in the Cooling System
This is a classic. You might notice constant bubbling in the radiator or the coolant overflow tank, especially when the engine is running and warmed up. A combustion leak tester (sometimes called a “block tester”) is your best friend here. If that blue fluid turns yellow, you’ve got exhaust gases in your coolant. If you’ve already ruled out a cracked cylinder head or a blown head gasket—and believe me, I always check those first—then that gas is probably entering through a crack in the block’s deck surface or a cylinder wall. That same crack can also let coolant into a cylinder, which will give you a misfire, or worse, hydro-lock, where the cylinder fills with liquid and the engine just won’t turn over. For more on that specific symptom, see white smoke from the exhaust that smells like coolant.
My Diagnostic Approach: Pinpointing the Problem
Alright, this is where the rubber meets the road. Too many times, I’ve seen folks jump to the worst conclusion—a cracked block—when it’s something far more common and cheaper to fix. Your job, or mine, is to systematically rule out those more likely, less catastrophic failures first. A blown head gasket is a pain, sure, but it’s usually a fraction of the cost and effort of a block replacement. So, how do we really nail down the source?
Start with the Basics, Then Dig Deeper
I always start with the fundamentals: a cooling system pressure test and a combustion gas test. These two tests will tell you a lot right off the bat. But to really differentiate a block crack from its common mimics, you need a more targeted approach. Here’s the breakdown I use in the shop:
| Symptom | Points to Cracked Engine Block | More Common Mimics (Check These First) | My Definitive Test to Confirm |
|---|---|---|---|
| Coolant and oil mixing (milky oil, oily coolant) | Internal crack or casting porosity between oil and coolant passages in the block. | Failed head gasket, cracked cylinder head, oil cooler failure (less common for coolant in oil, more for oil in coolant). |
First, a cooling system pressure test. If it holds pressure but you still have mixed fluids, and a combustion gas test is negative, then I’m looking hard at the block. You can also try pressurizing the cooling system with the oil filler cap off and listen for air, or vice-versa. If the head and gasket are confirmed good, the block is the next suspect. |
| External coolant leak at rear of engine | Crack in block casting near the transmission bellhousing mounting surface. | Failed freeze plug, leaking heater hose, intake manifold gasket (especially on V-engines), rear main seal housing gasket. |
Clean the area meticulously. Then, pressurize the cooling system to about 15 psi (check your service manual for exact spec). Use a borescope and UV dye to pinpoint the exact source. A block leak will typically seep directly from the casting, not from a seam or bolt. |
| Oil leak at rear of engine | Crack or porosity in the block near the rear main cap web or oil gallery plugs. | Rear main oil seal failure, oil pan gasket, valve cover gasket, oil pressure sender, cam plug. |
Again, clean everything. Add UV dye to the oil and run the engine. A rear main seal leak usually shows up below the crankshaft centerline. A block leak, especially from a casting flaw, often originates higher up on the block’s surface. Sometimes you need to drop the transmission to get a clear view. For other rear oil leak issues, see symptoms of a worn crankshaft journal. |
| Coolant entering a cylinder (misfire, hydro-lock, white smoke) | Crack in cylinder wall or the block’s deck surface (the flat top where the head sits), often below the head gasket’s fire ring. | Blown head gasket, cracked or warped cylinder head. |
Perform a cylinder leak-down test with the radiator cap off. Look for bubbles in the coolant or a drop in coolant level. If you pull the head and the gasket looks good, and the head passes inspection (pressure test, dye penetrant), then the block deck or cylinder wall is the prime suspect. You might need to pressure-test the bare block itself. Refer to how to tell if your cylinder head is cracked or burnt for head checks. |
My Two Cents:
This structured approach is how you avoid pulling an engine apart unnecessarily. I’ve seen it happen too many times because someone skipped a critical test. And here’s a big one: if you just replaced a head gasket and you’re still seeing coolant in the oil, then it’s absolutely time to suspect the block. That’s a classic scenario. More on that specific nightmare in what to do if you still have coolant in oil after a head gasket replacement.
What Actually Causes a Block to Crack?
A cracked engine block doesn’t just happen out of the blue. It’s almost always the result of some specific stress, a manufacturing flaw, or a combination of factors. Here’s what I’ve seen over the years in the shop:
Casting Defects
Sometimes, the problem starts right at the factory. We’re talking about casting defects like “core shift,” where the sand cores used to form internal passages move during the casting process. This can lead to uneven wall thickness in the block—one side might be super thin, the other thick. I’ve seen certain older aluminum V6s, for example, that were notorious for thin spots between cylinders or near coolant passages. Then there’s casting porosity, which is basically microscopic voids in the metal. These can allow a slow, insidious seepage between oil and coolant galleries from day one, often getting worse over time.
Severe Overheating
This is probably the biggest culprit. Thermal stress is absolutely brutal on engine metals. When one part of the block gets significantly hotter than another—maybe because of a localized cooling system failure or a low coolant level—the uneven expansion and contraction can literally tear the metal apart. I’ve seen vertical cracks in cylinder walls after just one severe overheat event. Radial cracks around head bolt holes or valve reliefs are also pretty common. This is exactly why catching any coolant loss or temperature creep early is so critical. If your engine runs hot and you can’t find a leak, you need to dig deep and find out why. For more on that, read engine overheating and coolant loss with no visible leaks.
Corrosion and Chemical Attack
Corrosion is a sneaky killer, especially in aluminum blocks. Using the wrong type of coolant—like putting traditional green silicate coolant into a system designed for OAT (Organic Acid Technology) coolant—can trigger galvanic or electrolytic corrosion. This literally eats away at the water jacket walls from the inside out, weakening the block until it cracks. In heavy-duty diesel engines with wet liners, you also have to worry about cavitation, which is essentially the implosion of air bubbles that erodes the block’s liner bore over time. It’s like tiny hammers constantly beating on the metal.
Mechanical Damage and Assembly Errors
Sometimes it’s just plain old mechanical failure. A connecting rod deciding to introduce itself to the outside world, for instance, can punch a hole right through the side of the block. Over-torquing head bolts, or worse, reusing torque-to-yield (TTY) head bolts, can strip threads in the block. That compromises the clamping force on the head gasket, which can lead to leaks and eventually stress cracks. And while a failed freeze plug isn’t a block crack itself, severe corrosion of the plug seat in the block can definitely mimic one. That’s usually a repairable issue, but it still highlights the importance of proper coolant and maintenance. One last thing: a warped or cracked cylinder head is not the same as a cracked block, but severe overheating can certainly damage both. If you’re wondering about that, check out can engine overheating warp a cylinder head?
Can You Fix a Cracked Engine Block? (The Hard Truth)
Alright, so you’ve got a confirmed cracked block. Now what? This is where reality hits hard. Can it be fixed? Sometimes, yes. But honestly, most internal cracks mean the block is toast. It’s all about the location and severity of that crack. Some external ones can be repaired, but it’s a big “if” and it’s definitely not a DIY job.
This is Professional Territory. Seriously.
If the crack is external, accessible, and not in a critical load-bearing area—like on the side of the block, away from main bearing caps or cylinder walls—a specialist might be able to weld it, braze it, or use a high-temperature epoxy. But this requires specialized equipment, proper crack preparation (grinding a V-groove, cleaning), and expertise. This is not something you tackle with a tube of J-B Weld in your driveway and expect it to last.
Let’s break down the typical scenarios I see:
External Epoxy Patches (A Big “Maybe”)
Cooling System Sealants (Use with Extreme Caution)
Hard-to-Reach Areas (Often Not Worth It)
Internal Cracks (Almost Always a Death Sentence)
Now, two related issues that are often repairable:
-
Corroded Freeze Plug Seats: If a freeze plug has corroded out, and the seat in the block is just pitted, it can often be cleaned up, and a new brass plug installed with a high-temp sealant like Permatex Aviation Form-A-Gasket. This is a common fix.
-
Stripped Head Bolt Holes: If you’ve got a stripped head bolt hole in the block, a professional can install a threaded insert (like a Time-Sert or a Helicoil, though I prefer Time-Serts for critical applications). But here’s the kicker: you must follow the insert manufacturer’s specific torque specs, not the original engine manufacturer’s. That’s a mistake I’ve seen made more than once.
Validating a Block Repair: Don’t Skip This Step
Look, if you’ve gone through the trouble of repairing a block, you absolutely cannot just slap it back together and hope for the best. Any repair, especially on something as critical as the engine block, needs to be thoroughly tested under real-world conditions. Skipping this is just asking for another, potentially worse, failure.
For External Epoxy or Sealant Repairs:
The minimum standard here is a solid cooling system pressure test. I’ll pressurize the system to 15 psi (or whatever the cap rating is, usually 15-16 psi) and let it sit for at least 30 minutes. You shouldn’t see more than a 1 psi drop. After that, you need to run the vehicle through at least three full heat cycles—that’s cold start to full operating temperature and then back to cold. Then, re-inspect the repair area with UV dye and a blacklight. You should see absolutely zero seepage. If you do, it’s not holding.
For More Serious Repairs (Welds, Sleeves, Thread Inserts):
Validation needs to be even stricter. After assembly, a cylinder leak-down test is non-negotiable. I want to see less than 10% leakage on all cylinders. You’re also going to want to drive it for about 500 miles, then use coolant test strips or a combustion gas analyzer to check for any hydrocarbon contamination in the coolant. No detectable exhaust gases means the repair is holding its own.
The tools for this aren’t optional: you need a quality cooling system pressure tester, UV dye and a blacklight, a cylinder leak-down gauge, and a combustion gas analyzer (that “block tester” fluid). Trying to cut corners here is just gambling with the entire engine’s life, and that’s a bet I’m not willing to make.
The Bottom Line: Repair vs. Replace (Making the Call)
This is where the rubber meets the road, financially speaking. It’s not just about what’s technically possible; it’s about what makes economic sense for your vehicle. I have these conversations with customers all the time. Here’s a realistic look at costs and the risks involved:
| Repair Type | DIY Cost (Approx.) | Shop Cost (Approx.) | My Estimated Success Rate | Secondary Risk if Failed |
|---|---|---|---|---|
| External epoxy patch | $50 (materials only) | $500–$1,000 (labor for prep, application, testing) | 40% (highly dependent on crack type/location) | Sudden, catastrophic coolant loss leading to severe overheating and engine damage. |
| Freeze plug replacement | $20–$50 (materials, tools) | $200–$600 (access often requires removing other components) | 95% (if the seat isn’t too corroded) | Low; usually just a minor leak if not seated properly. |
| Head bolt thread repair (Time-Sert) | $150–$250 (kit cost) | $300–$500 (per hole, often done with head gasket job) | 98% (if done correctly with proper torque) | Insert failure, leading to head gasket blowout and potential head/block damage. |
| Engine block replacement (long block) | $2,000–$5,000 (part cost, plus consumables) | $6,000–$12,000+ (part, labor, fluids, incidentals) | 100% (of the block itself; assumes proper assembly) | Assembly error, or overlooking the original root cause of failure. |
Prevention: Keep Your Block from Cracking in the First Place
The best repair, bar none, is the one you never have to do. Most block cracks are preventable, or at least their risk can be drastically reduced. It all comes down to understanding the root causes and staying ahead of them with good maintenance habits. Believe me, an ounce of prevention is worth a whole new engine block.
My Essential Maintenance Checklist
-
Use the RIGHT Coolant: This is huge. Always, and I mean always, use the specific coolant type recommended in your owner’s manual. Mixing coolants or using the wrong type is a recipe for internal corrosion that will silently eat away at your block over time. Flush and replace your coolant at the manufacturer’s recommended intervals, too.
-
Prevent Overheating: Overheating is a block’s worst enemy. Stay on top of your cooling system. Replace the thermostat and radiator cap on schedule. Make sure your electric fans are kicking on when they should, and that the fan shroud is intact. If your temperature gauge starts creeping up, pull over safely and figure out why. Don’t just keep driving.
-
Regular Visual Inspections: Once a month, pop the hood and take a good look around your engine. Pay special attention to the block’s surfaces—especially along the transmission seam, near freeze plugs, and around any casting marks. Look for any dampness, crusty coolant deposits, or oily streaks. Catching a small leak early can save you a fortune.
-
