White Smoke, Sweet Smell? Here’s What’s Really Going On Inside Your Engine
Alright, let’s cut to the chase. If you’re seeing thick, steady white smoke pouring out of your tailpipe—not just a puff on a cold morning, but sustained output—and it smells distinctly sweet, like maple syrup or antifreeze, you’ve got a serious internal problem. That’s not normal exhaust. That’s steam, and it means coolant is getting burned right in your engine’s combustion chambers.
And if your coolant reservoir keeps dropping without any visible leaks on the ground, well, that pretty much seals the deal. We’re talking about an internal leak, and it’s not something you can ignore.
First Steps: Confirming the Internal Leak
The first thing I do when I suspect an internal coolant leak is a cooling system pressure test. It’s non-invasive and tells you a lot. Hook up a radiator pressure tester to your coolant reservoir or radiator neck. Pump it up to the pressure rating on your radiator cap—usually 15 to 18 psi. Then, you just watch the gauge.
If that gauge drops more than 1 psi per minute, you’ve got a significant leak. Now, if you don’t see any coolant dripping externally from hoses, the water pump, or the radiator itself, then the problem is definitely internal. That’s when we start digging deeper.
Pinpointing the Source: Head Gasket, Head, or Block?
Here’s the tricky part: white smoke, coolant loss, and combustion gases in the cooling system all look the same whether it’s a blown head gasket, a cracked cylinder head, or a cracked engine block. You can’t just jump to conclusions. In my 25+ years, I’ve seen too many folks replace a head gasket only to find the problem persists because the head or block was actually cracked. So, we need to isolate it.
Symptom: White Smoke, Coolant Loss, Combustion Gases in Coolant
This is your primary symptom. Once you’ve confirmed an internal leak with the pressure test, the next step is to figure out where the coolant is entering the combustion chamber. A blown head gasket is by far the most common culprit here. But a cracked cylinder head or even a rare block crack can cause identical symptoms.
What I do:
- Borescope Inspection: With the spark plugs removed, I’ll snake a borescope (a small camera) into each cylinder. Look for steam-cleaned piston tops or cylinder walls, which indicate where coolant has been burning off. Sometimes you’ll even see a small puddle of coolant if the leak is significant and the engine has sat for a bit.
- Pressurize with Plugs Out: If the borescope doesn’t show anything definitive, I’ll pressurize the cooling system again (15-18 psi) with all the spark plugs out. Then, I’ll watch each cylinder bore for coolant to weep or pool. This can often pinpoint the exact cylinder.
- Block Test (Chemical Sniffer): This is a must-do. It uses a chemical fluid that changes color (usually blue to yellow) if it detects combustion gases in the coolant reservoir. If it changes color, you’ve got exhaust gases getting into your cooling system, confirming a breach between the combustion chamber and a coolant passage.
- Head Removal & Inspection: If all else fails and you’re still not sure, you’ll have to pull the cylinder head. Once it’s off, you can visually inspect the head gasket for signs of failure. You can also take the head to a machine shop to have it pressure tested and checked for warpage or cracks. To check the block, you can seal off the coolant passages in the block deck and re-pressurize the block itself, looking for leaks into the cylinder bores. This is getting into serious diagnostic territory, usually reserved for when the head gasket replacement didn’t fix it.
Symptom: Coolant in Engine Oil (Milky Oil)
If you pull your dipstick and the oil looks like chocolate milk, or you see milky froth under the oil fill cap, you’ve got coolant mixing with your oil. This is bad news, and it means you’re on a fast track to bearing failure.
What I do:
- Glycol Detection Strips: These are quick and easy. Dip one in the oil, and it’ll tell you if glycol (antifreeze) is present.
- Check Oil Cooler: Some vehicles have an oil cooler integrated into the radiator or a separate liquid-to-liquid cooler. If this fails, it can mix coolant and oil. I’ll pressure test the cooler separately if it’s accessible.
- Head Gasket/Cracked Head: A failed head gasket is the most common cause for coolant-oil mixing, especially if it’s a path between an oil gallery and a coolant passage. A cracked cylinder head can also be the culprit.
- Block Crack (Rare): It’s rare, but a crack or porosity in the block casting that bridges a coolant gallery and an oil return gallery can cause this. This is more common in aluminum blocks. With the head removed, you’d be looking for seepage from oil drain-back holes under cooling system pressure.
Symptom: External Coolant Weeping from a Non-Gasketed Area
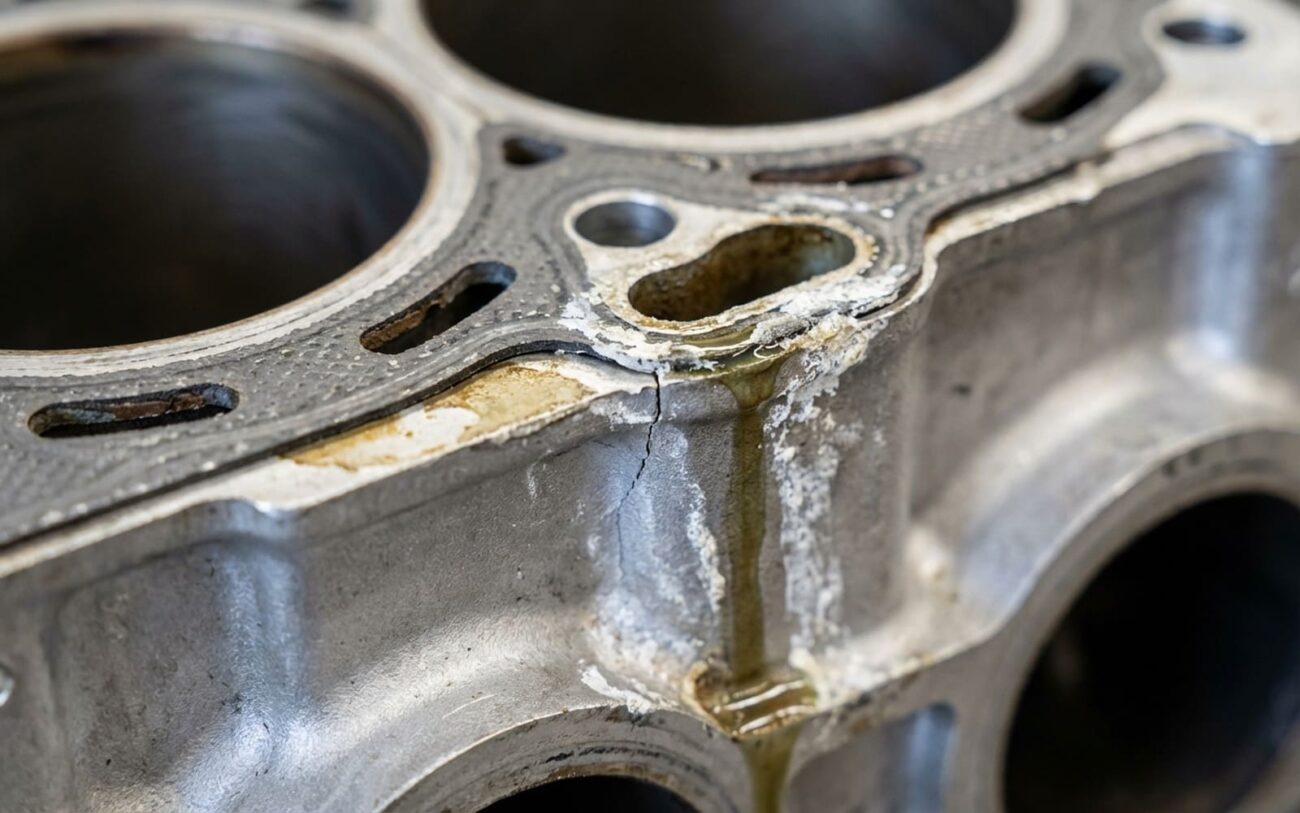
Sometimes you’ll see coolant weeping from the side of the engine block itself, not from a hose, fitting, or gasket seam. This usually points to casting porosity or a thermal stress crack in the block wall, often near a coolant jacket.
What I do:
- Clean and Inspect: Thoroughly clean the area. I mean spotless. Then, pressure test the cooling system again.
- UV Dye: Add UV dye to the coolant. Let it circulate, then use a black light to pinpoint the exact source of the leak.
- Confirm Parent Metal: If the leak is coming directly from the block’s “parent metal” (not a freeze plug, sensor, or fitting), then your block is compromised.
- Common Mimics: Don’t overlook the obvious. Make sure it’s not a leaking freeze (core) plug, a cracked heater hose fitting, or a leaking water pump housing. These are far more common and easier to fix.
Why Engine Blocks Fail (It’s Not Always Random)
True engine block failures aren’t as common as head gasket issues, but when they happen, it’s usually for a reason. Here’s what I’ve seen in the shop:
- Manufacturing Defects: Sometimes it’s just a bad casting from the factory. Things like “core shift” can leave thin spots in the block walls, or you might have microscopic porosity in the metal. I remember certain GM Ecotec 2.4L engines, for example, had known issues with casting porosity near the rear coolant passages. These aren’t isolated incidents; they show up in service bulletins and across multiple vehicles.
- Thermal Stress Cracks: This is a big one. Severe or repeated overheating cycles can create intense hot spots, especially between cylinders. That kind of stress can literally crack the block. It’s why I always preach about keeping your cooling system in top shape.
- Corrosion: Using the wrong type of coolant, or worse, mixing different coolant formulas, can lead to electrolytic corrosion. This process slowly eats away at the coolant galleries from the inside. Over time, it can weaken the metal enough to open up cracks, especially in aluminum blocks.
- Impact Damage: This is usually catastrophic. A thrown connecting rod, a spun bearing, or even a severe engine knock can physically fracture the block. If you’ve had a major internal engine failure, inspect the block carefully for external damage or internal cracks.
Repair Options: From Patch to Full Engine Swap
The Hard Truth About Block Repairs
Your options here depend entirely on where the damage is, how bad it is, and what kind of block you have. Some are minor fixes, but often, a compromised block means the engine’s life is over.
External Epoxy Sealing Professional Only
Freeze Plug Replacement DIY Feasible
Internal Crack or Severe Damage Non-Repairable → Replace
Verifying the Repair: Don’t Skip This Step
Never, ever assume the job is done just because the engine fires up. You need to test under real-world conditions. Here’s my checklist:
- External Epoxy Repair: For an epoxy patch, I look for absolutely no visible seepage after 24 hours and at least three full thermal cycles (cold to operating temp and back). A final check with UV dye and a black light will catch even the tiniest weep.
- Freeze Plug Replacement: A cooling system pressure test is your best friend here. It needs to hold steady at 15–18 psi for a full 30 minutes with no drop and no external leakage.
- Full Block Replacement (or Head Gasket/Head Repair): This is more involved.
- First, a stable cooling system pressure test.
- Second, a negative block test (the chemical sniffer should stay blue, indicating no combustion gases in the coolant).
- Third, a thorough road test. Get the engine fully warmed up, drive it under varying loads, and watch for any white smoke from the exhaust.
- Finally, and this is crucial: pull the dipstick and check the oil after a few hundred miles. Any hint of milky residue means the problem isn’t fully resolved. Don’t overlook this; it’s caught more than one lingering issue for me.
The Real-World Decision: Costs, Labor, and Value
Let’s talk about money, because that’s often the deciding factor. This isn’t just about the repair cost; it’s about the vehicle’s value and long-term reliability. Block replacement is a major undertaking.
| Repair Type | DIY Cost (Parts) | Shop Cost (Total) | Success Rate | Secondary Risk |
|---|---|---|---|---|
| External Epoxy | $20–$50 | $200–$500 | <50% | Sudden coolant loss / Overheating |
| Freeze Plug | $5–$15 | $150–$400 | >95% | Overheating if seat is corroded |
| Block Replacement | $1,500–$4,000 | $3,500–$7,000+ | >98% | Assembly failure (Torque/Timing) |
My “60% Rule”
Here’s what I tell customers in my shop: If the repair estimate for a block replacement—or any major engine work—exceeds about 60% of your vehicle’s current market value, it’s usually not worth it. I’ve seen people pour $6,000 into a 12-year-old sedan worth $4,000. Unless it’s a rare classic or has deep sentimental value, that money is almost always better spent on a newer, more reliable vehicle. It’s a tough pill to swallow, but it’s the financial reality.
Preventing a Recurrence: Simple Habits, Big Payoff
The best repair is the one you never have to do. Preventing block issues (and head gasket issues, for that matter) comes down to consistent, smart maintenance. Trust me, it pays off.
My Preventative Maintenance Checklist
-
Use the Right Coolant: This is non-negotiable. Always use the exact type specified by your vehicle manufacturer (GM Dex-Cool, Ford Orange, Honda Type 2, etc.). Mixing different coolant formulas is a recipe for electrolytic corrosion, which eats away at internal passages and can lead to cracks.
-
Check Coolant Levels Monthly: Get into the habit of checking your coolant when the engine is cold. Any unexplained drop is a huge red flag that something is going on internally, even if you don’t see external leaks yet.
-
Inspect Your Oil Cap: Every time you check your oil, or during an oil change, take a look at the underside of the oil fill cap. If you see milky, frothy residue, that’s coolant in your oil. Don’t delay—act immediately.
-
Replace Your Radiator Cap Periodically: A weak or failing radiator cap can’t hold proper pressure. This lowers the coolant’s boiling point, leading to localized steam pockets and increased stress on your cooling system components, including the block and head gasket. It’s a cheap part that prevents expensive problems.
