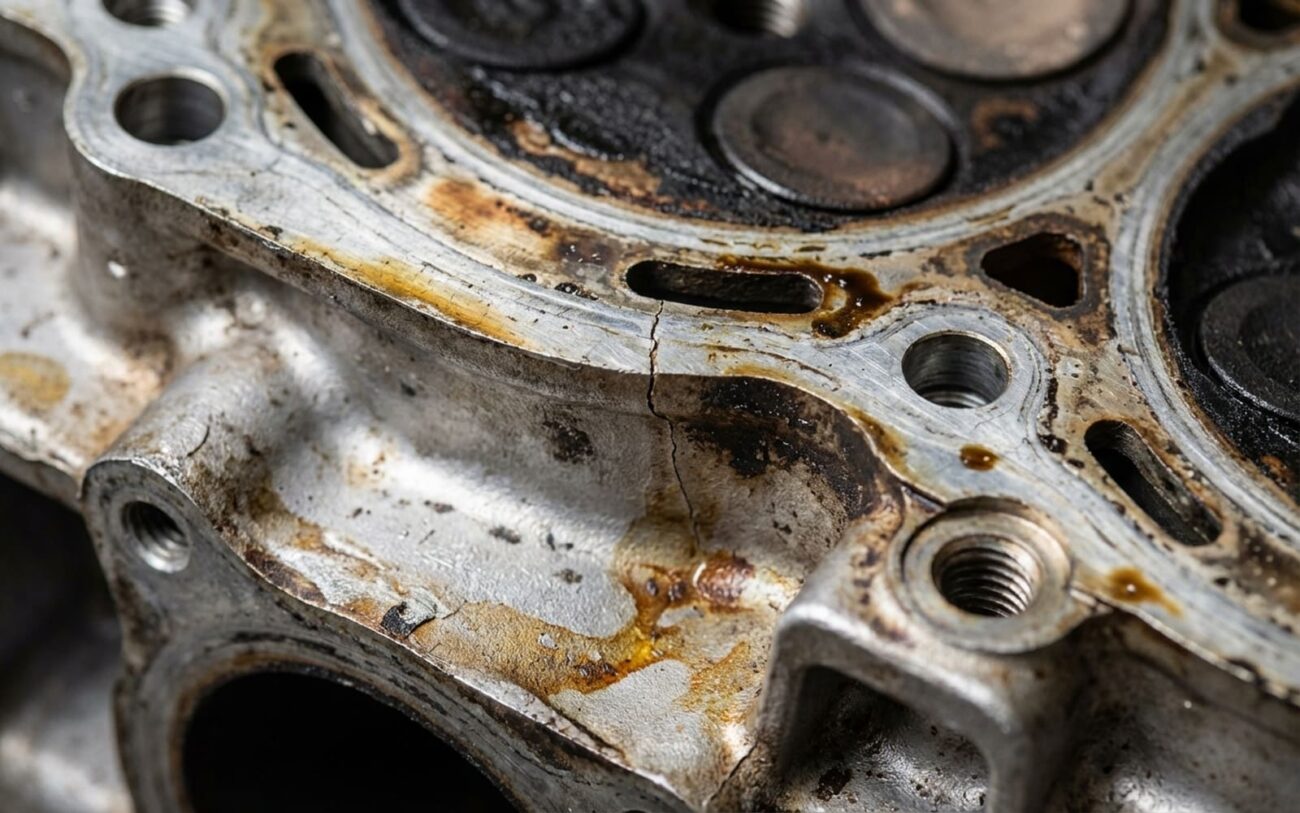
Cracked Cylinder Head: My 25-Year Playbook for Diagnosis and Repair
Alright, let’s talk about cracked cylinder heads. This isn’t one of those “maybe it’s a loose hose” situations. When a head cracks, you’ve got a serious problem on your hands, and diagnosing it right is absolutely critical. After 25 years turning wrenches, I’ve seen my share of these – some obvious, some that’ll make you pull your hair out trying to find. The key is knowing what to look for and, just as important, what not to jump to conclusions about.
Symptoms I Look For & How I Confirm Them
When a cylinder head cracks, it breaches the sealed systems it’s supposed to maintain – combustion, coolant, oil. This lets fluids and pressure go where they absolutely shouldn’t. You’re not looking for one magic bullet; you’re piecing together a pattern. And here’s where experience really matters: almost every symptom of a cracked head also shows up with a blown head gasket, a warped head, or even a simple component failure. Don’t jump to conclusions.
External Coolant Leaks
The first thing I always check for is an external coolant leak that’s clearly coming from the head casting itself, not a hose, gasket seam, or water pump. I’ve seen it countless times: a steady drip near the exhaust ports or along the edge of the head that just won’t go away. A leaking head gasket usually seeps at the seam where the head meets the block. A crack in the aluminum casting, though, will show fluid actually weeping right out of the metal. External oil leaks from the head are less common, but they can happen if a crack develops in an oil gallery feeding a camshaft.
To confirm an external leak, I clean the area thoroughly, add some UV dye to the coolant, and pressurize the system to 15–18 psi. Then I run the engine for a bit and inspect with a UV light. If that dye is glowing from the metal itself, you’ve found your crack.
Internal Fluid Mixing (Coolant in Oil, Oil in Coolant)
More frequently, I see internal mixing. Coolant getting into the oil creates that milky, frothy residue you’ll find on the dipstick or under the oil filler cap – often called “milkshake” or “mayonnaise.” This is serious business; coolant destroys your oil’s lubrication, leading to rapid bearing wear. Conversely, if you see an oily sheen or sludge in the coolant overflow tank, that’s oil getting into the coolant, which reduces the coolant’s ability to transfer heat effectively.
While a failed oil cooler, a blown head gasket, or even a degraded transmission cooler in the radiator can cause this, a crack connecting a coolant passage to an oil gallery in the head is a definite possibility. My go-to test here is a cooling system pressure test with the oil cap off. If you see bubbles in the oil, it means pressurized coolant is making its way into the crankcase, often through a crack.
Combustion Gases in the Cooling System
If you’re losing coolant with no visible leak, combustion gases are likely entering the cooling system. You’ll notice persistent bubbling in the radiator or overflow tank when the engine is idling, even when cold. The upper radiator hose may also feel abnormally firm shortly after startup due to trapped pressure. And if you see thick, white smoke from the exhaust that smells distinctly sweet, that’s coolant burning in one or more cylinders – a classic sign of a crack bridging a combustion chamber and a coolant passage.
To pinpoint this, I run a combustion leak test (often called a “block test”) with that blue fluid; if it changes color (usually to yellow), you’ve got exhaust gases in the coolant. For a more precise diagnosis, I’ll do a cylinder leak-down test with the cooling system open. Pressurize each cylinder, and if you hear air escaping into the coolant reservoir, you’ve found your culprit.
Misfires and Low Compression
Another big red flag is a misfire or low compression in one or two adjacent cylinders. You might get a P0300 (random misfire) or a cylinder-specific code like P0301. If a head crack allows compression to escape into a coolant jacket or an adjacent cylinder, no amount of tune-up parts or fuel injector cleaning will fix it. Left unchecked, this can lead to hydro-lock – especially if coolant leaks into a cylinder overnight and can’t compress on startup. I’ve seen that bend connecting rods or damage pistons. And as coolant circulates through the bearings, it washes away the oil film, increasing the risk of spun crankshaft bearings and eventual engine seizure.
A frustrating but common scenario:
If you’ve recently replaced a head gasket and the same symptoms return—especially coolant in oil or combustion in coolant—a cracked head is a likely culprit. I’ve seen this happen more times than I can count.
The Definitive Test: Machine Shop Inspection
The most reliable way to confirm a crack is to remove the cylinder head and have it inspected by a qualified machine shop. For cast iron heads, a Magnaflux test uses magnetic particles to reveal surface cracks. For aluminum heads, a pressure test is standard: they’ll seal and pressurize the coolant passages, often with dye, to detect leaks invisible to the naked eye. Sometimes they’ll even heat the head during the test, as some cracks only open up when the metal expands.
Why Do Cylinder Heads Crack? (It’s Not Just Age)
Cylinder heads don’t just crack from old age. They fail due to stress – thermal, mechanical, or chemical. Understanding the root cause is crucial if you want to prevent it from happening again.
Thermal Stress: The Number One Killer
This is the leading cause, especially for aluminum heads. A sudden, severe overheating event, or even repeated cycles of getting too hot, causes uneven expansion and contraction. Think about those thin sections, like the area between exhaust valve seats or between adjacent cylinders – they’re the most vulnerable. I’ve seen heads crack after a driver pushes through an overheating warning just to “make it home.” That extra five minutes can be the difference between a repairable warp and a completely cracked head.
Casting Defects
Sometimes, it’s a manufacturing flaw. Some aluminum heads, particularly from certain production runs, have microscopic porosity or voids from the foundry process. These might not cause issues for years, but under heat and pressure, they can grow into leak paths. This isn’t wear and tear; it’s a defect from day one.
Electrolytic Corrosion: The Silent Destroyer
This is a sneaky one. When the wrong coolant type is used, or the coolant isn’t changed on schedule, the electrolyte balance shifts. This causes galvanic corrosion inside coolant passages, especially in aluminum heads. The metal literally erodes from the inside out, thinning the walls until they crack. It’s often mistaken for “soft block” issues, but the damage frequently starts in the head. This is why using the exact OEM-specified coolant is non-negotiable.
Mechanical Damage & Improper Assembly
Less common causes include impact damage – like a dropped valve during a timing belt failure – and improper machining. A poorly resurfaced head with sharp edges or an uneven finish can develop stress risers, making it more prone to cracking under normal combustion loads. And yes, over-torquing or uneven torque on head bolts can contribute, especially with torque-to-yield (TTY) bolts. These stretch during installation and must be replaced every time the head is removed. Reusing them or skipping the correct sequence can lead to warping or cracking over time.
Repair Options: Can You Really Fix a Cracked Head?
Whether a cracked head can be repaired depends entirely on the location, size, and type of crack. There’s no universal answer – only judgment based on experience and a thorough machine shop inspection.
This is Shop Territory, Not DIY
Working on internal engine components demands specialized tools, precision machining, and a lot of experience. There’s no safe shortcut for structural repairs on a cylinder head. If you’re not equipped for engine teardown and machine shop work, this is a job for the pros.
External, Non-Critical Cracks (Professional Weld Repair)
- The area is cleaned down to bare metal.
- Stop holes are drilled at each end of the crack to prevent it from spreading.
- A V-groove is ground along the crack.
- The entire head is pre-heated to around 200°F to prevent thermal shock during welding.
- It’s then TIG welded with an appropriate aluminum filler rod (typically 4043 or 5356).
- Finally, controlled cooling and post-weld machining (if needed) are performed.
After welding, the head must be pressure tested again. I’ve seen successful repairs last years, but success rates drop sharply if the crack is near a combustion chamber, a coolant passage, or any high-stress area. It’s always a bit of a gamble.
Minor External Coolant Seep TEMPORARY / LAST-RESORT
Internal Cracks NON-REPAIRABLE → REPLACE HEAD ASSEMBLY
When you replace the head, always use the correct OEM-specified coolant (e.g., Dex-Cool for GM, HOAT for Chrysler, or OAT for European models) and replace torque-to-yield head bolts. Reusing TTY bolts is a recipe for improper clamping force and future head gasket failure – I’ve seen it happen too many times.
How I Validate the Repair (Don’t Skip This!)
You can’t just assume the problem is fixed because the head is back on. Validation is critical. For a welded repair, the cooling system must hold 15–18 psi for at least 30 minutes with no drop. Then, run the engine through three full heat cycles and recheck for leaks, maybe with UV dye again.
For a Head Replacement:
-
Perform a combustion leak test (block test) with blue fluid. No color change means no exhaust gases in the coolant.
-
After 50–100 miles, test the coolant with hydrocarbon test strips; contamination should be less than 0.1%.
-
Monitor for a smooth idle, no misfires, and a stable temperature gauge.
-
Use an infrared thermometer to check for hot spots on the head. These can indicate restricted coolant flow or air pockets.
A truly successful repair should eliminate all the original symptoms: no white smoke, no coolant loss, no oil contamination. If you’re still seeing white smoke from the exhaust, the issue isn’t fully resolved, and you need to go back to diagnostics.
Cylinder Head Replacement Cost & When to Walk Away
Repairs vary widely in cost and risk. Here’s a realistic breakdown based on what I see in my shop:
| Repair Type | DIY Cost (Parts Only) | Shop Cost | Success Rate (My Experience) | Secondary Risk if Failed |
|---|---|---|---|---|
| Professional weld of external crack | N/A (requires specialized labor) | $800–$1,500 | ~70% | Complete coolant loss, engine damage |
| Cylinder head replacement (new/reman) | $1,500–$3,000 | $2,500–$4,500+ | 95%+ | Valvetrain damage if timing is off |
A full head replacement is far more reliable but comes at a steep price. The weld is a cost-saving gamble – only advisable for minor, accessible cracks, and only if you trust your machine shop implicitly. As a rule of thumb I use in my shop: if the repair cost exceeds 60% of the vehicle’s private-party market value, it’s time to seriously consider alternatives like a used engine swap or, frankly, moving on to a different vehicle. Don’t throw good money after bad.
Prevention and Early Detection: Your Best Defense
Preventing a cracked head starts with meticulous cooling system maintenance. Use only the coolant type specified in your owner’s manual, mixed with distilled water at the correct ratio (usually 50/50). Flush and replace coolant at the manufacturer’s recommended interval – don’t wait until it looks dirty or you start having problems.
Replace aging components like the thermostat and water pump preventatively. A failing thermostat can cause sudden, catastrophic overheating, and a worn water pump may not circulate coolant effectively, especially at idle or under load.
Make visual inspections part of your routine. Once a month, pop the hood and check the top of the engine for new coolant stains, white crust (evaporated coolant), or oil seepage. Weekly, check your coolant level (when cold) and inspect the oil dipstick for any milky residue. These simple checks can save you thousands.
In my 25 years in the shop, I’ve seen more heads saved by timely action and good maintenance than replaced due to neglect. Stay vigilant, test thoroughly, and don’t assume the worst – until the evidence proves it.
