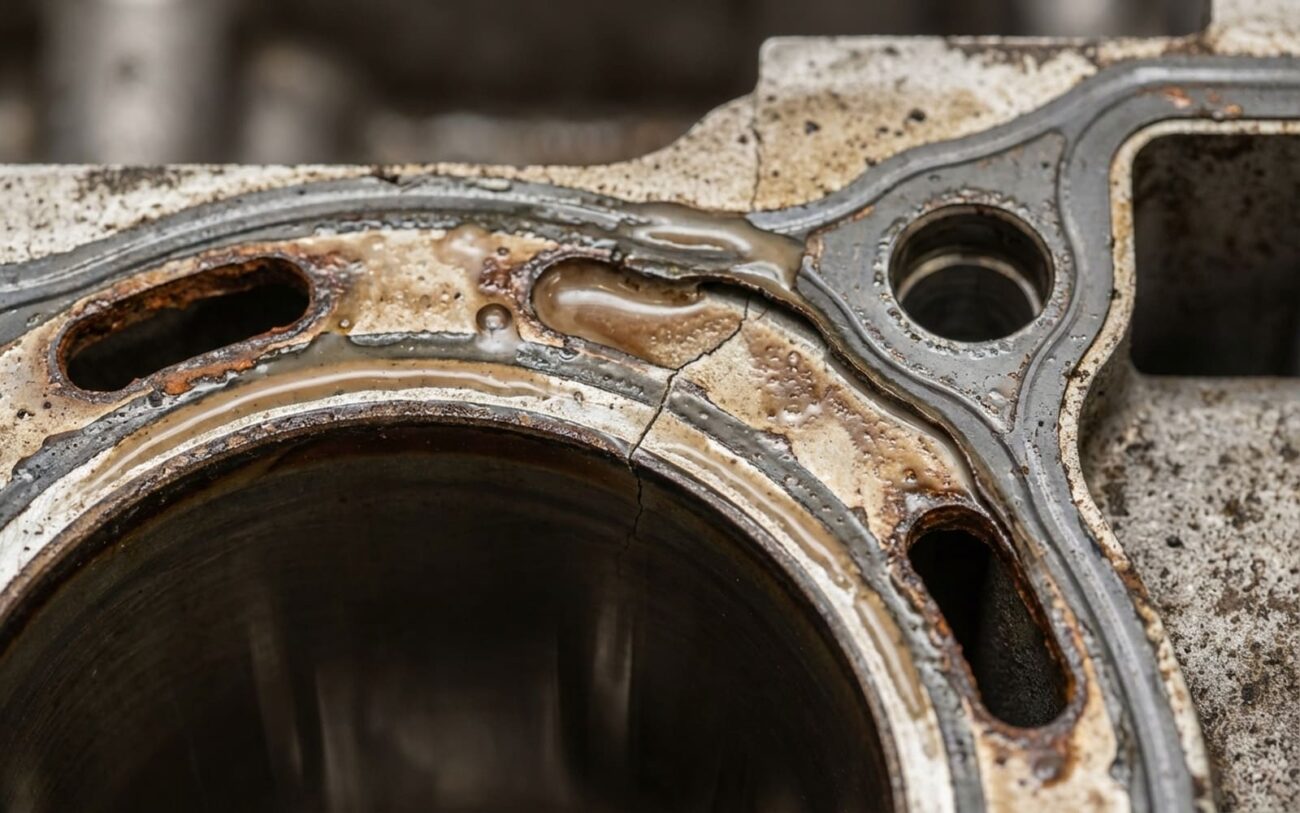
Alright, let’s talk about engine problems. When a car starts chugging coolant, blowing white smoke like a steam train, or the dipstick looks like a chocolate milkshake, everyone, and I mean everyone, immediately shouts “head gasket!” And yeah, a lot of the time, they’re right. But after 25 years under the hood, I can tell you this: sometimes, that head gasket is just the messenger, not the problem. The real culprit? A cracked engine block. And that’s a whole different ballgame.
I’ve torn down hundreds of engines in my career, and I’ve seen countless folks waste time and money replacing a head gasket only to have the same symptoms pop right back up. Why? Because a cracked block can mimic every single classic sign of head gasket failure. That’s why diagnosis matters more than ever. Jumping straight to a gasket job without confirming the source can leave you right back where you started, only poorer and more frustrated.
Signs That Scream “Look Deeper!”
The symptoms of a failed head gasket and a cracked block overlap significantly. That’s exactly why misdiagnosis is so common. But certain patterns should raise red flags and push you to look deeper than just the gasket. Here’s what I look for:
Constant Coolant Loss, No External Leak
This is one of the most telling signs. If your coolant reservoir keeps dropping but you can’t find a puddle anywhere, that fluid isn’t just evaporating. It’s being forced out under pressure. What’s happening? Combustion gases are entering the cooling system, over-pressurizing the radiator, and pushing coolant out the overflow. A blown head gasket can absolutely do this. But so can a crack that connects a cylinder directly to a coolant passage.
The key difference I’ve observed? A crack in the block often maintains this pressure continuously, even when the engine is cool. It’s not as dependent on thermal cycling like a gasket seal might be. So, if you’re constantly topping off coolant and can’t find a drip, put this at the top of your suspicion list.
Coolant in Your Oil (The “Chocolate Milk” Effect)
You pull the dipstick, and instead of golden-brown oil, you see something that looks like a Starbucks mocha. That’s coolant in your oil, and it’s a lubrication emergency. Coolant dilutes oil, robbing it of its viscosity and load-bearing ability. Your crankshaft bearings aren’t protected, and you’re at serious risk of spun bearings or complete engine seizure. I’ve seen too many engines die this way.
A head gasket can allow coolant into the oil if it fails between a coolant jacket and an oil gallery. But a crack in the block—especially near the main bearing bulkhead or between cylinders—can create the same internal mixing. If that milky residue reappears quickly after an oil change, especially on a cold start, the leak source is likely more severe than a surface-level gasket failure. It’s often a block issue.
Oil in Your Coolant (Greasy Sludge)
This is less common but often more concerning. If you see a greasy brown sludge floating in the coolant reservoir or under the radiator cap, oil is getting into your cooling system. While a failed engine oil cooler or even a transmission cooler (if it runs through the radiator) can cause this, a crack in the block that bridges an oil gallery to a coolant jacket is another possibility. Unlike head gasket leaks, which more often allow coolant into oil, oil in coolant tends to point toward internal engine damage, especially in aluminum blocks where casting porosity or thermal stress can open a path.
Hydrolock (The Engine Won’t Turn)
This is the most dramatic symptom and one you never want to experience. If the engine won’t turn over and makes a solid clunk or grinding noise, it means a cylinder is full of liquid—usually coolant that leaked in while the engine was off. A severely blown head gasket can allow this, but a crack in the cylinder wall or deck surface is a more likely culprit for coolant migration into the combustion chamber. If this happens, stop cranking immediately. Trying to force the engine to turn can bend connecting rods or damage the crankshaft. I’ve seen bent rods from hydrolock more times than I care to count.
How I Pinpoint the Problem: My Diagnostic Steps
When symptoms point to internal fluid mixing or pressurized coolant, you need a methodical approach. The goal isn’t just to confirm a leak—it’s to pinpoint the source. Is it the head gasket, the block, the oil cooler, or something else? Here’s how I approach it in the shop:
Step 1: Rule Out the Simple Stuff First
Before I even think about a cracked block, I do the basics. I’ll perform a cooling system pressure test to rule out any external leaks—hoses, radiator, water pump, heater core. You’d be surprised how often a simple hose clamp is the culprit. I also check the oil cooler. On many vehicles, the engine oil cooler is a separate unit. If it’s leaking internally, it can cause oil in coolant or vice-versa. I’ll bypass it temporarily and retest to see if the symptoms clear up.
Step 2: Testing for Combustion Gases in Coolant
If the pressure test holds but I’m still losing coolant or seeing pressure in the system, the next step is a combustion leak detector, often called a “block tester.” You put a special fluid in a test tube, place it over the radiator fill neck, and pump air from the cooling system through it. If combustion gases are present, the fluid changes color (usually from blue to yellow). This confirms an internal leak, but it doesn’t tell you where it is yet.
To narrow it down, I’ll often pull the spark plugs and perform a cylinder leak-down test. This involves putting compressed air into each cylinder at TDC (top dead center) and listening for air escaping into the cooling system (bubbles in the radiator) or the crankcase (hissing from the oil fill). If I hear air in the radiator from a specific cylinder, that’s a strong indicator of a head gasket or a crack in that cylinder’s deck surface or wall.
Step 3: Investigating Coolant in Oil or Oil in Coolant
If I’m seeing “chocolate milk” on the dipstick (coolant in oil), after ruling out the oil cooler, I’ll add UV dye to the radiator. I’ll run the engine for a bit, then drain the oil and inspect it with a black light. If I see the dye in the oil, it confirms coolant is getting into the oil. Then, I might use a borescope to inspect the cylinder walls and deck surface for any visible cracks or signs of gasket failure.
For oil in coolant, once the oil cooler is bypassed, I’ll sometimes pressurize the oil gallery. I’ll remove the oil pressure sender, install an adapter, and apply low-pressure air (around 10-15 psi) to the oil system. Then I’ll watch the coolant reservoir for bubbles. If bubbles appear, it’s a strong sign of a crack connecting an oil passage to a coolant passage within the block.
Step 4: The Borescope Inspection
This is invaluable. With a borescope, I can snake a camera into the cylinders (through the spark plug holes), into coolant passages (if accessible), and sometimes even into oil galleries. I’m looking for hairline cracks on the cylinder walls, pitting, or damage to the deck surface. Sometimes, you’ll see a distinct crack running between two cylinders or from a cylinder wall into a coolant jacket. This is often the smoking gun for a cracked block.
Diagnosis is a ladder—you start with the simplest, most accessible checks before moving to invasive tests. Never assume it’s the block right away. Rule out the head gasket, oil cooler, and external leaks first. Only after eliminating those should you conclude the block itself is compromised.
Why Blocks Give Up the Ghost
Engine blocks are built tough, but they’re not indestructible. When a crack develops, it’s almost always due to one of four root causes. Understanding which one is at play helps determine whether the failure was preventable—and whether the same issue could affect a replacement block.
Manufacturing Defects
These are more common than people think. Core shift during casting can leave cylinder walls too thin, especially between adjacent bores. Sand inclusions or porosity in cast iron or aluminum can create weak zones that fail under combustion pressure. These often show up early in an engine’s life or after repeated heat cycles. I’ve seen certain engines—like some Ford 1.5L EcoBoost and GM Ecotec models—become known for porosity issues in the block’s coolant passages, leading to gradual coolant loss and eventual internal mixing.
Thermal Stress
This is the leading cause of cracks in otherwise healthy engines. Repeated or severe overheating causes uneven expansion and contraction, especially in the narrow “web” between cylinders. Aluminum expands faster than coolant can dissipate heat, creating micro-cracks that grow over time. In engines with pressed-in cylinder liners, overheating can cause the liner to shift or the surrounding aluminum to weaken, opening a path to coolant. This is why engine overheating with no visible leak should never be ignored—it’s often the first step toward catastrophic failure.
Corrosion
Corrosion eats away at the inside of coolant passages, especially in aluminum blocks. Using tap water instead of distilled, skipping coolant changes, or mixing incompatible coolants can lead to electrolytic corrosion. This weakens the metal from within, thinning walls until they crack or leak. In diesel engines with wet cylinder liners, cavitation—caused by rapid pressure changes—can erode the liner wall, leading to coolant intrusion. It’s a slow killer, but a killer nonetheless.
Mechanical Damage
This includes things like a thrown connecting rod, severe detonation, or foreign object damage. A rod breaking through the block wall is obvious, but even repeated pre-ignition or knock can create stress fractures in the cylinder wall. These are usually accompanied by a deep, rhythmic engine knock at idle and under load, and often lead to immediate, catastrophic failure.
One thing I stress to customers:
A head gasket is a seal, not a structural component. It fails due to heat, age, or improper torque. But a cracked block is a structural failure. The gasket might be the first thing to go, but if the block is cracked, replacing the gasket alone is just postponing the inevitable.
Your Options When the Block is Cracked
Once you’ve confirmed a cracked block, the next step is deciding what to do. The answer depends heavily on the crack’s location, its severity, and frankly, the overall value of the vehicle. Here’s what you’re looking at:
External, Non-Structural Cracks
Internal, Structural Cracks
Short Block Replacement
Long Block Replacement
“Block Sealer” Products
The Hard Truth: Cost Considerations
Cost can’t be ignored. Diagnosis alone—pressure tests, borescope inspection, component isolation—can run several hundred dollars in labor. Once the block is confirmed cracked, a remanufactured long block with professional installation typically ranges from $5,000 to $8,000, depending on the vehicle. For high-mileage or lower-value cars, this often exceeds the vehicle’s worth. That’s why getting a definitive diagnosis first is critical. Don’t let a shop sell you a $2,000 head gasket job if the block is the real issue—you’ll be back with the same symptoms in a few months, and out even more money.
