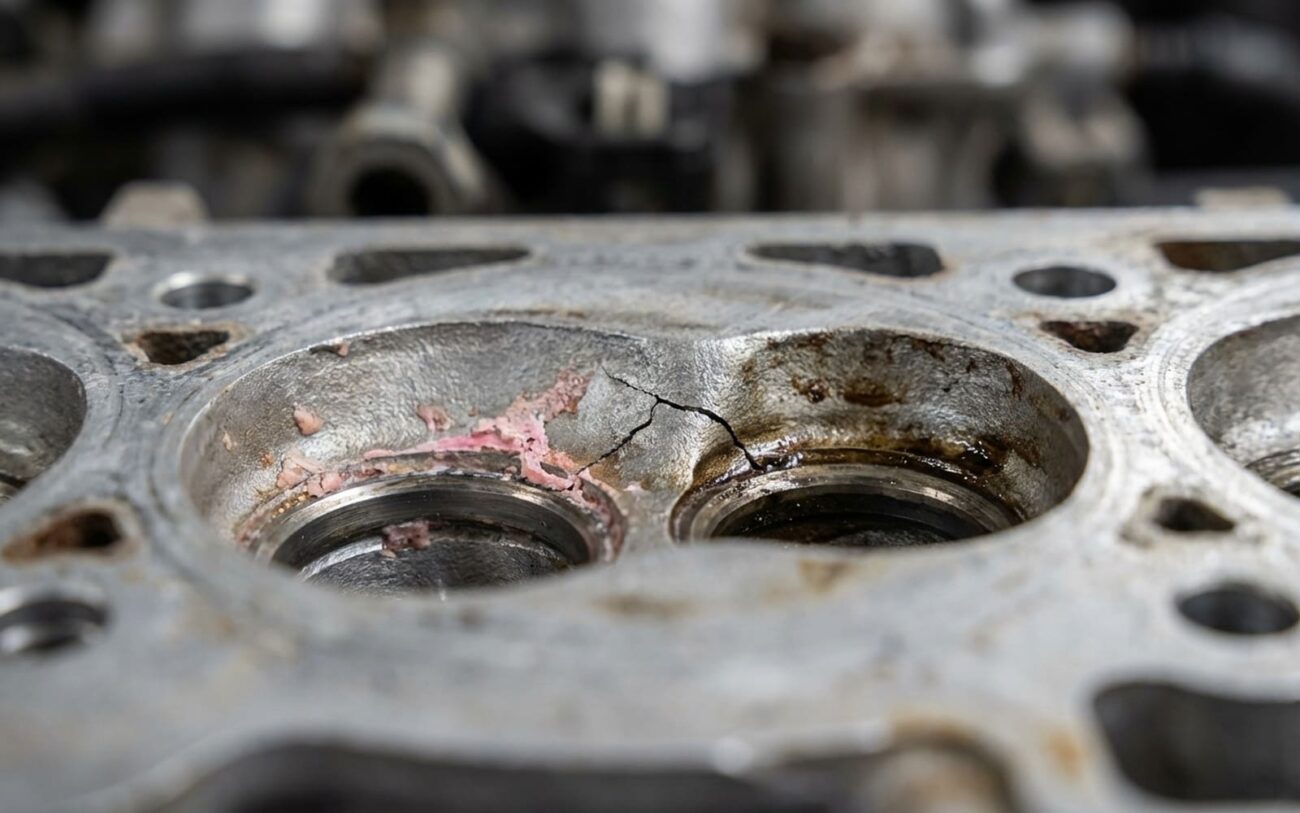
When the Engine Block Itself Is the Problem
Alright, let’s talk about engine block failures. I know what most folks jump to when they see coolant disappearing or an engine overheating: “Blown head gasket!” And yeah, a lot of the time, they’re right. But after 25 years under the hood, I’ve learned that sometimes, the problem runs deeper—right into the engine block itself. The tricky part? The symptoms often look identical to a bad head gasket, which is exactly why these get misdiagnosed so often.
The biggest red flag for a block issue, in my experience, is persistent coolant loss with zero visible external leaks. I mean, you’ve checked everything: no drips on the driveway, hoses are dry, water pump isn’t weeping. You’re just constantly topping off that overflow tank, and it’s frustrating. That’s when my radar goes up for an internal block problem.
Another classic sign is coolant mixing with your engine oil. You pull the dipstick, and instead of nice, golden oil, you see a milky, tan sludge. Same thing under the oil filler cap. Now, don’t panic and condemn the block right away—this symptom is far more commonly caused by a head gasket or a cracked cylinder head. We rule those out first, always. Only then do we start looking at the block itself.
Sometimes, you might actually see coolant weeping directly from the block’s casting, not from a gasket seam, a freeze plug, or a threaded port. It’s like the metal itself is sweating. And here’s a trick I use: an infrared thermometer can sometimes point to one cylinder running significantly hotter than the others. That can be a clue that an internal crack is messing with the cooling flow around that cylinder.
How I Pinpoint the Problem: No Guesswork Allowed
Look, just guessing and throwing parts at it—like a new head gasket or water pump—is a surefire way to empty your wallet and still have the same problem. I’ve seen customers waste hundreds, sometimes thousands, doing just that. A lot of other issues can perfectly mimic a cracked block: a leaking intake manifold gasket (especially on older V6s with “wet” intake designs), a failing transmission oil cooler, or even an internal leak in the radiator. That’s why, in my shop, systematic diagnosis isn’t just a suggestion; it’s the only way we operate.
When I’m trying to figure out if it’s the block or something else, I rely on a few key tools and a logical process. Here’s a quick rundown of how I differentiate between a true block failure and those common imposters:
| Symptom | Points to Engine Block | Common Mimics | My Go-To Test to Confirm |
|---|---|---|---|
| Coolant loss, no external leak | Internal porosity or a crack in the block’s water jacket, letting coolant into the crankcase or combustion chamber. | Bad head gasket, intake manifold gasket leak, pinhole in radiator or heater core. |
First, pressure test the cooling system. If it drops, then do a combustion gas test. If that shows combustion gases, a borescope inspection of the cylinders is next. But remember, a head gasket is still way more likely here. If you suspect a head gasket, check out: symptoms of a blown head gasket caused by a cracked engine block. |
| Coolant/oil emulsion (milky sludge) | A crack or porous area connecting a coolant passage and an oil gallery inside the block. | Failed oil cooler, cracked cylinder head, breached head gasket. |
Drain the oil. If it’s milky but the coolant looks clean (no oil in it), that points to coolant entering the oil. Isolate and pressure-test any oil/transmission coolers first. If you’ve just done a head gasket and still have this, don’t ignore it: what to do if you still have coolant in oil after a head gasket replacement. |
| External coolant seepage on block | Casting porosity or a micro-crack in the raw metal of the block itself, not from a plug or gasket. | Failed freeze plug, leaking block heater, corroded galley plug. |
Clean the area spotless and dry it completely. Then, pressurize the cooling system and inspect under a bright light. UV dye can be your best friend here. Don’t just assume it’s a freeze plug; confirm it. More on that here: how to tell if your engine block is cracked. |
The essential tools in my arsenal for this kind of diagnosis are a good cooling system pressure tester and a combustion gas analyzer—what most of us just call a “block tester.” A borescope is invaluable for peeking inside cylinders without tearing the engine down, and an infrared thermometer can help spot those hot spots. Skipping these diagnostic steps? That’s just asking for a misdiagnosis and a lot of wasted money, both yours and mine.
Why These Things Actually Break Down
When I talk about a “true” engine block failure, I mean the actual cast iron or aluminum housing itself has developed a crack or a porous area. We’re not talking about a leaky gasket, a blown freeze plug, or a bad oil cooler here. These failures don’t just happen out of the blue; they almost always come from a few specific causes I’ve seen over and over again.
One big culprit is manufacturing defects. Sometimes, you get sand inclusion or porosity in the original casting. It might hold up for years, but eventually, that weak spot gives way and starts to weep coolant. I’ve seen this more often than you’d think, especially in certain aluminum engine families—some of those V6 designs had higher-than-normal porosity rates right from the factory. Then there’s thermal stress. Repeated overheating cycles cause the metal to expand and contract unevenly. Over time, this stress can lead to cracks, especially between cylinder bores where the metal gets really hot.
And finally, there’s mechanical trauma. This is the catastrophic stuff, like a thrown connecting rod punching a hole right through the side of the block. If you’ve had that kind of internal engine failure, the block is almost certainly done for. Just remember, any overheat severe enough to crack a block is also very likely to warp the cylinder head. That’s a whole other can of worms, and you can read more about it here: can engine overheating warp a cylinder head?
What We Can (and Can’t) Do About It
This Ain’t a DIY Job for Most Folks
Let’s be clear: fixing engine block cracks is serious business. While some minor external repairs might be possible, anything internal or structural usually means you’re looking at a full engine replacement. Trust me, you want a pro handling this to ensure your safety and the car’s reliability.
External Epoxy Repair Professional Only
Cooling System Sealants Temporary Only
Short Block Replacement Professional Only
Full Engine Assembly Replacement Non-Repairable
Don’t Just Assume It’s Fixed: Verifying the Repair
Look, I’ve seen too many people assume a repair worked only to have the problem resurface weeks or months later. Never, ever assume. You’ve got to validate the fix. For an external epoxy repair, this is absolutely critical. After the epoxy has fully cured (and I mean fully—don’t rush it), pressure-test the cooling system. Hold it at operating pressure for at least 20 minutes, then watch that gauge like a hawk for any drop. And visually inspect the repair area under a bright light for any signs of seepage.
My Post-Repair Checklist
-
Run the vehicle through at least three complete heat cycles. That means a cold start, getting it up to operating temperature, and letting it cool all the way down. This helps stress the system and reveal any weaknesses.
-
If you’re really paranoid (and I usually am), add UV dye to the coolant and use a blacklight to scan for even the tiniest seeps you might miss otherwise.
-
For any engine replacement, always perform a combustion gas test. That fluid needs to stay blue, indicating no exhaust gases are getting into the coolant.
-
After about 500 miles, inspect the engine oil again for any signs of contamination. Better yet, send a sample for lab analysis if you want absolute peace of mind.
The Hard Reality: Cost vs. Value
Let’s not sugarcoat it: repairing or replacing an engine block is one of the most expensive things that can happen to your vehicle. Before you decide to sink a bunch of money into it, you absolutely have to weigh that cost against the car’s current value. This isn’t just about the repair; it’s about what you’ll get back.
| Repair Type | DIY Parts Cost (Approx.) | Professional Cost (Approx.) | My Success Rate Estimate | Secondary Risk |
|---|---|---|---|---|
| External Epoxy Repair | $50 | $300 – $800 | 70–80% (for minor seepage) | Sudden, catastrophic overheating if the repair fails. |
| Freeze Plug Replacement | $30 | $200 – $600 | 95%+ | If corrosion is widespread, new leaks might pop up elsewhere. |
| Short Block Replacement | $2,500 – $6,000 | $5,000 – $10,000+ | 99%+ (if done correctly) | Improper installation or reused worn components can lead to immediate failure. |
| Cooling System Sealant | $20 | $100 (for application) | 50% (at best, for minor leaks) | Can easily clog your radiator, heater core, or thermostat, causing more problems. |
Here’s my personal rule of thumb, based on decades of seeing these situations: if the estimated repair cost is going to exceed 60% of what your vehicle is actually worth on the private-party market, it’s almost never worth fixing. At that point, you’re pouring good money after bad, and the car becomes a financial black hole. Sometimes, it’s just time to cut your losses.
How to Keep This From Happening Again
Your Best Defense: Proper Maintenance
Most engine block failures aren’t random acts of God. They stem from preventable causes, mainly severe overheating and long-term corrosion. A disciplined maintenance routine isn’t just a suggestion; it’s your absolute best defense against this kind of catastrophic failure.
Here’s what I tell all my customers:
-
Use the right coolant, always. Mixing different types of coolant is a recipe for disaster. It can cause gel formation, reduce cooling efficiency, and accelerate electrolytic corrosion, which eats away at your block from the inside.
-
If that temperature gauge spikes, pull over IMMEDIATELY. I can’t stress this enough. “Just making it home” when your engine is overheating is how you crack a block, warp a head, or worse. Shut it down, let it cool, and get it towed if you have to.
-
Inspect your block during oil changes. Take a minute to look for any weeping, crusty deposits, or discoloration around freeze plugs and along the block’s casting. Catching a small seep early can prevent a major internal failure down the road.
-
Don’t ignore unexplained coolant loss. If you’re constantly adding coolant, but can’t find a leak, get it diagnosed. A small problem caught early is always cheaper to fix than a catastrophic one.
Finally, if your engine has been severely overheated, it’s worth considering checking head bolt torque, especially on modern engines with torque-to-yield fasteners. Though, in practice, many of these aren’t designed to be re-torqued. For more on that specific topic, you can check out: how often should you check cylinder head bolt torque on modern engines?
