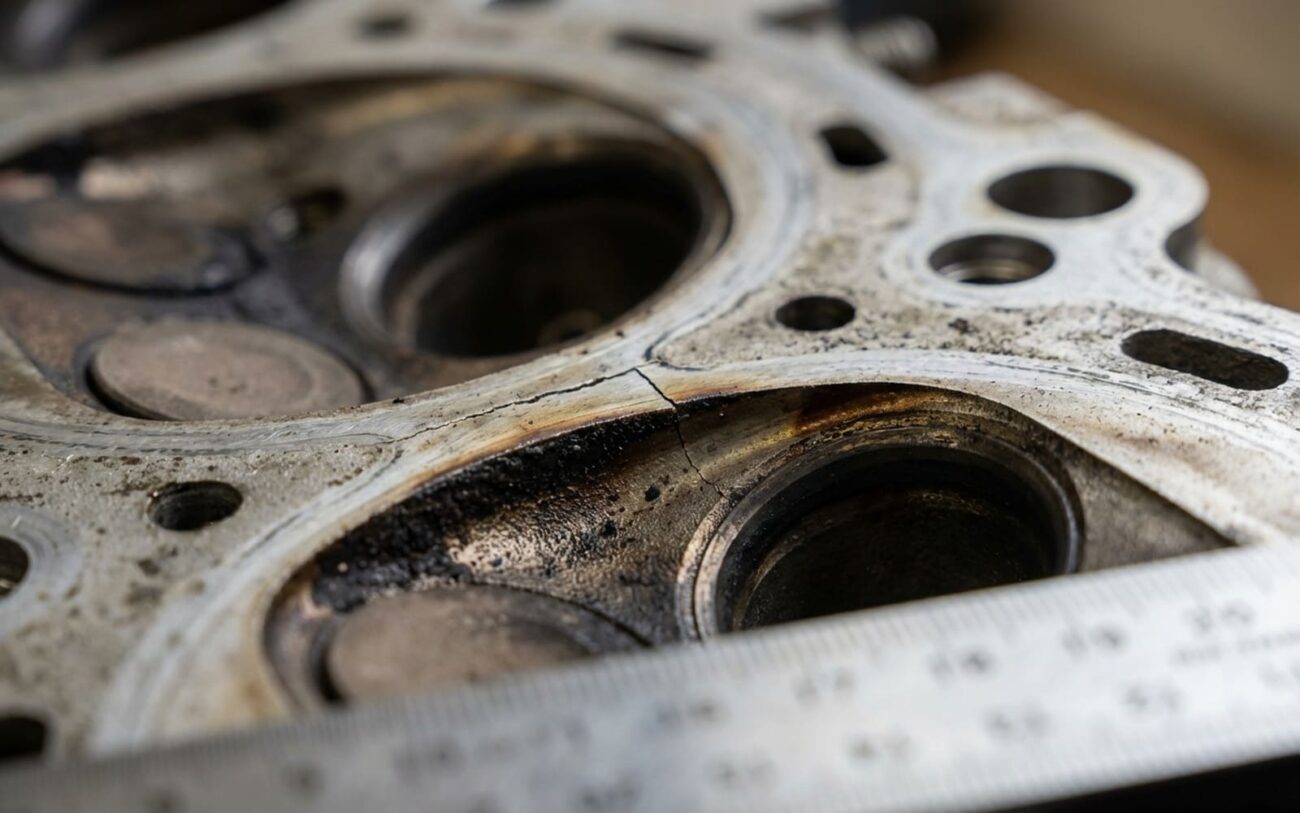
Alright, let’s talk warped cylinder heads. In my 25+ years turning wrenches, this is one of those problems that’ll fool even seasoned mechanics if they’re not careful. It starts with an overheat, sometimes a bad one, sometimes just a series of smaller ones. But the real trouble? The symptoms look exactly like a blown head gasket. So, shops replace the gasket, send you on your way, and a few weeks later, you’re back with the same damn problem. Why? Because a warped head isn’t just a failed seal; it’s a failed component. And if you don’t fix the component, that new gasket doesn’t stand a chance.
What You’ll See: The Symptoms of a Warped Head
When a cylinder head warps, it loses its flat mating surface to the engine block. This distortion, even if it’s just a few thousandths of an inch, is enough to break the seal of the head gasket. I’ve seen it manifest in a few key ways:
First, look for an external coolant leak along the head-to-block joint. You clean the engine, run it up to temp, and within minutes, you see that tell-tale slow seep or weep of coolant running down the side. This is especially common on aluminum heads, which are much more prone to warping than cast iron. The head simply isn’t clamping down evenly on the gasket anymore.
More often, though, you’ll get internal leaks. If you see a steady stream of bubbles in the coolant overflow tank with the engine running, that’s combustion gases pushing into the cooling system. A combustion leak test kit, often called a “block tester,” will turn yellow to confirm those hydrocarbons are present. Another classic sign is white, sweet-smelling exhaust smoke that just won’t quit, even after the engine is fully warmed up. That’s coolant burning off in the combustion chamber.
And then there are the compression issues. If you run a compression test and find low readings on adjacent cylinders—say, #2 and #3—that’s a big red flag for a warped head. The distortion creates a shared leak path between those cylinders, allowing pressure to escape. I see this misdiagnosed as a simple head gasket failure all the time, only for the new gasket to blow again in short order because the underlying warp wasn’t addressed.
How I Pinpoint It: Beyond Just a Blown Head Gasket
It’s easy to jump to “blown head gasket” with these symptoms, but my job is to figure out if it’s just the gasket, the head itself, or something even deeper like a cracked block. Throwing a new gasket at a warped head is a waste of your money and my time. The table below shows you how I differentiate these failures based on what I see and what tests I run.
| Symptom | Points to Cylinder Head Warping | Common Mimics (Other Causes) | Definitive Test to Confirm |
|---|---|---|---|
| External coolant leak at head/block joint | The head’s deck surface is no longer flat, so the gasket can’t seal properly under clamping load. | Failed MLS head gasket, warped or pitted block deck, improperly torqued head bolts. |
Remove the head. Use a certified precision straightedge and feeler gauge on both the head and block decks. Warpage exceeding OEM spec (typically >0.002″ or 0.05mm over 6″) confirms distortion. |
| Combustion gases in cooling system | Warping lifts the head gasket, or a thermal crack forms in the head casting itself. | Blown head gasket, cracked engine block, failed EGR cooler. |
Perform a combustion leak test (block tester). If positive, remove the head and pressure test its coolant passages. |
| Coolant entering combustion chamber | Warping or a crack near a valve seat or fire ring allows coolant to migrate into the cylinder. | Head gasket breach, intake manifold gasket leak (especially on V6/V8 engines). |
Borescope inspection after the engine has sat overnight. Coolant pooling on a piston points to an upper leak. |
| Low compression in adjacent cylinders | Severe warping across the head deck creates a shared leak path between cylinders. | Localized head gasket failure, broken piston rings, valve train issues. |
Perform a leakdown test. If air escapes into the neighboring cylinder, you’ve got a shared breach. |
The bottom line here is that you can’t accurately diagnose a warped head without pulling it off and checking it on a bench. Too many shops skip this crucial step, replace the gasket, and then wonder why the problem comes right back. If you suspect warpage, it’s worth confirming before you sink a bunch of money into labor.
Why It Happens: The Root Causes of Head Warping
The primary culprit behind a warped cylinder head is always thermal stress from overheating. It’s not just one massive overheat, either; I’ve seen plenty of heads warp from repeated, milder overheating events that gradually fatigue the metal. Think about it: when a head heats up unevenly, different areas expand at different rates. Aluminum heads, which expand about twice as much as cast iron, are particularly vulnerable.
The combustion chambers and exhaust ports get screaming hot, while the ends of the head and the coolant-filled areas stay relatively cooler. This temperature difference creates immense internal stress. When that stress exceeds what the metal can handle, the head permanently deforms—usually bowing upward in the center. This warpage typically runs lengthwise across the head and is almost always worst between the middle cylinders.
In some extreme cases, instead of just warping, the head will actually crack. These thermal fatigue cracks often show up between valve seats, from a spark plug tube to a coolant passage, or right across the deck surface between cylinders. I’ve seen this pattern a lot in high-output aluminum heads, like those found in GM’s Ecotec or Chrysler’s 3.6L Pentastar engines, especially when they’ve been run hard or neglected cooling system maintenance.
Another factor that often gets overlooked is material degradation. Aluminum heads are heat-treated to a specific strength (like T6 temper). A severe overheat can actually alter that temper, softening the metal. A softened head can’t maintain its shape under the clamping force of the head bolts, making it far more likely to warp, even under normal operating conditions, after that initial overheat event.
It’s crucial to understand that a warped head is usually the root cause of a head gasket failure, not the other way around. While detonation or improper torque can blow a gasket, a warped head physically prevents the gasket from sealing properly, no matter how perfectly it’s installed. That’s why simply replacing the gasket so often leads to a repeat failure.
Fixing It Right: Repair Options for a Warped Cylinder Head
This Ain’t No DIY Oil Change
Once you’re dealing with warpage, cracks, or internal passages, you’re firmly in PROFESSIONAL-ONLY territory. The head needs to come off, and the repair path depends entirely on the severity and location of the damage. Not all damage is the same, and the fix has to match the failure.
Minor Warpage & Resurfacing Professional Only
Mechanical Damage Repair DIY-FEASIBLE
Severe Damage & Cracks NON-REPAIRABLE → REPLACE
And speaking of temporary fixes: I get asked about epoxy all the time. Look, on a non-pressurized, external crack, it might hold for a short tow or a couple of days of very light driving. But under engine heat and pressure? It will fail. Every single time. And never, ever use chemical sealants like “liquid glass” in the cooling system. Those things are notorious for clogging radiators, heater cores, and even EGR coolers, which just leads to another, more severe overheat. It’s a band-aid that causes more problems down the road.
Proof It’s Fixed: Validating the Repair
Reassembling an engine without verifying your work is just asking for trouble. A proper repair needs to be validated at every single stage. After machining, the head must meet OEM flatness specs—that’s usually no more than 0.002″ (0.05mm) deviation over a 6″ span in any direction. Your machine shop should provide those measurements.
Once the head is installed, I always pressure test the cooling system. Hook it up to at least 15–22 psi (check your manufacturer’s spec) and let it sit for 30 minutes. No drop in pressure means your external seals and passages are holding tight.
Next, run the engine to full operating temperature and perform another combustion leak test on the coolant. You shouldn’t detect any hydrocarbons. Then, a compression test should show consistent readings across all cylinders, with no more than a 10% variation. If one or two adjacent cylinders are still low, you might still have a sealing issue—could be a warped block deck or even improper torque on the head bolts.
The tools for this aren’t exotic, but they are absolutely essential: a certified straightedge, feeler gauges, a cooling system pressure tester, a combustion leak detection kit, a compression gauge, and a properly calibrated torque wrench. Skipping any of these steps is just rolling the dice on a repeat failure.
The Hard Numbers: Cost, Risk, and When to Repair vs. Replace
Repairing a warped head is a major investment, no two ways about it. The decision often boils down to the vehicle’s current value, how bad the damage is, and whether the engine block is also affected. Here’s a quick look at the typical costs and risks I see:
| Repair Type | DIY Cost Range | Shop Cost Range | Success Rate | Secondary Risk |
|---|---|---|---|---|
| Machine head & reassemble (DIY remove/install) | $300–$600 | $1,500–$3,000 | 95% | Engine seizure or bearing failure from coolant in oil if not done right. |
| Machine head & reassemble (Full shop labor) | N/A | $2,000–$4,000 | 95% | Same as above; potential shop warranty coverage (which is a big plus). |
| Cylinder head replacement (new/remanufactured) | $800–$2,500 | $3,000–$6,000 | 98% | Low, assuming correct installation and no other underlying issues. |
| Temporary external epoxy repair | Under $50 | N/A | < 20% | Sudden catastrophic overheating, engine damage. Not worth it. |
My rule of thumb is this: if the repair estimate exceeds 60% of the car’s fair market value (check KBB or NADA), you really need to consider if a used or remanufactured long-block makes more sense. If the cost starts approaching or exceeding 100% of the car’s value, it’s probably time to evaluate replacing the vehicle altogether. That calculation changes even more if the block is also warped or cracked, which adds a whole new layer of complexity and cost.
My Best Advice: Preventing Warpage in the First Place
The absolute best way to handle a warped head is to never have one. Period. Prevention starts and ends with maintaining your cooling system religiously. It’s the lifeblood of your engine.
My Essential Cooling System Checklist
-
Use the correct coolant. This isn’t just about color; it’s about chemistry. Generic antifreeze can lead to corrosion and scale buildup, especially in aluminum passages.
-
Replace your thermostat on schedule. A stuck-closed thermostat is one of the most common causes of sudden, severe overheating. It’s a cheap part that can save you thousands.
-
Don’t overlook the radiator cap. A weak cap reduces system pressure, which lowers the boiling point of your coolant and allows steam pockets to form. (Yes, this matters a lot.)
-
Monitor your engine temperature daily. If that gauge climbs above normal, shut it down and investigate immediately. Don’t wait for it to peg out.
-
Inspect for leaks. Regularly check the head-to-block area for any signs of seepage and pull your oil dipstick for a milky substance (coolant mixing with oil).
