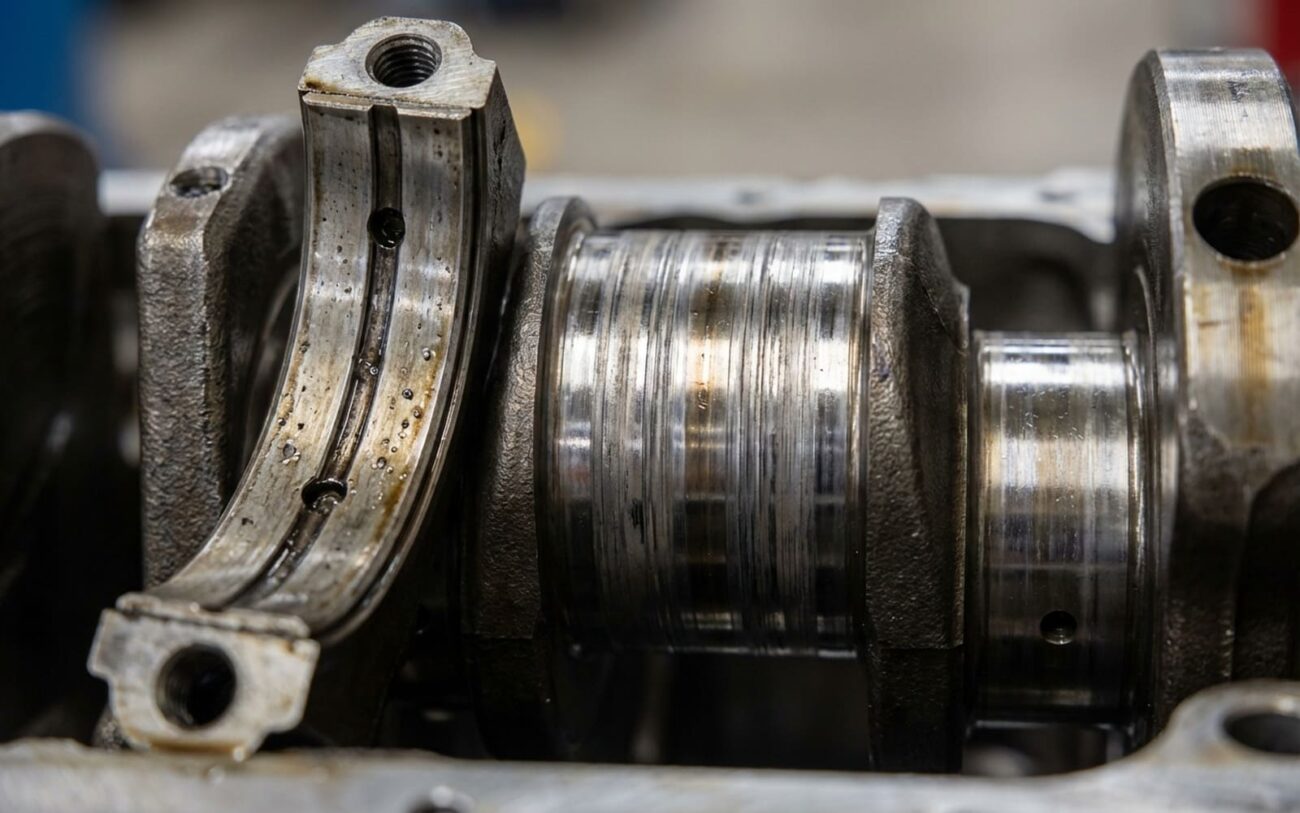
After more than 25 years turning wrenches, I can tell you this: an engine doesn’t just “get old” and start knocking. When you hear that deep, rhythmic thud-thud-thud from the bottom end, especially under load, your crankshaft journals are screaming for help. This isn’t a whisper; it’s a full-blown announcement that your engine’s lifeblood—that microscopic oil film—has failed.
These journals are the highly polished, hardened surfaces on your crankshaft where the main and connecting rod bearings ride. They’re machined to tolerances tighter than a human hair, and when they wear, things go south fast. I’ve seen more than a few engines where the owner “just drove it a little longer” and ended up with a hole in the block. Let’s talk about what to look for, how to confirm it, and what you can actually do about it.
The Warning Signs: What Your Engine Tells You
That Deep Knocking Sound
The first thing most drivers notice is a deep, heavy, metallic knock from the lower end of the engine block. It’s not a high-pitched tick; it’s a low-frequency thud-thud-thud that increases steadily with RPM. We usually call this a “main bearing knock,” and it gets louder when you put the engine under load – like accelerating hard or climbing a hill.
This sound happens because worn journals create too much clearance between the bearing and the crankshaft. Instead of a smooth, oil-cushioned rotation, the bearing shell starts slamming into the journal with every power stroke. That pounding destroys the oil film, accelerates wear, and can quickly lead to a spun bearing or even a broken connecting rod. Trust me, you don’t want to see what a broken rod does to an engine block.
Low Oil Pressure: The Silent Killer
Another critical symptom, and often more insidious, is low oil pressure, especially when the engine is warm and idling. You might see the gauge drop low, or worse, the oil pressure warning light flickers on. This isn’t always a faulty sensor, though that’s a good place to start checking. What happens is the worn journals create enlarged gaps between the bearing and the crank, allowing oil to escape too easily. This robs the entire system of the pressure it needs to keep everything lubricated.
Critical Warning: Low oil pressure is a self-destructive cycle. Less pressure means more metal-to-metal contact, which means more wear, even lower pressure, and eventually, total engine failure. If that light comes on, shut it down immediately. Don’t risk it.
Metal in the Oil: The Smoking Gun
Finally, you can find the physical evidence. If you drop the oil pan or cut open the oil filter and find a silvery, gritty sludge inside, you’ve got a serious problem. An oil analysis, which I highly recommend for any suspicious engine, will show elevated levels of iron (from the steel journal) alongside copper, lead, or aluminum (from the bearing overlay). This isn’t just “normal wear” – this is a clear sign the bottom end is coming apart. It’s like finding bone fragments in your blood; it means something is seriously wrong internally.
Diagnosing Crankshaft Journal Wear: Separating Fact from Fiction
Now, not every deep knock or low oil pressure reading means your crankshaft is toast. Other issues can mimic these symptoms: a failing oil pump, worn rod bearings, even a loose torque converter. The key is to isolate the source before you start tearing into the engine. A proper diagnosis starts with careful observation, but it always ends with precise measurement.
| Symptom | Indicates Crankshaft Journal Wear | Common Mimics | Diagnostic Method (My Approach) |
|---|---|---|---|
| Persistent lower engine knock | Excessive clearance due to journal wear, usually a main bearing issue. | Worn rod bearings, piston slap, loose flywheel bolts, torque converter issues. |
Use a mechanic’s stethoscope to pinpoint the noise. If it’s loudest at the main caps, it’s a strong indicator. |
| Low oil pressure at idle (warm) | Oil bleeding past worn main bearings due to enlarged journal diameter. | Faulty oil pressure sensor, clogged pickup screen, worn oil pump, rod bearing wear. |
Always verify with a mechanical oil pressure gauge. Don’t trust the dash light alone. |
| Metal shavings in oil or filter | Steel (iron) particles mixed with bearing material (copper, lead, aluminum)—classic sign of failure. | Camshaft wear, timing chain debris, turbocharger failure, gear train wear. |
Perform an oil analysis. Visually inspect the oil filter media for metallic sheen or chunks. |
The Definitive Check: Dropping the Pan
The most definitive diagnosis requires dropping the oil pan. Once you’re in there, you can remove the main and rod bearing caps and inspect the bearing shells. A wiped, discolored, or spun bearing is a massive red flag. But here’s the kicker: a bad bearing doesn’t always mean a bad crank. The journal itself could still be within spec, especially if you caught it early.
This is where precision comes in. Always measure the journal diameter with a micrometer and check for roundness and taper. You’ll also want to plastigage the bearing clearance—most OEM specs call for something in the range of 0.0008″ to 0.0025″. If that clearance exceeds 0.003″, and the journal shows scoring or is out-of-round, then yes, the crankshaft is compromised and needs attention.
Why Journals Fail: It’s Never Just “Old Age”
Crankshaft journals don’t just wear out from mileage alone. They fail because something broke down that critical protective oil film or because damaging particles got into the system. Understanding the root cause is key to preventing a repeat failure.
Abrasive Wear: The Grinding Paste
This is the most common culprit. Tiny hard contaminants—dirt, metal fines from other failing components, or carbon particles—circulate in the oil. These embed themselves into the softer bearing material and act like a grinding paste, slowly scoring and wearing down the journal surface. This is why clean oil and regular, high-quality filter changes are non-negotiable. It’s cheap insurance.
Adhesive Wear: Metal-on-Metal Scuffing
Also known as scuffing or galling, this happens when the oil film completely collapses. It can be due to overheating, using the wrong oil viscosity (especially too thin), or extreme engine loads. Without that vital layer of oil, microscopic high spots on the bearing and journal literally weld together under pressure, then tear apart as the crank spins. This leaves rough, torn metal on both surfaces, and once it starts, failure accelerates rapidly.
Corrosive Wear: The Acid Attack
This one’s often overlooked. Acidic byproducts from fuel blow-by and oil oxidation attack the journal surface. It’s worse during short trips where the engine never fully warms up, preventing these acids from evaporating. Coolant contamination, from a leaking head gasket or a cracked block, makes this even worse, creating a corrosive sludge that pits the hardened steel. I’ve seen engines that look fine on the outside, but inside, the journals are eaten away.
Fatigue Failure: Cracks in the Hardened Steel
Repeated stress cycles can cause micro-cracks in the journal, especially at the fillet radius (that curved transition between the journal and the crank web). Over time, these cracks grow and lead to spalling—small chunks of material breaking off the surface. This is more common in high-performance or heavily loaded engines, or those that have seen a lot of hard use.
A Note from My Bench: While most journal wear comes down to poor maintenance or oil issues, I’ve seen some engine families, like certain 2.7L EcoBoost units, that have had field reports of premature wear linked to heat management or specific design quirks. But even then, oil starvation from a failed pump or ignored warning light remains the primary killer. Don’t blame the manufacturer if you didn’t change your oil.
Repair Options: Can You Save That Crankshaft?
Professional Territory Only
Let me be absolutely clear: this is not a DIY job for the inexperienced. You’ll need an engine stand, precision torque wrenches, micrometers, plastigage, and access to a reputable machine shop. Plus specialty tools like a harmonic balancer puller. If you’re asking if you can do this in your driveway with a basic socket set, the answer is no.
Crankshaft Reconditioning (Grind & Polish)
Full Crankshaft Replacement
And let me be absolutely clear: there is no “band-aid” fix for worn journals. Switching to a thicker oil might quiet the knock temporarily by maintaining a slightly better film, but it doesn’t fix the excessive clearance. It just masks the problem until a bearing spins. And once a bearing spins, you’re looking at catastrophic engine seizure, possible block damage, and a total loss of the engine. Don’t try to limp it along; you’ll only make it worse and more expensive.
Validating the Repair: How I Know It’s Done Right
A successful crankshaft rebuild isn’t just about getting the engine to start; it’s about ensuring it runs correctly and reliably. There are three non-negotiable checkpoints I use every time:
-
1
Bearing Clearance: Every single main and rod bearing must be measured. Confirm the clearance is within OEM specifications (typically 0.001″ to 0.0025″). Too tight risks oil starvation; too loose causes knocking and rapid wear. This isn’t a “close enough” job.
-
2
Oil Pressure: Before you even think about starting it, prime the oil system. Then, use a mechanical gauge to verify pressure builds quickly and holds steady (usually 10–20 psi at idle when hot, but check your specific engine’s specs). If it’s low, you missed something.
-
3
Noise and Vibration: The engine should be completely quiet. Use your stethoscope to check each main cap location. Any knocking, rumbling, or unusual vibrations means something is wrong. Don’t try to “run it in” if it’s making noise—it’s already failing.
You’ll also want to monitor the engine closely for the first few hours of operation. Check the oil filter for any new metal debris, recheck oil pressure once it’s fully hot, and avoid heavy loads until the bearings are properly seated. A scan tool can help monitor RPM stability and detect any misfires that might indicate other mechanical issues.
Cost and Value: Is a Crankshaft Rebuild Worth It?
Let’s talk numbers, because this is a significant investment. You need to weigh the repair cost against the overall value of your vehicle. The table below reflects realistic costs I see in my shop for a typical inline-4 or V6 engine rebuild involving crankshaft service.
| Repair Type | DIY Parts Cost | Professional Shop Cost | Success Rate (if done right) | Risk of Failure (if done wrong) |
|---|---|---|---|---|
| Crankshaft Machining & Rebuild | $500 – $1,500 | $2,500 – $4,000+ | 95%+ | High—incorrect clearance or contamination causes rapid failure. |
| Complete Engine Replacement | $3,000 – $6,000 | $5,500 – $9,000+ | 98%+ | Low—especially with a warranty from a reputable supplier. |
My Mechanic’s Rule of Thumb:
If the repair cost exceeds 50% of the car’s current market value, and it’s not a classic or sentimental vehicle, you really need to consider replacement. Putting $6,000 into an engine for a car worth $4,000 just doesn’t make financial sense in most cases. There are exceptions, of course, but be honest with yourself about long-term reliability and what you’re trying to achieve.
Preventing Crankshaft Journal Wear: The Real-World Approach
Most crankshaft failures are preventable. It really boils down to two things:
1. Excellent Oil Maintenance
This is your best defense. Change your oil and filter on schedule, without fail. And if you drive in “severe service” conditions—short trips, towing, stop-and-go traffic, or extreme temperatures—follow the severe service interval in your owner’s manual, not the “normal” one. Use the OEM-recommended viscosity and a high-quality filter. Don’t cut corners here; a cheap filter or incorrect oil is asking for trouble.
2. Act Immediately on Warning Lights
If that oil pressure light comes on, shut the engine off immediately. Even a minute of running with low oil pressure can damage bearings and journals beyond repair. Similarly, fix oil leaks promptly. Being a quart low might not seem like much, but it can drop pressure enough to collapse the oil film under load, leading to rapid wear.
Train Your Ears & Eyes
-
Listen for new noises on cold start or under acceleration. A ticking might be lifters; a deep knock is often bearings.
-
If you have an oil pressure gauge, watch for gradual declines over time. That’s a subtle but important clue.
-
Check your dipstick—not just the level, but the color and consistency. A milky film means coolant; a metallic sheen means metal in suspension.
Early detection can literally save you thousands of dollars. Catching bearing wear before it damages the crankshaft means you might only need new bearings and a bearing-only rebuild. Once those journals are scored, the job escalates fast, and so does the cost. And if you’re still dealing with coolant in oil after a head gasket job, it could mean a deeper issue like a cracked block—that’s a whole other can of worms.
