That Highway Wander? My Bet’s on Rear Control Arm Bushings.
Listen, if your car feels like it’s got a mind of its own on the highway, constantly drifting or needing little steering corrections to stay in line—you’re not imagining things. That vague, unsettled feeling isn’t just tiring; it’s your car telling you something’s loose in the rear suspension. After more than two decades wrenching on cars, I can tell you that nine times out of ten, when a customer describes this exact symptom, we find worn rear control arm bushings are the main culprit.
These bushings are supposed to be the unsung heroes of your suspension. They allow controlled movement, sure, but their real job is to keep your wheels pointed exactly where they need to be, even under load. When they wear out, that precision goes right out the window. The rear wheels start shifting around, just subtly enough to make the whole car feel like it’s “wandering” or “tramlining” down the road. It’s like the back end is trying to steer itself.
And that highway wander? It’s the hallmark, but it rarely comes alone. You might also notice a distinct “squirm” from the rear end when you hit the gas hard or brake suddenly. It’s almost like the back of the car is shifting sideways a bit. When the wear gets really bad, you’ll start hearing it too—a distinct clunk or thud from the rear, especially over bumps or uneven pavement. That’s usually metal-on-metal contact where there should be cushioned articulation.
Delta: 0.45°
Diagnosing the Real Culprit: My Approach
While that highway wander screams “rear bushings,” you can’t just jump to conclusions. Plenty of other things can mimic these symptoms: worn front tie rods, a bad alignment, even failed strut mounts up front can make a car feel unstable. And a solid clunk? That could be stabilizer bar links or failing shocks. That’s why a methodical diagnosis is critical. Just going by symptoms often leads to misdiagnoses and wasted money. My approach always combines a thorough physical inspection with alignment data and, most importantly, real-world observation.
| Symptom | Often Points to Bushings | Other Common Suspects | How I Confirm It |
|---|---|---|---|
| High-speed wandering or tramlining | Excessive lateral play in the rear suspension, causing the toe angle to change under load. | 1. Worn front ball joints/tie rods 2. Incorrect front toe/caster 3. Loose steering rack components |
Get a full 4-wheel alignment printout. If the rear toe values are all over the place, or if the tech can’t hold them in spec, those bushings are shot. |
| Rear squirm during acceleration/braking | Fore-aft compliance in the bushing lets the wheel move under power or braking, messing with the toe angle. | 1. Worn trailing arm bushings 2. Loose differential mounts 3. Failed rear torque arm |
With the car on a lift (or jack stands, safely!), use a pry bar at the bushing mounting point. If you see more than 2–3 mm of visible movement, or it feels “spongy” instead of firm, it’s failed. |
| Clunk or thud from rear over bumps | The rubber has completely broken down, or the inner metal sleeve has separated from the outer. | 1. Failed shock/top mount 2. Loose stabilizer bar link (Check my stabilizer bar guide for more on this) |
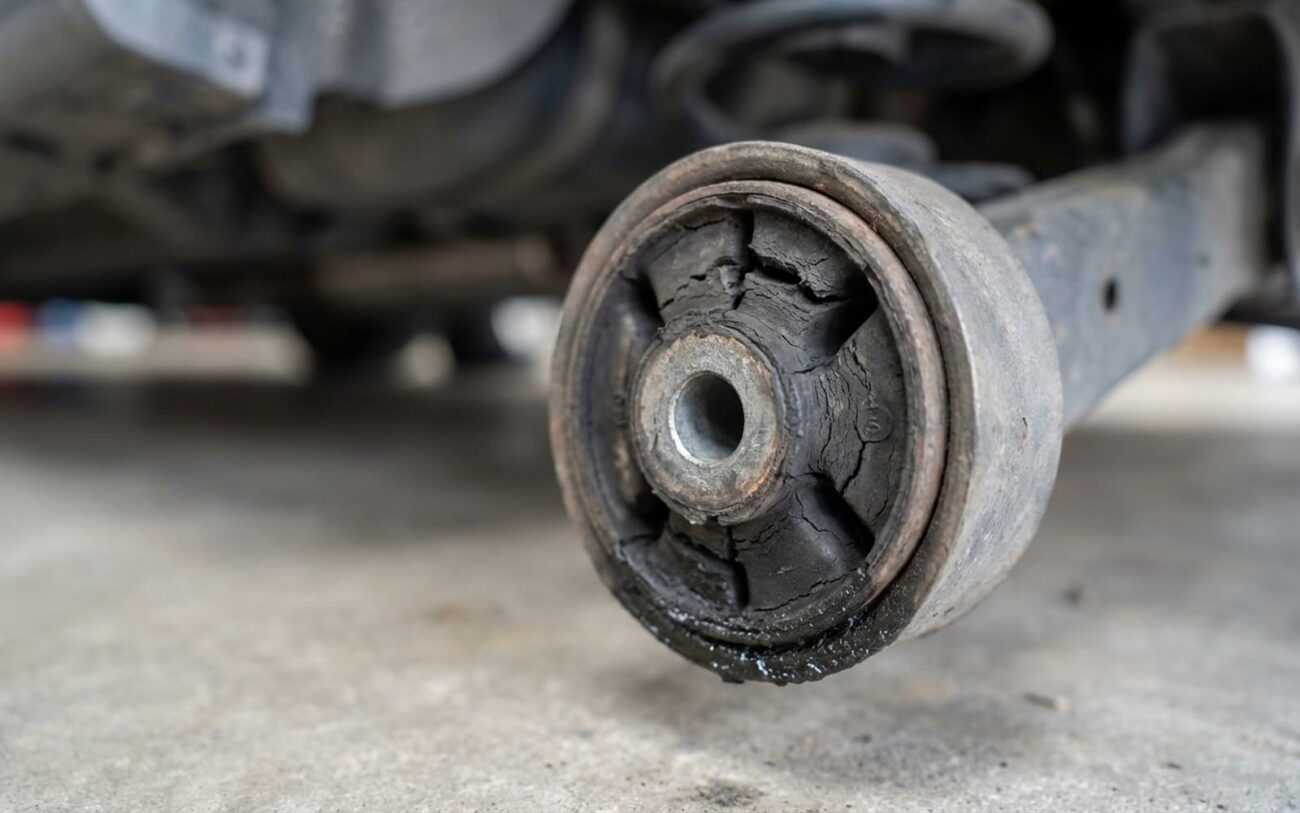
Visually inspect for deep cracks, missing chunks of rubber, or signs of the metal sleeve separating. Then, grab the control arm and try to shake it by hand. If you hear or feel any clunking, it’s definitely shot. |
Why These Bushings Give Up the Ghost
Bushings don’t just fail overnight; it’s a slow death, usually from a mix of age, environment, and good old mechanical stress. The most common cause I see is the rubber itself breaking down. Ozone cracking is a big one, especially in dry, sunny climates. And heat from the exhaust system or drivetrain? That’ll cook the rubber, making it hard and brittle way faster than it should.
The Bushing Killer: Oil Contamination
This is a big one. A leaking axle seal, a transmission cooler line, or even just a persistent engine oil drip can turn rubber bushings into mush in no time. I’ve seen bushings completely disintegrate in less than a year when they’re constantly soaked in oil. If you spot any kind of leak near your suspension components, fix it. Immediately. It’ll save you a lot of headache and money down the road.
Then there’s mechanical fatigue. Every pothole, every bump, every corner you take—it all flexes that bushing. Over 100,000 miles, those tiny movements add up. Eventually, you get internal cracking, and then boom, failure. Some vehicles are definitely more prone than others. I’ve noticed certain compact sedans and performance models, especially those with stiffer suspensions, tend to chew through bushings faster due to the increased stress.
Repairing It Right: What Actually Works
Critical Installation Note: Don’t Skip This!
This is where many DIYers, and even some shops, screw up. You absolutely must tighten the control arm bolts with the suspension loaded at normal ride height. If you torque them while the wheels are hanging in the air, you’ll preload the bushings incorrectly. That means they’ll be under constant stress at normal ride height, and they’ll fail prematurely. I’ve seen it happen too many times.
Complete Control Arm Replacement
Bushing Press-Out/In Professional Only
Alignment Compensation Temporary & Dangerous
Confirming the Fix: It’s Not Over ‘Til It’s Right
Just replacing the parts isn’t the finish line—it’s just the start. A proper repair has to pass two critical tests. First, a full 4-wheel laser alignment is non-negotiable. The rear toe and camber don’t just need to be within factory specs; they need to be stable. That means they shouldn’t drift between measurements or from side to side. If the alignment tech is struggling to set or hold the rear toe, it’s a huge red flag that your new bushings (or the installation) aren’t quite right.
Second, and just as important, is a real-world road test. Drive the same highway stretch where you first noticed the wandering. The car should feel planted, stable, and track straight without constant steering corrections. There should be no rear squirm under acceleration or braking, and certainly no clunks over bumps. If any of those symptoms remain, head back to the shop (or your garage) and recheck the installation, torque specs, and the quality of those new bushings. Don’t settle for “good enough” when it comes to your car’s handling.
Cost, Value, and Making the Right Call on Safety
When it comes to repair costs, you’ve got options, but remember: you’re paying for safety and peace of mind. Here’s a general breakdown of what I typically see in my shop and what you might expect for parts if you’re tackling it yourself.
| Repair Type | DIY Cost (Parts) | Shop Cost (Total) | My Success Rate Expectation | Secondary Risk |
|---|---|---|---|---|
| Complete Control Arm Replacement (Pair) | $200 – $600 | $800 – $1,500 | 95%+ | Low. Main risks are improper torque (under or over) or forgetting to load the suspension before final tightening. |
| Bushing Press-Out/Press-In (Pair) | $80 – $200 | $400 – $800 | 90%+ | Medium. Higher risk of damaging the control arm itself if not done precisely; improper press fit can cause persistent noise or premature failure. |
| Temporary Alignment Compensation | $100 – $200 | $100 – $200 | 60% (and dropping fast) | High. This masks a serious safety issue. You’re risking sudden, unpredictable loss of control, especially at highway speeds or during emergency braking. I strongly advise against this. |
When you’re looking at these numbers, consider the value of your vehicle and, more importantly, your safety. If the professional repair cost starts creeping up towards 40% of the car’s market value, it’s time to seriously think about your options. But whatever you decide, never compromise on control. Your life, and the lives of others on the road, depend on it.
My Tips for Prevention and Early Detection
Keep Your Suspension Healthy
-
Regular Visuals: Every time you’re under the car for an oil change or tire rotation, take a good look at those rubber bushings. Look for cracks, bulges, or any signs of oil saturation.
-
Address Leaks Immediately: If you see oil dripping from an axle seal, transmission line, or anything else near your suspension, get it fixed. That oil will eat rubber for breakfast.
-
Mind the Road: I know it’s not always possible, but try to avoid potholes and curb strikes. Hard impacts can tear or displace a perfectly good bushing in an instant.
-
Listen to Your Car: If you start feeling that “tramlining” sensation (where the car seems to follow every groove in the road), or any new clunks, get the rear suspension checked out sooner rather than later. Early detection saves bigger headaches.
More Suspension Insights
Having trouble figuring out if it’s bushings or something else? I’ve put together guides on worn stabilizer bar links and springs sagging on one side that might help you narrow down other suspension noises and issues.
