When Your Car Sits Crooked: What a Sagging Corner Really Means
You’ve seen it, right? Your car looks like it’s doing a subtle lean, maybe dipping a bit on the driver’s side front or the passenger rear. It’s not your imagination. After a quarter-century in this business, I can tell you that a visible lean almost always points to one thing: a compromised suspension spring.
I’ve diagnosed this hundreds of times. The two main culprits I see are corrosion and plain old overload. But listen, this isn’t just about how your car looks. That sag changes everything – how it handles, how your tires wear, and even how it aligns. We’re going to dig into what’s happening, how to confirm it, and what you absolutely need to do next, the right way and, more importantly, safely.
How to Spot a Bad Spring (and What Else It Affects)
The first thing I always do is measure the ride height. You need a flat, level surface for this – a sloped driveway will give you false readings. Grab a tape measure and go from the center of each wheel hub straight up to the fender lip. Do all four corners. If one side is 3/4 inch (about 19 mm) or more lower than the opposite side on the same axle, you’ve got a real problem. That kind of discrepancy almost always means you’ve got a failed or permanently sagged coil spring.
Think of it like this: your car’s suspension is designed to work in balance. When one spring sags, it’s like walking with one shoe missing a heel. Your whole posture shifts, and every step puts stress where it doesn’t belong. This isn’t just cosmetic; it creates a steering pull toward the low side because the suspension geometry is now all out of whack. Standard alignment adjustments can’t fix that—it’s a mechanical imbalance that needs a mechanical repair.
You might also hear some unsettling noises. A sharp “clunk” or a metallic “twang” over bumps from that corner is a big red flag. Often, that’s the sound of broken coil ends shifting or binding in their seats. And yes, this is absolutely a safety concern. I’ve seen cases where a fully broken spring dislodged during a hard turn, leading to loss of control. Even if it hasn’t broken yet, that uneven loading accelerates wear on critical components like ball joints, control arm bushings, and CV axles. Your tires will wear unevenly because of improper camber, and you’ll never get a proper alignment. Don’t ignore this; it won’t fix itself.
Is It the Spring, or Something Else? My Diagnostic Approach
Before you start throwing parts at it, you’ve got to confirm the culprit. A sagging corner can be mimicked by other worn or failed parts. A collapsed strut mount, for instance, can lower the spring seat and create the same visual effect. A severely worn control arm bushing might let the entire suspension arm shift downward. And that clunking noise? It’s not unique to broken springs—it could be a loose sway bar link, a failed strut bearing, or even a worn ball joint. Here’s how I typically narrow it down:
| Symptom I See | Points to Spring | Common Look-Alikes | How I Confirm It |
|---|---|---|---|
| One Corner Sits Low | Corroded, fatigued, or permanently sagged coil spring. | Collapsed strut, worn control arm bushing, or damaged strut tower. |
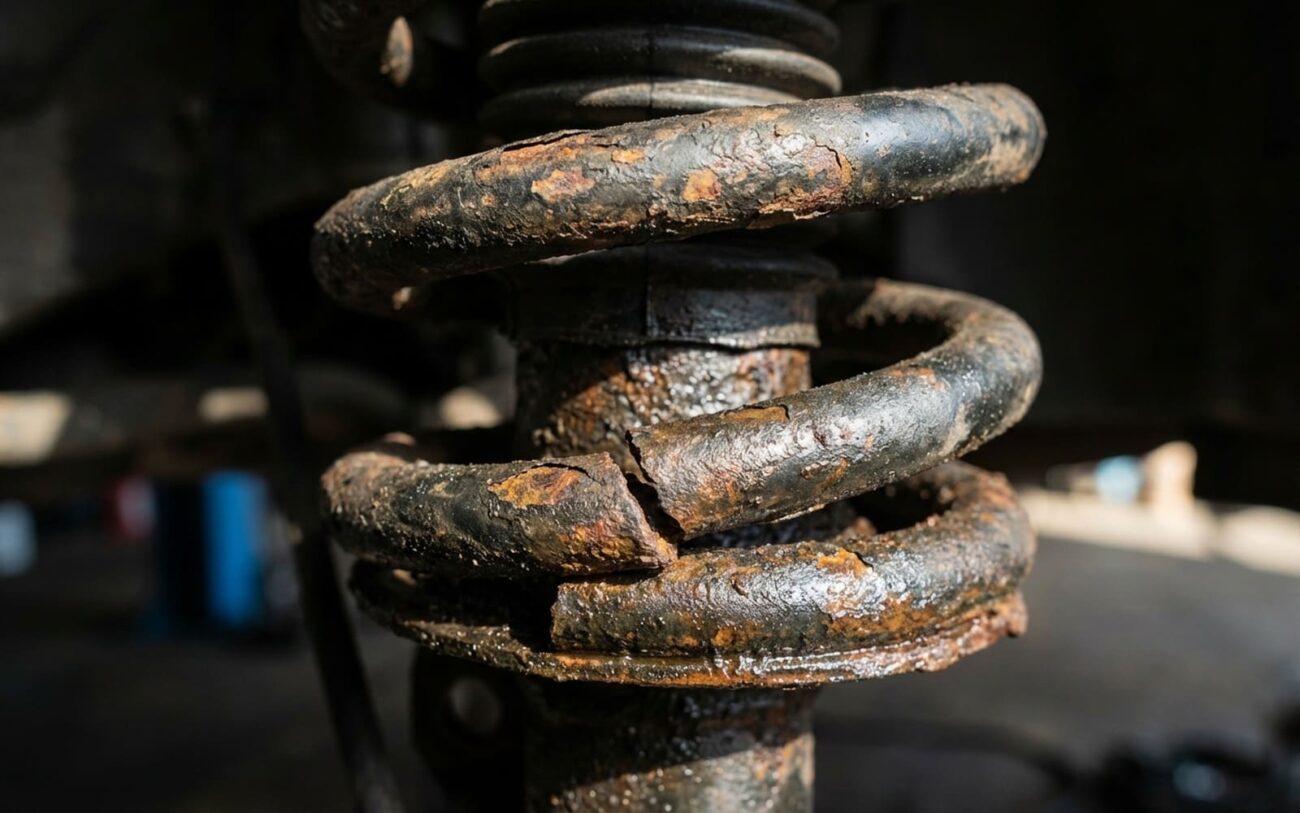
Visually inspect the spring for heavy rust, flaking, or broken coils. If in doubt, I’ll remove it with a professional compressor and measure its free height against a new one. |
| Low Corner with a Clunk/Twang | Cracked or broken coil spring end. | Failed strut mount/bearing, loose sway bar link, worn ball joint. |
With the vehicle lifted and the suspension loaded (supporting the control arm), I use a borescope to look deep into the spring seats for metal debris or obvious breaks. Sometimes you can even see the fracture with a good flashlight. |
| Steering Pull to One Side | Uneven spring tension causing cross-weight imbalance. | Brake drag, caster misalignment, or radial tire pull. |
After confirming ride height difference, if the pull persists after a basic alignment check (and tires are good), I’d suspect a spring. A four-corner weight measurement, if available, can confirm a cross-weight difference greater than 2%, which strongly points to a spring issue. |
Why Springs Fail: The Real Enemies Are Salt and Weight
Springs aren’t supposed to just give up for no reason. They’re built tough, but over time, two main forces beat them down: corrosion and mechanical stress.
Corrosion fatigue is the biggest killer I see, especially in places where they salt the roads. Road salt, moisture, and grime collect on the spring, particularly on the bottom coils where it sits in the spring seat. This leads to pitting—tiny cracks that grow with every compression cycle. Eventually, the spring snaps at its weakest point. When I pull one out, I almost always see heavy rust scaling, flaking, or deep pits right where it broke.
Overload is the second major cause. If a vehicle regularly carries heavy loads—think roof racks, trailers, or even just constantly hauling heavy work gear—the spring can take a permanent set. That means the steel has yielded and lost its original free height. Once that happens, it’s done. You can’t heat it up or try to re-arch it safely; that just weakens the metal further. It needs to be replaced.
My Take:
A spring failure is specific to the coil itself. A collapsed strut mount is a mount issue, a bent control arm is structural. The spring is a passive component—it either maintains its designed height or it doesn’t. If it doesn’t, it’s toast.
The Repair: There’s Only One Way to Do It Right (and Safely)
THIS IS PROFESSIONAL TERRITORY. SERIOUSLY.
Let me be clear: a coil spring is under immense pressure. Releasing that pressure safely requires a professional-grade wall-mounted or screw-type spring compressor. I’ve seen too many DIY attempts go wrong. A failure during disassembly can launch metal with lethal force. This is not a job for cheap rental tools or a YouTube tutorial unless you’re a seasoned pro with the right equipment.
Always Replace in Pairs Critical
Follow OEM Procedure & Torque Specs No Shortcuts
Confirming the Fix: Don’t Skip These Steps
Replacing the springs isn’t the end of the job; it’s the beginning of validation. First, drive the car 5–10 miles, taking it over some bumps if you can. This lets the suspension settle into its new ride height. Then, go back to that flat, level ground and re-measure ride height at all four corners. The difference between sides on the same axle should now be within 10 mm (about 3/8 inch), per most OEM specs. If it’s still off, something’s wrong with the installation.
Next, and this is non-negotiable, get a full four-wheel alignment. This isn’t just a toe adjustment—it’s a complete check of camber, caster, and toe. With new springs, you should be able to bring all values into spec. Cross-camber and cross-caster should be within 0.5 degrees side-to-side. If they’re not, that’s a sign to double-check the spring installation and all mounting points.
My Post-Repair Road Test
After the alignment, I always take the car for a good road test over rough roads and through some sharp turns. There should be no clunks, twangs, or groans. If you hear a new noise—say, a clicking sound on turns—you might have disturbed a CV joint during the repair. It happens.
The Cost and the “40% Rule”
Let’s be honest, this isn’t a cheap repair. But letting it go will absolutely cost you more in the long run—think wasted tires, constant alignment issues, and secondary damage to other suspension components. Here’s a ballpark of what you’re looking at for professional work:
Front Spring Pair
Includes parts and labor for MacPherson Strut systems. DIY parts cost $200-$500.
Rear Spring Pair
Live axle or independent systems. DIY parts cost $150-$400.
My “40% Rule”
I always tell my customers: if the repair cost exceeds 40% of your vehicle’s current value, it’s time to seriously weigh your options. This might be the first of many aging-system failures, and you could be pouring money into a losing battle.
How to Keep Your Springs Happy (and Avoid This Headache Again)
My Prevention Checklist
-
Wash your undercarriage regularly, especially if you live in a snowy climate. That spring wash in the spring (pun intended!) is crucial for flushing away road salt and grime that leads to pitting.
-
Respect your vehicle’s Gross Vehicle Weight Rating (GVWR). Chronic overloading is a surefire way to accelerate spring fatigue and cause them to take a permanent set. Know your limits.
-
Do a quick visual inspection twice a year. Just get down and look for deep rust, heavy scaling, or cracked paint on the bottom coils. Catching this early can save you a lot of grief.
-
Periodically check for uneven roof lines or wheel arch gaps. Park on level ground and just eyeball it. If something looks off, measure it.
