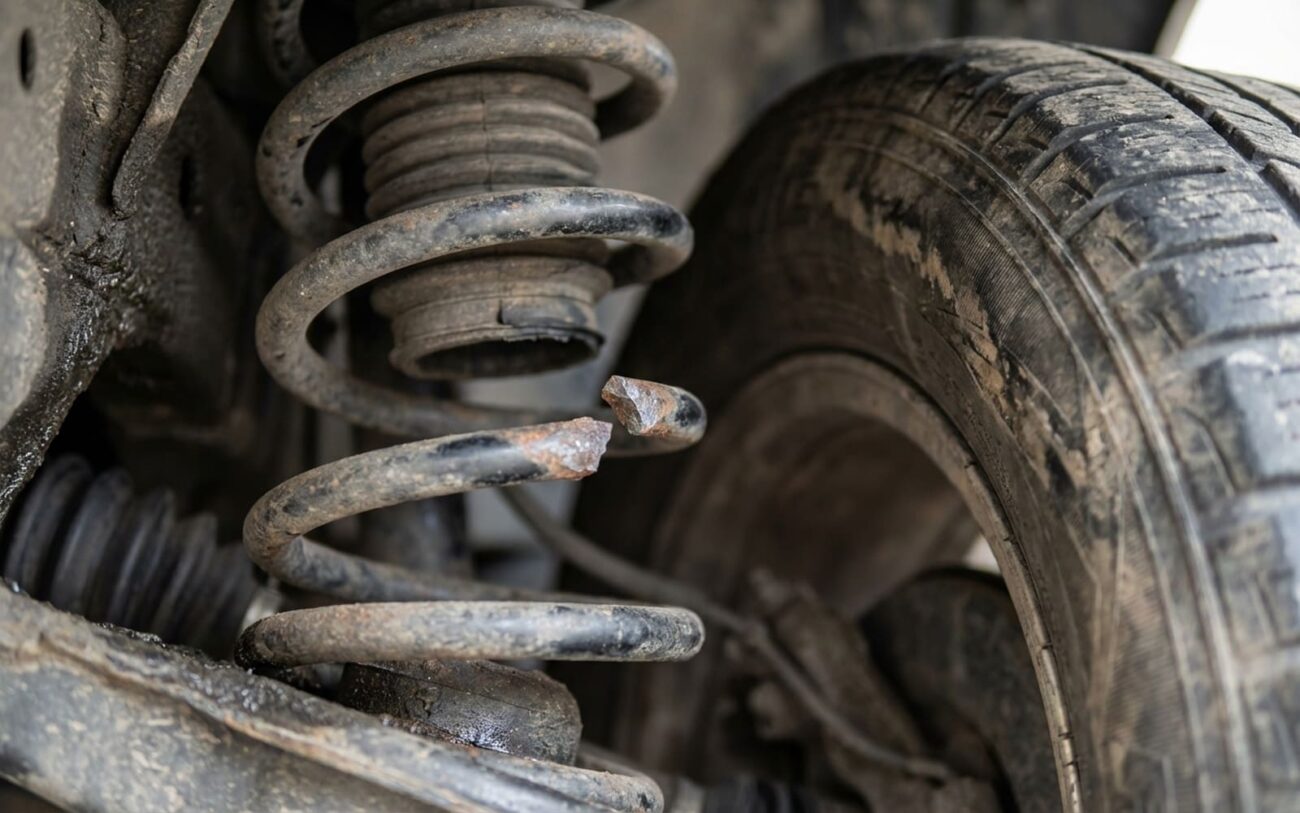
Alright, let’s talk about broken coil springs. This isn’t just a minor annoyance; it’s a direct threat to your suspension and, more importantly, your safety. In my 25+ years turning wrenches, I’ve seen too many folks ignore the early signs, only to end up with a shredded tire or a completely ruined shock absorber because that broken spring shifted and started chewing through everything in its path.
Spotting a Broken Spring: The Obvious & The Sneaky
The most common giveaway is a sharp, metallic “clunk” or sometimes a “twang” when you hit a bump, especially if it’s coming from just one corner of the vehicle. That noise? That’s the fractured end of the spring slamming into the spring perch or a control arm as the suspension tries to do its job. It feels like a hard stop mid-travel, and that’s exactly what it is—the spring can’t compress smoothly anymore.
Sag: 1.5″ Drop
Another dead giveaway is vehicle sag. If you notice your car sitting noticeably lower on one side, especially at a front or rear corner, that’s almost always a collapsed or broken coil. With a piece of the spring gone, it just can’t support the vehicle’s weight right. I’ve measured drops of an inch and a half or more on a corner with a broken spring.
Think of it like this: your car’s suspension is a chair. If one leg is shorter, the whole frame twists and leans, putting stress on every joint. That’s what a broken spring does to your suspension components.
But here’s the really dangerous part that a lot of people miss: that broken spring doesn’t just sit still. It can twist or shift in its perch, and the sharp, jagged edge of the broken steel can rub against your tire’s sidewall. I’ve pulled wheels off cars and found deep gouges worn right through the rubber—sometimes in just a few hundred miles. A sidewall blowout at highway speed is no small risk, so don’t take this lightly.
And don’t forget the shock absorber. It’s engineered to work with a properly tensioned spring. When the spring breaks and shortens, the shock is forced into constant over-compression. This leads to overheated fluid, blown seals, and in severe cases, internal damage like a bent piston rod from bottoming out. So yes, a broken spring can absolutely ruin a shock. In fact, I see it more often than not—especially when the vehicle keeps getting driven.
Is It Really a Broken Spring? Differential Diagnosis
Now, a loud clunk and uneven ride height don’t automatically scream “broken spring.” Plenty of other suspension components can mimic these symptoms, and misdiagnosis is pretty common without a proper inspection. Worn strut mounts, failing ball joints, or loose sway bar links can all make similar noises. Here’s how I usually sort it out:
1. Ride Height Check
If you’ve got noticeable sag, measure from the center of the wheel hub to the fender lip on all four corners. Compare it to the other side of the axle. A significant difference (say, over an inch) is a strong indicator. Then, get under the car and visually inspect the spring. Look for a clean break, often at the very bottom coil where it sits in the perch. Sometimes it’s just a small piece that’s broken off, making it hard to spot without really looking.
2. Clunking Noise Investigation
With the vehicle safely lifted and the wheel removed, grab the spring and try to wiggle it. If it moves independently in its perch, or you can see the fractured end shifting, that’s your clunk. If the spring looks fine, then I start checking other suspects: grab the sway bar link and try to move it (should be tight), check for play in ball joints, and inspect the strut mount for cracks or excessive movement. A loose spring end hitting metal is a very distinct sound and feel.
3. Abnormal Tire Wear
Cupping or uneven tire wear can be caused by a broken spring, but it’s more often a worn shock. However, a broken spring throws off the suspension geometry, leading to erratic wheel movement. If you’ve got severe, non-adjustable camber issues (meaning the wheel is leaning in or out excessively, and the alignment shop can’t fix it), that could point to a structural issue like a broken spring affecting the whole assembly. Always get a 4-wheel alignment check after any major suspension work, or if you suspect geometry issues.
Why Springs Break: Root Causes
So, why did your spring decide to call it quits? In nearly all cases, it’s good old metal fatigue. Coil springs are under constant stress—compressing and extending millions of times over the vehicle’s life. That stress isn’t evenly distributed; it concentrates most at the bottom coil, right where it rests in the spring perch. Over time, microscopic cracks form and grow with each cycle, eventually leading to a full fracture. It’s just physics.
Heads Up: Service Bulletins Exist!
I’ve seen known service bulletins for certain model years—particularly some older Ford F-150s and GM SUVs—where front springs were prone to premature corrosion-related failures. These were often addressed with better-coated replacement springs. Always worth a quick check for your specific vehicle.
Corrosion dramatically speeds this fatigue process up, especially in regions where road salt is used. Salt eats through the spring’s protective coating, exposing the steel to rust. Those little pits create stress risers—perfect spots for cracks to start. I’ve pulled springs with deep corrosion pits that weren’t even visible until I cleaned them up, and sure enough, those pits were right where the break occurred.
Getting It Fixed: Your Options & My Advice
Safety Is Non-Negotiable
The repair approach depends heavily on your suspension type and any collateral damage. This isn’t a repair to rush or cut corners on. Period.
Non-Strut Suspensions DIY Feasible (With Caution)
MacPherson Strut Assembly Professional Recommended / Specialized Tools
Immediate Safety Hazard DO NOT DRIVE
Temporary Fixes NONE EXIST
After the Repair: Post-Fix Validation
Replacing the spring is only half the battle. You absolutely must verify the repair was done correctly and that no secondary damage was missed. Trust me, a quick check now can save you a headache later.
Your Post-Repair Checklist
-
Ride Height: Get that tape measure out. Measure from the wheel hub center to the fender lip on all corners. They should be within ½ inch of each other. If not, something’s still off.
-
Test Drive: Don’t just drive around the block. Hit varied road surfaces—some smooth, some bumpy. That clunk should be completely gone, and the ride should feel controlled, not bouncy or harsh.
-
Visual Inspection (Again): Once everything’s settled, take another look. Confirm the new spring is seated squarely in both perches, not twisted or cocked. Make sure all bolts are tight (re-check torque after a short drive if you’re really particular).
-
Alignment & Secondary Systems: Get a 4-wheel alignment. Any suspension work impacts alignment. Also, scan for any new ABS or traction control codes, and double-check brake lines and ABS wiring near the strut for any signs of contact or damage you might have missed.
The Bottom Line: Cost, Risk & When to Fix It
Let’s be realistic: fixing a broken spring isn’t cheap, but ignoring it is far, far more expensive. Here’s a rough breakdown of what you’re looking at, based on what I see in the shop:
Single Spring (Non-Strut)
This is for one spring, installed by a shop, including parts and labor. If you DIY, parts alone run $100-$300.
Quick-Strut (One Corner)
This includes a complete, pre-assembled strut unit. It’s often safer and faster for DIYers, with parts costing $200-$500.
Full Axle Pair + Alignment
This is the most comprehensive fix. It ensures balanced handling, prevents uneven tire wear, and is what I always recommend if the budget allows.
Now, here’s the hard part: when does the repair make financial sense? If the total cost—including new springs (and often shocks, if they’re damaged), any necessary tires, an alignment, and labor—exceeds about 40% of your car’s current fair-market value, you need to pause and think. Is it worth putting that much money into this vehicle? But if the rest of the car is solid, the engine and transmission are good, fixing a broken spring is both safe and economical in the long run. It’s a critical component, not a luxury.
Prevention & Monitoring: Keep It From Happening Again
My Proactive Maintenance Tip
In areas with winter road salt, regular undercarriage washing is your absolute best defense. A thorough rinse every few weeks can remove salt buildup before it eats through the spring’s protective coating. And during every oil change, spend two minutes with a good flashlight checking the bottom coils of your springs for cracks or deep rust pockets. A little proactive looking can save you a big headache and a lot of money down the road.
