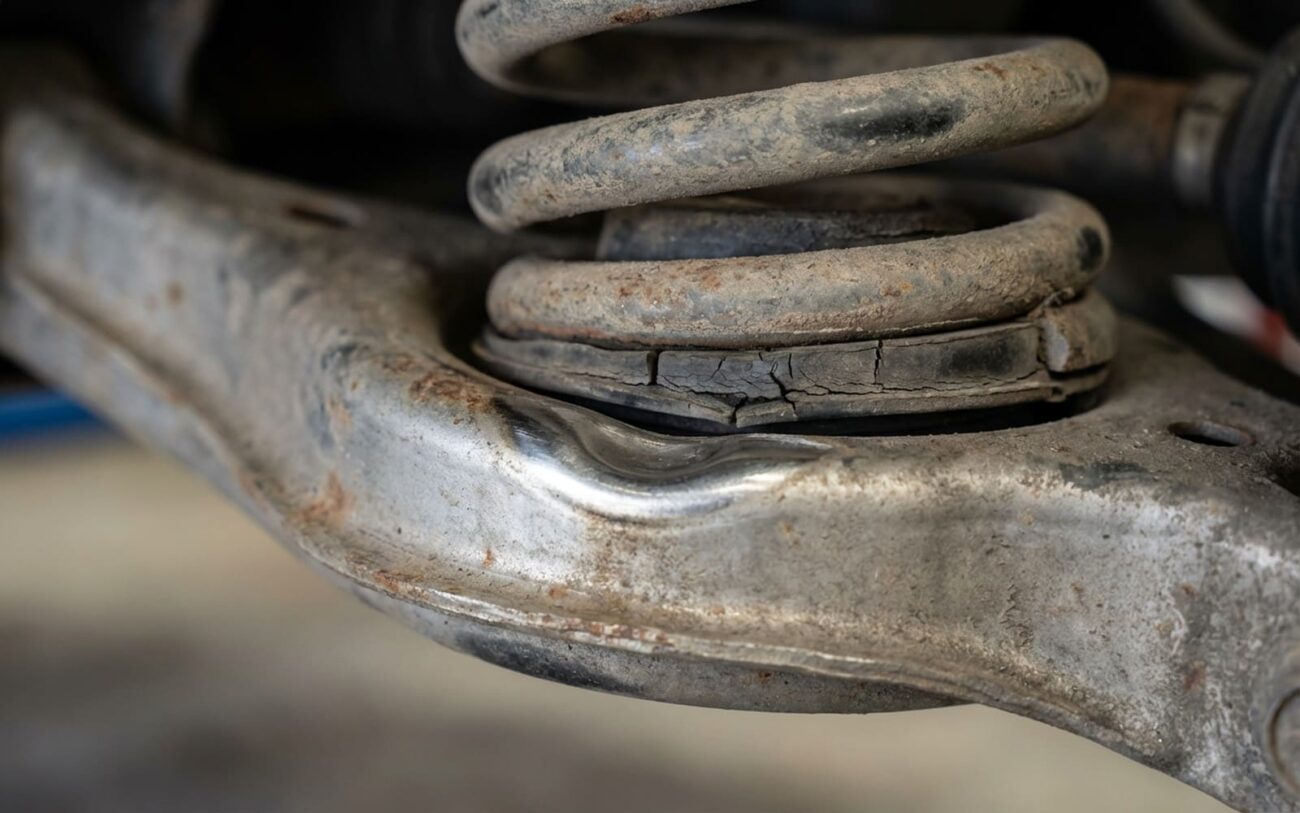
Bad Coil Springs: What I Look For
After 25+ years wrenching on suspensions, I can tell you one thing for sure: coil springs don’t just snap overnight. They wear out. Slowly. Quietly. And they’ll mess up your ride, your tires, and your wallet long before you hear that dramatic bang of one finally giving up the ghost. Most folks miss the early warnings, and that’s where the real damage starts. Let’s talk about how to spot it.
The biggest problem with a worn-out spring is what we call “metal fatigue.” It’s not cracked or broken, not yet anyway. It’s just lost its oomph, its tension. Think of it like a muscle that’s been overworked for years—it just can’t hold things up like it used to. This means your car sits lower, the suspension bottoms out, and everything else has to work harder. And trust me, that adds up to more expensive repairs down the road.
SUSPENSION MONITOR
Sag: 15mm – 25mm
Recognizing the Symptoms of Worn Springs
The most obvious and reliable sign of spring fatigue is a change in your car’s stance. I always tell customers to look at their car from the side. If it looks like it’s crouching, or the fenders are closer to the tires than they used to be, that’s not “normal settling.” That’s metal fatigue. This sag can hit just one corner, or an entire axle. While a collapsed control arm bushing or a worn strut mount can mimic this look, a consistent, measurable drop in height across both sides of an axle is almost always the spring’s doing. I’ve seen cars sag anywhere from half an inch to a full inch or more, depending on the vehicle and how bad the springs are.
Next, pay attention to how the car feels over bumps. A fatigued spring loses its designed spring rate—that’s the amount of force it takes to compress it. As it sags, the suspension runs out of travel faster, leading to a harsh, jarring ride. You’ll feel a sharp “clunk” over small dips or seams in the road. That’s the suspension bottoming out. It’s not damping failure—that gives you a bouncy, floaty ride. This is different: it’s like hitting a solid stop. The shocks are still working, but they’re being over-compressed because the spring isn’t doing its job.
Another big red flag I see is alignment issues, especially with camber. If your shop can’t get camber into spec, or your tires are wearing bald on the inside edges, I’m checking ride height first. Suspension geometry is set at a specific ride height. When the spring sags, it pulls the control arms and steering knuckles into unnatural angles, dragging camber negative. Yes, a bent arm or a worn ball joint can do this too—but if it’s paired with a visibly low stance, the spring is the likely root cause. On some older Hondas, for example, I’ve seen negative camber go way out of spec just from tired springs.
And let’s not forget handling. The car may feel floaty on highways or lean excessively in corners. That’s because the spring’s stiffness is what resists body roll. When the spring rate drops due to fatigue, the body rolls more, making the car feel unstable. Worn sway bar links can worsen this, but those usually come with their own set of clunks over bumps. Fatigued springs? They’re quiet, but deadly to control.
Differential Diagnosis: Is It the Springs or Something Else?
Okay, so you’ve got some symptoms. Now, how do you know it’s the springs and not something else? This is where the real diagnostic work comes in. Many suspension issues look alike, so your job is to isolate the real cause before you start ordering parts. Here’s how I break it down in my shop:
| Symptom | Likely Spring Involvement | Common Mimics | Definitive Test (My Approach) |
|---|---|---|---|
| Low Ride Height | Yes — spring sag due to metal fatigue or permanent set. | Collapsed control arm bushings, worn strut mount, damaged spring perch. |
Measure ride height (fender center to wheel center) on level ground. Compare to factory specs. This is non-negotiable. |
| Harsh Ride / Bottoming Out | Yes — reduced spring rate causes early compression limit. | Failed shock absorber (no damping), missing or hardened bump stop. |
Perform a good, hard bounce test. If the vehicle settles in 1–2 bounces, your shocks are likely still doing their job. |
| Excessive Body Roll | Yes — loss of spring rate reduces roll resistance. | Worn sway bar end links, soft or cracked sway bar bushings. |
Inspect sway bar components for play by hand. If they’re tight, and you still have roll, check your ride height. |
Why Coil Springs Give Up the Ghost
When we say a spring is “fatigued,” we mean the steel itself has degraded. It’s not cracked or broken—it’s just weak. The primary cause is metal fatigue: microscopic cracks forming in the steel from repeated compression and release. Each cycle adds a tiny bit of permanent stretch. Over 100,000 miles, that adds up to measurable sag. It’s just physics.
The Corrosion Factor:
If you live in a rust belt, road salt and moisture are spring killers. They collect around the lower coils, causing pitting. These pits act as stress risers—tiny points where cracks start. I’ve seen springs from salty climates fail at half the mileage of a dry-state car.
Overloading is another big factor. Hauling heavy cargo or towing at max capacity pushes the spring beyond its yield point. Like stretching a rubber band too far, it doesn’t return to its original length. That’s called a “permanent set,” and it’s irreversible. I’ve seen this a lot on work trucks or SUVs that regularly tow heavy trailers. Heat also plays a role; springs mounted near exhaust manifolds or turbo systems can lose their temper over time, softening the steel. It’s not common, but I’ve seen it happen on some performance cars.
Repair Options: How I Fix Fatigued Springs
No Safe Shortcuts Here
Let me be absolutely clear: You cannot repair a fatigued coil spring. Don’t try heating it, bending it, or “re-tensioning” it. That’s a recipe for disaster, plain and simple. You’ll destroy the metallurgy and create a dangerous failure risk. Replacement is the only safe and correct option.
Axle Pair Replacement Standard Repair
Complete Strut Assembly My Recommendation
Torque & Alignment Are Mandatory
Validating the Repair and Long-Term Prevention
Replacing springs isn’t the finish line—it’s the starting point. You must verify the repair actually fixed the problem. Drive the car 50–100 miles to let the suspension settle, then re-measure that ride height. The new height should be within 5 mm of factory specs. If it’s not, something’s still off, or you’ve got the wrong parts.
My Long-Term Care Checklist
-
Wash the undercarriage regularly, especially in winter. Get that road salt off the lower coils before it causes pitting.
-
Every time you rotate tires, do a visual inspection for flaky rust or deep pitting on the springs. Catch it early.
-
Measure ride height annually. If it’s dropped more than 1/2 inch over two years, you’re looking at fatigue.
-
Avoid chronic overloading or towing beyond the vehicle’s rated capacity. You’re just asking for “permanent set.”
Cost, Risk, and When to Repair
So, you’ve diagnosed weak springs. What’s it going to cost, and when is it worth doing the repair? Here’s my take:
| Repair Type | DIY Cost (Parts Only) | Shop Cost (Parts & Labor) | Success Rate (If Done Right) | Secondary Risk (If Done Wrong) |
|---|---|---|---|---|
| Axle Pair Spring Replacement | $200 – $500 | $600 – $1,200 | 99% | Rapid tire wear, shock damage if alignment is skipped. Dangerous spring compressor risk for DIY. |
| Strut Assembly (Quick-Strut) | $300 – $800 | $900 – $1,500 | 99% | Risk of strut failure if cheap parts are used or bolts are not torqued correctly. |
Economic Reality Check
Here’s a hard truth: if the repair bill starts creeping up to 40% or more of your car’s actual value, you need to seriously think if it’s worth it. Spending two grand on suspension for a three-grand car with 200,000 miles and other looming repairs? That’s throwing good money after bad. Sometimes, it’s time to let go.
For more on related suspension issues, see: How to Tell if Your CV Axles Are Worn and Can a Torn CV Boot Destroy the Joint in Under 300 Miles?
