Alright, let’s talk about shocks. After 25 years under the hood, I can tell you there’s a lot of confusion out there about what these things actually do. Most folks think a shock absorber holds up the car. Nope. That’s your springs, plain and simple. What the shock does, its one job, is damping. It controls how fast that spring compresses and, more importantly, how fast it rebounds. Without it, your car’s just a pogo stick.
When a shock goes bad, you lose that control. And trust me, the symptoms are unmistakable if you know what you’re looking for. This isn’t just about a bumpy ride; it’s a safety issue. I’ve seen vehicles with worn-out shocks take up to 20% longer to stop from 60 mph. Think about that. Every time a tire bounces, it loses full contact with the road, and that means less grip for braking and cornering. That’s not theoretical—that’s dangerous.
Spotting a Bad Shock: My Diagnostic Checklist
The most reliable sign of a truly failed shock is uncontrolled oscillation. You hit a bump or pothole, and instead of the wheel settling after one firm bounce, it keeps going—two, three, even four cycles. That’s a dead giveaway. Inside that shock, there’s a piston moving through oil, controlled by valves and often pressurized with nitrogen. When that system fails, there’s nothing left to resist motion. You’re left with a spring just flailing on its own.
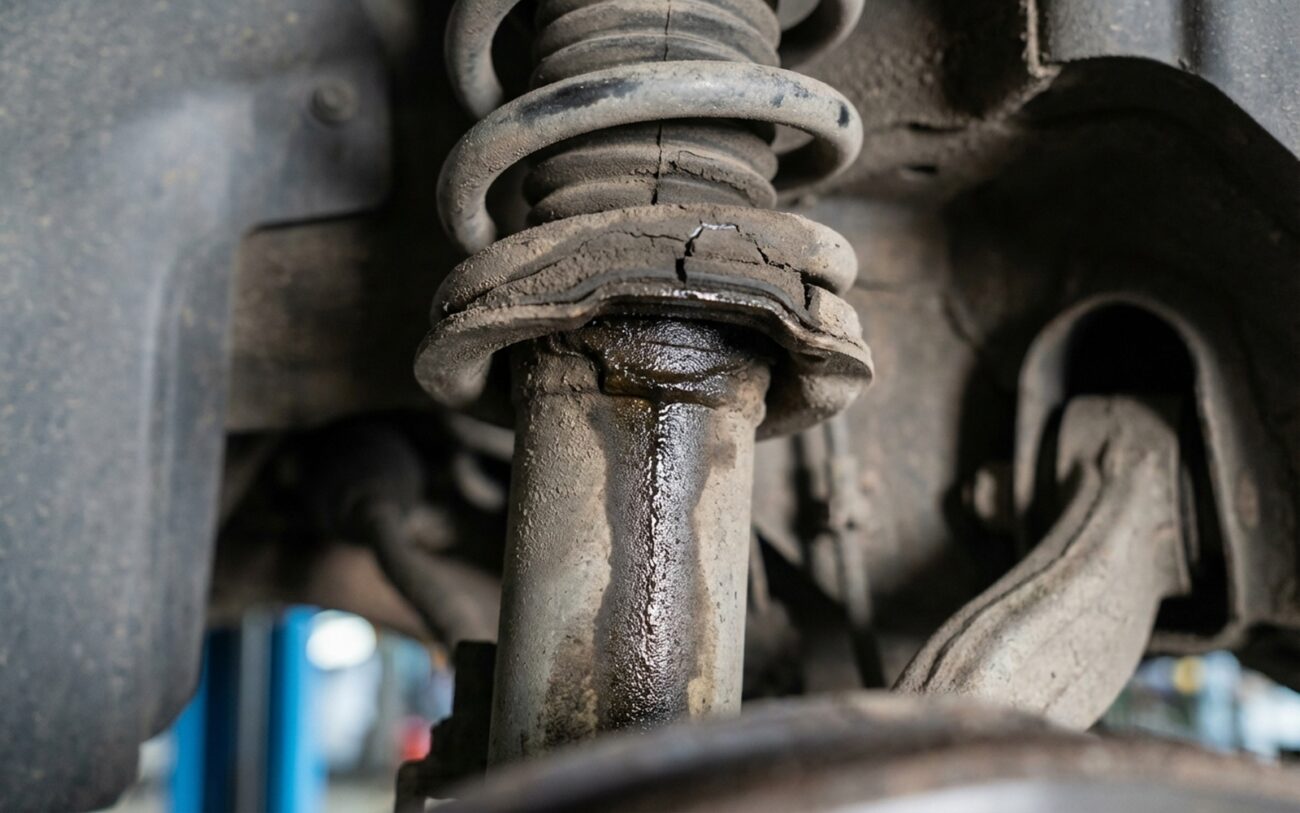
Another big red flag is visible fluid. See a dark, oily streak running down the side of the shock body, especially near the top where the piston rod comes out? That means the main shaft seal has failed. It might start as just a slight dampness, but once that fluid loss begins, it’ll only get worse, and fast.
Don’t Jump to Conclusions: Ruling Out the Mimics
This is where a lot of DIYers, and even some newer techs, get tripped up. A bouncing car or a clunking noise doesn’t automatically scream “bad shocks.” You’ve got to isolate the source. The old “bounce test” (pushing down on a corner) is a decent screening tool, but it won’t tell you if the problem is the shock, a worn bushing, or a broken spring. Misdiagnosing means wasted time and money, and nobody wants that.
Pro Tip: Always check the cheap stuff first.
I see it every week in my shop: a customer replaces both front struts, only to find the clunk is still there. Why? Because the real problem was a $25 sway bar end link. Always inspect the simple, common wear items before you commit to major suspension work.
Here’s how I break down common symptoms and what they actually mean:
-
Excessive bounce after an impact: This is the classic sign of internal valve failure or a complete loss of damping fluid or gas charge. But don’t rule out a sagged or broken coil spring—especially on an older strut. To be sure, you need to manually cycle the shock without the spring. A good unit will offer smooth, firm resistance through its entire stroke. If it’s spongy, has dead spots, or makes noise, it’s done.
-
Fluid leak on the damper body: This almost always means a failed piston rod seal. However, I’ve seen power steering fluid drip from above, or a leaking strut mount bearing mimic this. My approach? Clean the area thoroughly with brake cleaner, drive it for a day or two, and then re-inspect. If the leak reappears and originates around the piston rod, you’ve found your culprit.
-
Audible clunk from the suspension: This is a tricky one. It could be internal piston damage or a loose lower mounting bolt on the shock. But it’s far more commonly a worn strut mount, a failed sway bar end link, or a bad ball joint. Use a pry bar to check for play at all the mounts and joints. And always, always verify that all hardware is torqued to spec. I’ve found loose bolts more times than I can count.
Why They Give Up: Inside the Failure
Most shock failures start internally. The main weak point is almost always that main shaft seal—the rubber gasket where the chrome piston rod slides in and out. Over time, heat, road salt, and grit just eat away at it. It hardens, shrinks, cracks. Once it starts leaking, that fluid loss is inevitable, and the shock is on borrowed time.
The Concept
“Without that fluid, the oil aerates into foam. It’s like trying to stop a heavy door with a wet sponge instead of a proper hydraulic arm. No resistance.”
The internal valving stack, made of thin, flexible metal shims, can also fatigue. These shims are critical; they control oil flow based on how fast the suspension is moving and how much load it’s under. When they wear out, damping becomes inconsistent, and that’s when you get that “floating” sensation on the highway. And here’s another killer: if road debris scores the chrome piston rod, that rough surface acts like a razor blade on the new seal with every single stroke. It’ll rip a new seal to shreds in no time.
Your Repair Options: What I Recommend
Rear Shock Absorbers (Non-Strut) DIY-Feasible
Front MacPherson Struts Professional Recommended
Dented or Damaged Shocks Non-Repairable
Making Sure You Fixed It Right: The Post-Install Check
Just bolting on new shocks isn’t the finish line. You’ve got to confirm the repair. First, do a thorough visual check: no fresh leaks, nothing rubbing, all mounting bolts tight. Then, measure the ride height. I always measure from the center of the wheel hub to the bottom of the fender lip. Compare side to side—any differences should be no more than ½ inch.
Perform that bounce test again, on each corner: push down hard and release. The vehicle should rebound once and settle. If it bounces two or more times, you’ve got a problem. Either the new shock is defective (it happens), or another component is failing. Finally, take it for a road test. The ride should feel controlled—firm but not harsh. No floating, no wallowing, and definitely no delayed rebound.
The Cost and the Tough Decision
Here’s a rough idea of what you’re looking at for parts and labor. Keep in mind, prices vary wildly based on your vehicle and where you live.
| Repair Type | DIY Cost (Parts) | Shop Cost (Total) | Secondary Risk |
|---|---|---|---|
| Rear Shock Pair | $150 – $300 | $400 – $700 | Loose mounting bolts can lead to detachment. |
| Front Strut Assemblies | $400 – $800 | $800 – $1,400 | Incorrect installation can damage ABS sensors. |
My “40% Rule”
If the cost to replace all four corners of your suspension exceeds 40% of your car’s current market value, you need to ask yourself if it’s really worth it. For an older car that’s got other wear items piling up, throwing $1,200 or more at suspension might not make financial sense compared to putting that money toward a newer, more reliable vehicle. It’s a tough call, but one I help customers make all the time.
Keeping Those New Shocks Healthy
A Few Pointers for Longevity
-
Wash your undercarriage: Built-up grime, salt, and mud are killers for those seals. A monthly rinse, especially if you live where they salt the roads, can add years to their life.
-
Match the load: This is a big one. If you’ve got a lifted truck, you need heavy-duty units. If your car is lowered, you need shorter valving. Putting the wrong shock on will cause it to fail prematurely, every time.
-
Do quick visual checks: Just a glance at the shock bodies for dampness once a month can save you. Catching a small leak early means you can plan for replacement before it becomes a major safety issue.
