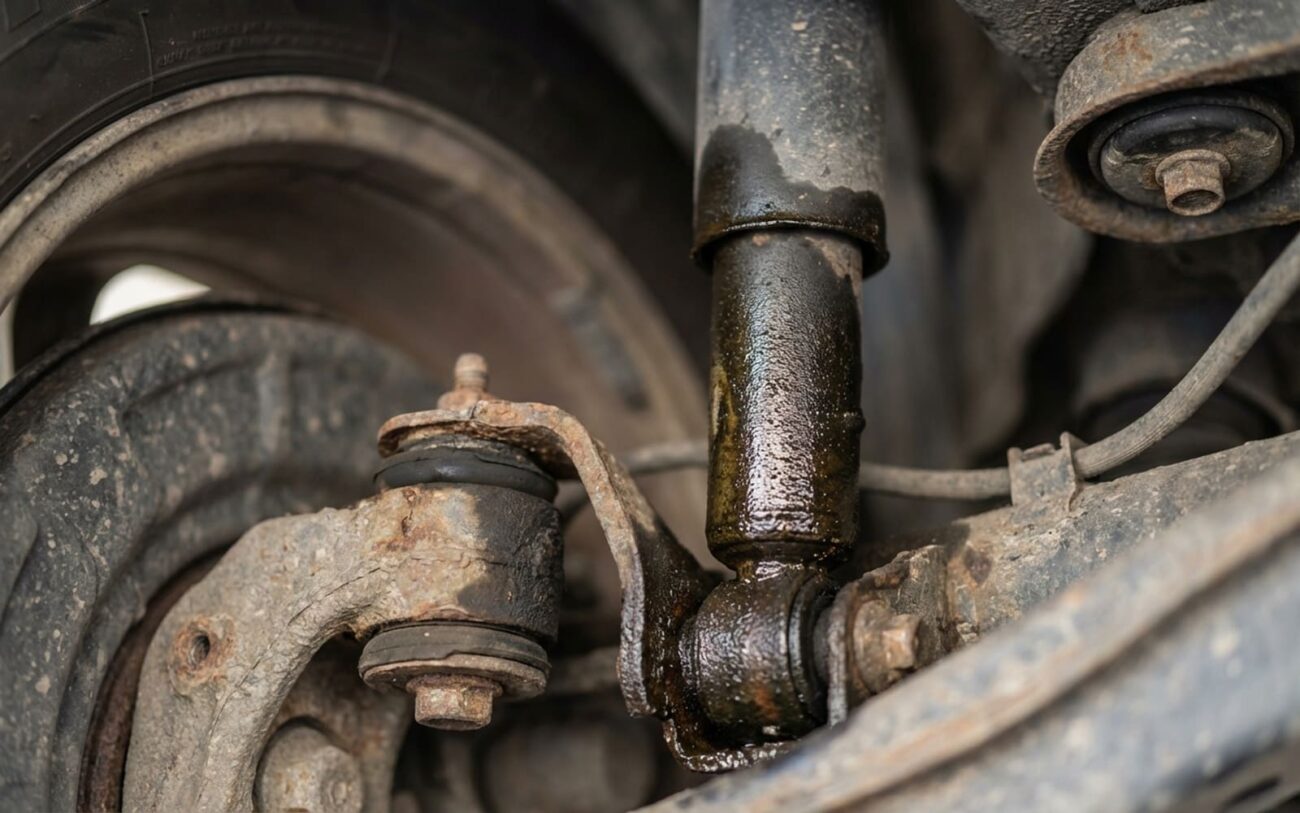
When a car starts feeling like a boat on the highway, especially in crosswinds, or you’re constantly fighting the wheel just to hold a straight line – that’s a classic sign something’s off with the suspension. Most folks immediately think ‘shocks,’ and often, they’re right. Worn shock absorbers or struts are usually the main culprits when your ride gets floaty and unstable. But here’s the thing: plenty of other worn parts can mimic these exact symptoms, so you can’t just jump to conclusions. I’ve seen too many good parts replaced because someone didn’t do their homework.
Recognizing the Problem & Initial Checks
Let’s talk about what I look for first. If a customer comes in complaining about a ‘floaty’ feel or their car swaying with every breeze, I’m thinking about the dampers. Here are the tell-tale signs I’ve learned over the years:
- The Lane Change Test: Find a safe spot and make a smooth lane change. A healthy suspension will transition and settle almost instantly. If your car leans hard, then rocks back and forth a couple of times after you straighten out, that’s excessive body roll. That’s a classic sign your shocks aren’t controlling the springs anymore.
- The Bump Test: Hit a single speed bump or a dip in the road. A good suspension compresses once and then stops. If your car keeps bouncing, two, three, four times – like a pogo stick – those dampers are shot. They’ve lost their ability to absorb and dissipate that energy.
- The Cold Start Clue: This one’s subtle, but I’ve seen it. If the car feels particularly disconnected or floaty when you first start driving on a cold morning, but then seems to firm up a little as it warms up, that often points to degraded internal fluid in the shocks. The fluid gets thinner when it’s cold, and if it’s already compromised, the effect is more noticeable.
- The Bounce Test (My Go-To): This is old school, but it still works. Park the car, go to each corner, and push down firmly on the fender or bumper. Just one good, hard push. Let go. A healthy suspension should rebound up once, maybe a tiny bit more, and then settle immediately. If it bounces more than 1.5 times, you’ve got a problem with that damper.
Ruling Out the Imposters: Differential Diagnosis
Okay, so you’ve done your initial checks and you suspect the shocks. But hold on a minute. As I said, other things can feel similar. Before you start ordering parts, let’s rule out the common imposters. The steering and suspension are a system, and when one component wears, it often affects how others behave.
- Tire Pressure: I know, I know, it sounds basic. But seriously, check your tire pressure. Underinflated tires can make a car feel squishy and unstable, especially at highway speeds. It’s a free check, so don’t skip it.
- Control Arm Bushings & Sway Bar Links: If you’re getting excessive body roll or a general loose feeling, especially over bumps, these are prime suspects. Get the car on a lift. Grab a good pry bar. You’re looking for excessive play in the control arm bushings. They shouldn’t have much give at all. And check those sway bar end links – if they’re broken or worn, the sway bar can’t do its job, leading to a lot of body roll.
- Steering Linkage, Ball Joints, and Tie Rod Ends: If the car feels like it’s ‘darting’ or wandering over uneven pavement, or you have to constantly correct the steering, it could be play in the steering system. With the front end lifted safely off the ground, grab the wheel at 12 and 6 o’clock and try to rock it. Any play there usually points to wheel bearings or ball joints. Then grab it at 3 and 9 o’clock and rock it – play here is usually tie rod ends or a loose steering rack. You shouldn’t have any noticeable play in these components.
I always tell people: the steering and suspension are a system. When one part wears, it puts more stress on others, and the symptoms can overlap. A thorough inspection is always worth the time.
Pro Tip on Noise:
Oh, and one quick side note: don’t confuse handling issues with driveline noise. I’ve had customers swear their suspension was making a racket, but it turned out to be a consistent whine from the rear at highway speed. That’s almost always unrelated to suspension and points straight to worn gears in the rear axle differential. Different problem entirely.
Why Shocks & Struts Fail
Alright, so you’ve confirmed it’s the shocks. But what actually goes bad in there? It’s not some mystery; it’s good old mechanical wear and tear, usually from age, heat, and just hundreds of thousands of cycles.
The most common thing I see is external leakage. That piston rod seal, it just wears out over time or gets nicked by road debris. Once that seal goes, hydraulic fluid starts weeping out. And when the fluid level drops, or air gets sucked into the system (we call that aeration), the damping effect goes right out the window. It’s like trying to run a hydraulic jack with no fluid – it just won’t work.
For gas-charged shocks, there’s a nitrogen charge in there that helps prevent cavitation – basically, air bubbles forming in the fluid. If that internal seal fails, the gas and fluid mix, and the shock fades fast, especially under heavy load.
Inside, you’ve got a valve stack – a bunch of precisely bent metal shims. These things are constantly flexing, opening, and closing to control fluid flow. After years and miles, they just fatigue, lose their tension, or even break. When that happens, the shock can’t properly regulate the spring’s movement.
And don’t forget contamination. Road grime, salt, dirt – it all gets kicked up onto that piston rod. Over time, that grime acts like sandpaper, slowly grinding away at the seal from the outside in. It’s a silent killer, but it’s a major reason for premature failure.
The Mechanics
“Think of it like this: a shock absorber is basically a screen door closer. If the fluid leaks out of that closer, the door just slams shut, right? In your car, that ‘slam’ is your tire losing proper contact with the road, and that’s not good.”
The Fix: Replacement & Installation
Once a shock or strut has failed, there’s really only one path forward: replacement. You can’t rebuild these things in the field, and there’s no additive that’s going to bring them back to life.
Crucial Safety Warning
If you’re tackling struts, you’re dealing with a coil spring that’s under immense compression. That spring stores hundreds, sometimes thousands, of pounds of force. Attempting to disassemble a loaded strut without a proper, heavy-duty coil spring compressor is incredibly dangerous. I’ve seen some nasty injuries from springs letting go. Don’t gamble with it. If you don’t have the right tools and training, take it to a pro.
When you replace them, always do them in pairs. That means both front shocks/struts, or both rear shocks. If you only replace one, you’ll end up with an imbalance in damping rates, and that can lead to pulling during braking, instability in turns, or just a generally weird feel. You want consistent control across the axle.
Installation Precision: This isn’t a job for ‘good and tight.’ You absolutely need a torque wrench. The factory specifications are there for a reason – too loose, and things can rattle or come apart; too tight, and you can strip threads or damage components.
- Top Mount Nuts: Usually in the range of 35–45 lb-ft.
- Lower Mounting Bolts: Often higher, around 70–90 lb-ft.
These are general guidelines. Always consult your vehicle’s specific service manual for the exact torque values. Every car is different, and getting this right prevents headaches down the road.
Post-Repair Validation & Alignment
Alright, you’ve got the new shocks in. Now, don’t just hand the keys back. You need to validate that repair.
- Road Test: Take the car out. Find that bump or dip that used to send you bouncing – it should now settle in one smooth motion. Get it up to highway speed and see how it handles those crosswinds. That ‘drifting’ sensation should be gone.
- Final Bounce Test: Repeat the bounce test at each corner. Push down, let go. It should rebound once and stop. If you still get multiple bounces, something’s wrong, or you’ve got another issue.
Don’t Forget Alignment:
This is a step many DIYers miss, and some shops even skip it if you don’t ask. Anytime you mess with suspension components, especially struts, you’ve changed the geometry. Even if it feels better, the alignment – particularly caster and toe – can be off. New shocks can actually make existing misalignment more noticeable. A proper alignment check and adjustment is a smart, necessary final step. It protects your new tires and ensures the car tracks straight and true.
Cost, Risk & The Bigger Picture
Let’s talk brass tacks: what’s this going to cost you, and when is it time to think about the bigger picture?
| Repair Type | DIY Cost (Parts Only) | Shop Cost (Parts & Labor) | Secondary Risk (If Done Improperly) |
|---|---|---|---|
| Front Struts (2) | $200 – $600 | $800 – $1500 | Noise, mount failure, or premature wear due to incorrect torque. |
| Full Set (4) | $400 – $1200 | $1500 – $2500 | Mismatched damping rates if only one end is done, leading to instability. |
(Note: These are rough estimates. Prices vary wildly by vehicle, part quality, and shop labor rates.)
I’ve always used a practical rule of thumb in my shop: If the cost of this repair, or any major repair, starts to creep above 40% of your car’s current market value, and it’s got over 100,000 miles on the clock, you really need to consider the bigger picture. Are other wear items like control arm bushings or ball joints going to need replacement soon? Are you just throwing good money after bad? Sometimes, it’s better to put that money towards a newer, more reliable vehicle. It’s a tough call, but it’s one you should make with all the facts.
Prevention & Monitoring
Okay, so how do you keep these things healthy and spot problems early? It’s pretty straightforward, but it takes a little attention.
-
Keep ’em Clean: If you drive on dirt roads, gravel, or through salted winters, make an effort to rinse off your lower suspension and those shiny piston rods regularly. Road grime and salt are abrasive and will chew up those seals faster than anything.
-
Regular Inspections: Every time you’re under the car for an oil change, take a minute to look at your shocks and struts. You’re looking for any shiny, oily film on the body or around the piston rod. That’s a tell-tale sign of fluid escaping, and it means the seal is compromised.
-
Annual Bounce Test: Do that bounce test I talked about earlier, once a year. It’s a quick, free way to catch a gradual loss of effectiveness before it becomes a major handling issue.
-
Tire Pressure & Alignment: This is basic maintenance, but it directly impacts your suspension. Proper tire inflation reduces unnecessary stress on your dampers, and a good alignment ensures everything is working together as it should. Don’t neglect these.
