Stabilizer Bar Clunks & Body Roll: My 25-Year Fix-It Guide
Alright, let’s talk about that clunking noise you’re hearing from the front end, especially when you hit a bump. Or maybe your ride just feels a little too “boat-like” in the corners. If that sounds familiar, then we’re probably looking at your stabilizer bar system. After more than two decades wrenching on cars, I can tell you these parts are some of the most common culprits for front suspension issues on just about any modern vehicle.
You might call it a sway bar, an anti-roll bar, or a stabilizer bar – doesn’t matter, it’s all the same thing. Its main job is to keep your car’s body from leaning too much when you turn. It does this by connecting the left and right sides of your suspension with a torsion bar. When one wheel goes up, the bar twists, transferring that force to the other side, which helps keep the chassis level.
But here’s the catch: that twisting action puts a ton of stress on two critical wear points: the bushings (where the bar mounts to the frame) and the end links (which connect the bar to the suspension). When these wear out, your symptoms will start subtle, but they’ll get worse, and fast.
What You’ll Hear & Feel: My Diagnostic Checklist
When a customer comes in with a suspension noise, I’ve got a mental checklist. For stabilizer bar issues, these are the big three:
1. The “Solid Clunk” Over Bumps
This is the most common complaint. You’ll hear a sharp, metallic clunk or knock when one wheel hits a pothole, a speed bump, or even just a driveway curb. Think of it like a sudden “thud” that you can actually feel through the floorboard. This happens because the stabilizer bar only twists when one side of the suspension moves independently. With worn parts, that sudden load gets transferred through loose joints, and you get that unmistakable noise. In my experience, this clunk usually comes from worn end links more often than the main bushings, but both can cause it.
2. Excessive Body Roll in Corners
If your car feels like it’s leaning too much when you take a turn, especially during that initial “turn-in” as you start to corner, then your stabilizer bar bushings are likely shot. When those rubber bushings degrade, the bar can rotate a bit in its mounts before it starts doing its job. This delays its stabilizing effect. You’ll really notice it during quick lane changes on the highway or when taking an exit ramp a little too fast.
3. Creaking or Popping at Low Speeds
This one usually shows up during slow, tight turns, like when you’re parking or maneuvering in a lot. It’s often a dry, hardened, or cracked bushing binding up as the bar twists. Sometimes the noise will come and go depending on temperature or how much load is on the suspension, but the wear is already there. It’s not going to fix itself.
How I Diagnose It (and Rule Out Imposters)
Front-end clunks are notoriously tricky. A worn ball joint, a failing strut mount, or even a loose control arm can all sound a lot like a bad sway bar. The key is isolating the source, and that means getting the car up and doing some targeted testing. Here’s how I approach it in the shop, and how you can narrow it down at home.
| Symptom | Most Likely Stabilizer Culprit | Common Imposters | My Go-To Test to Confirm |
|---|---|---|---|
| Front-end clunk over bumps | Worn end link ball joints or loose bar-to-frame bushings allowing lateral play. | Damaged strut mount, worn lower control arm bushings, loose ball joint, or subframe mount bolts. |
With the vehicle on the ground, turn the steering wheel 20–30° side to side. Listen for the clunk and watch for any independent movement in the end links. Then, with the car on jack stands, use a pry bar to check for play in the end links and around the bar-to-frame bushings. |
| Excessive body roll in corners | Degraded or cracked bushings reducing the torsional stiffness of the bar. | Worn shock absorbers, sagging coil springs, or failed control arm bushings. |
Perform a controlled bounce test: push down hard on each fender and release. If the car bounces more than once, suspect shocks first. For bushings, get under the car and use a pry bar to check for movement between the bar and its mounts. |
| Creaking or popping during low-speed turns | Dry, hardened, or split rubber bushings binding under load. | Dry lower ball joint, worn control arm bushing, or binding tie rod. |
This is a classic bushing test: spray a silicone-based lubricant generously onto the suspected bushings. If the noise disappears temporarily, even for a few days, you’ve found your culprit. And please, never use petroleum-based sprays like WD-40 on rubber – it’ll just make things worse in the long run. |
One more thing: a rhythmic clicking during sharp turns is usually a failing CV joint, not a sway bar. If that’s your symptom, check out our other guides on CV joint vs. suspension knock and knocking noise when coasting.
Why These Parts Give Up the Ghost
It’s not just “old age” that kills these components; there are specific reasons they fail. Knowing them helps you understand what you’re looking for during inspection and how to prevent future issues.
Stabilizer Bar End Links
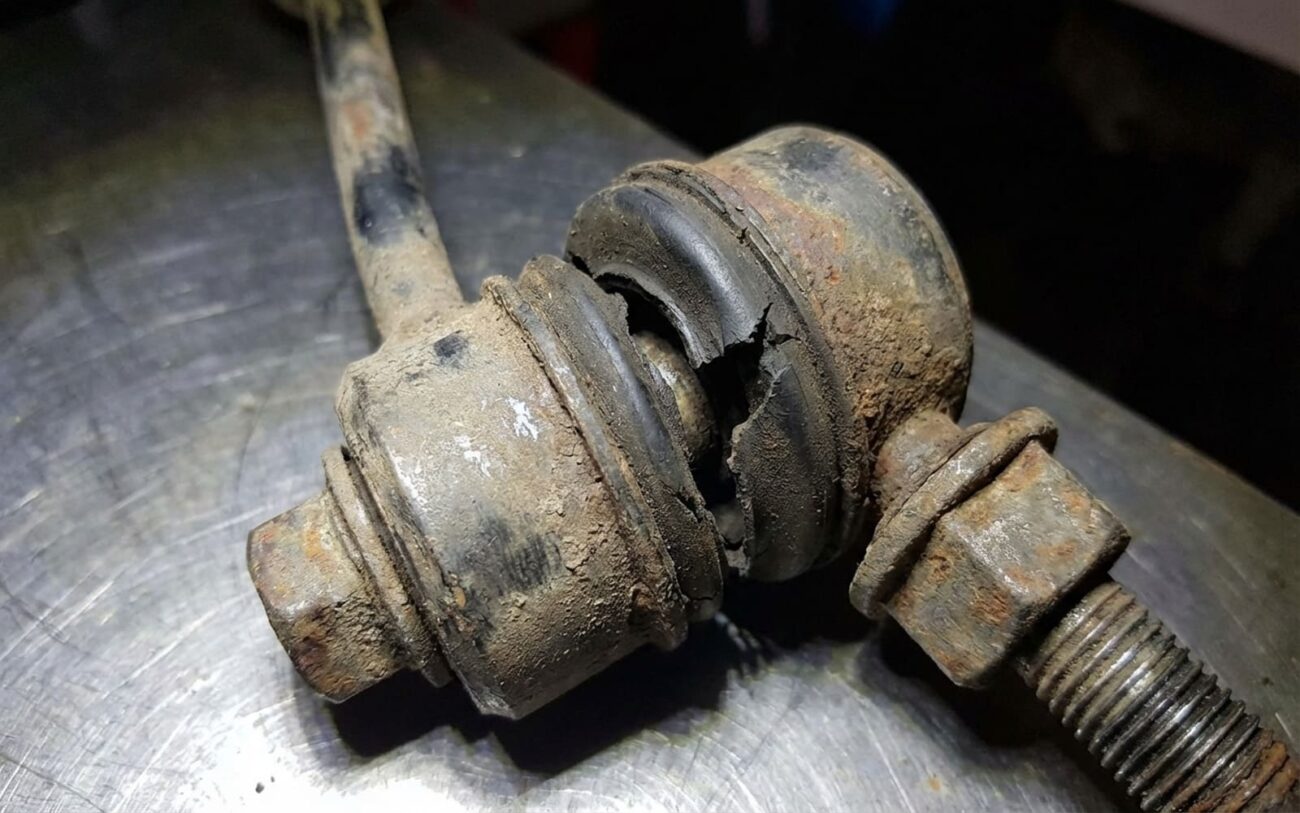
End links almost always fail because their internal ball joint loses lubrication. Most links have a small rubber boot that’s supposed to keep grease in and dirt out. But once that boot tears – and it often does, thanks to age, road debris, or even improper installation – the joint dries out. Then, dirt and grit get in there, acting like sandpaper, and the joint wears rapidly. I see this all the time, especially on older SUVs and crossovers. Once that joint develops play, that’s when you start hearing the telltale clunking.
Stabilizer Bar Bushings
Bushings fail differently. They’re typically made of rubber, and rubber just degrades over time. Heat, ozone (from the air), exposure to oil, or even road salt will harden and crack the material, making it lose its elasticity. Think about it: the stabilizer bar twists thousands of times over its life. A worn, stiff bushing can’t properly absorb that movement, leading to noise and a reduction in how effectively the bar works. Some vehicles use polyurethane bushings, which are generally tougher and resist cracking better than rubber, but they can still dry out or bind if they’re not properly lubricated or if their mounting hardware loosens up.
Pro Tip: Always Check the Hardware
Before you condemn a bushing, always double-check the mounting brackets and the subframe bolts. A loose or damaged bracket, or even a subframe bolt that’s backed out a bit, can mimic bushing wear perfectly. It allows the bar to shift, creating the exact same clunk as a worn-out bushing. I’ve seen customers waste money on parts when all they needed was a wrench.
Getting It Fixed: Your Options & My Advice
Both end links and bushings are generally straightforward repairs, making them good candidates for a DIYer with the right tools and a bit of patience. But there are critical steps you absolutely cannot skip.
Replacing Stabilizer End Links DIY-FEASIBLE
You’ll need a floor jack, jack stands, penetrating oil (essential for rusted nuts!), a socket set (usually 15–18mm), an Allen key (sometimes needed to hold the stud), and a torque wrench. The process is pretty simple: jack up the car, remove the old links, install the new ones.
The absolute most critical step here? Torquing those nuts with the suspension under normal load. What does that mean? It means the car should be sitting on its wheels, or at least the suspension should be compressed to its normal ride height. If you torque the links with the suspension hanging freely (like when it’s fully jacked up), you’ll pre-load the bushings inside the new link, and I guarantee you’ll be replacing them again much sooner than you should. Torque specs typically range from 35–65 ft-lbs for the strut side and 15–45 ft-lbs for the bar side, but always check your specific vehicle’s service manual.
Replacing Stabilizer Bar Bushings DIY-FEASIBLE
First, you’ll need to remove the end links (see above). Then, unbolt the mounting brackets that hold the bushings to the frame. Once the old bushings are off, clean the stabilizer bar surface thoroughly – any rust or debris will chew up the new bushing. Apply a good silicone-based lubricant to the inner sleeve of the new bushing before installation. Make sure the bushing’s split (if it has one) is oriented correctly, usually facing the rear of the vehicle or as per the manufacturer’s instructions. Torque the bracket bolts to spec, typically 25–40 ft-lbs.
A big note of caution: If your stabilizer bar is tucked away behind the subframe, this job can quickly go from DIY-feasible to a Professional Only task. Some vehicles require dropping the subframe, which is a whole different ballgame and not something I’d recommend for a beginner.
My Rule: Replace Both Sides, Always
Look, if one end link or bushing has failed, the one on the opposite side is usually not far behind. Common sense (and my experience) says to replace both links and both main bushings at the same time. It restores proper function to the whole system and saves you from having to get back under the car in a few months to fix the other side. Do it right, do it once.
Validating the Repair: Don’t Skip This Step
Once everything’s bolted back up, you’re not done yet. You need to confirm your work. Take the car for a drive on that specific bumpy road or stretch of pavement that used to make the noise. The clunk should be completely gone. If it’s still there, even faintly, you’ve either missed something or the noise was coming from a different component all along.
After the test drive, and with the vehicle back on the ground, try to move each new end link by hand. Give it a good shake. Then, use a pry bar to check for any play in the ball joint. There should be absolutely zero movement. For the main bushings, repeat the pry bar test near the mounting bracket – again, no movement between the bar and the bushing. If you find any play, re-check your torque specs and installation.
Alignment is Absolutely Critical
Here’s what many DIYers overlook, and it’s a mistake I see often: get a wheel alignment after any suspension work. Even replacing just end links or bushings can slightly change your suspension geometry, especially the toe and camber. Skipping an alignment will lead to uneven tire wear, and your car won’t track straight, costing you more in tires down the road. It’s cheap insurance for your new parts and your wallet.
Cost, Risk, and When to Walk Away
Replacing stabilizer bar components is generally a high-value repair with relatively low risk, assuming you follow the proper procedures. It’s one of those fixes that makes a noticeable difference for a reasonable cost.
| Repair Type | DIY Cost (Parts) | Shop Cost (Est.) | Success Rate | Secondary Risk (If Done Wrong) |
|---|---|---|---|---|
| Replace front end links (pair) | $40 – $120 | $250 – $400 | ~100% (if diagnosed correctly) | Incorrect torque can lead to premature failure or separation; using the wrong length link can bind the suspension. |
| Replace bar bushings (pair) | $20 – $60 | $150 – $300 | ~100% (if diagnosed correctly) | Misaligned bushings will wear out fast; loose brackets can cause violent bar shifting. |
Now, here’s the bigger picture: while these specific repairs are usually affordable, sometimes they’re just the tip of the iceberg. If you get under there and discover worn control arm bushings, bad ball joints, or leaking struts, your total suspension repair bill can climb fast. As a general rule of thumb I use in my shop: if the total estimated cost for all necessary suspension work starts to exceed about 60% of your car’s current market value as reliable transportation, it’s time to seriously consider the long-term viability of keeping that vehicle. Sometimes, it’s just not worth pouring good money after bad.
Prevention and Maintenance Tips from My Bay
-
Regularly rinse your car’s undercarriage, especially if you live in an area with road salt or heavy grime. That stuff eats away at rubber and metal.
-
Avoid spraying rubber bushings with petroleum-based cleaners or lubricants. They cause the rubber to swell, soften, and crack prematurely. Stick to silicone-based protectants if you want to keep them supple.
-
Make a quick visual inspection part of your routine maintenance. During oil changes, take an extra minute or two to look at the end links and bushings. It’s 60 seconds that can save you a headache later.
-
Grab the end links and give them a good shake. If you feel any play or movement in the ball joint, they’re worn. A torn rubber boot on an end link is an immediate red flag – it means the grease is gone and dirt is getting in.
-
For bushings, look for deep cracks, splits, or signs that the rubber has pulled away from its metal sleeve. If it looks dry and brittle, it’s probably not doing its job anymore.
