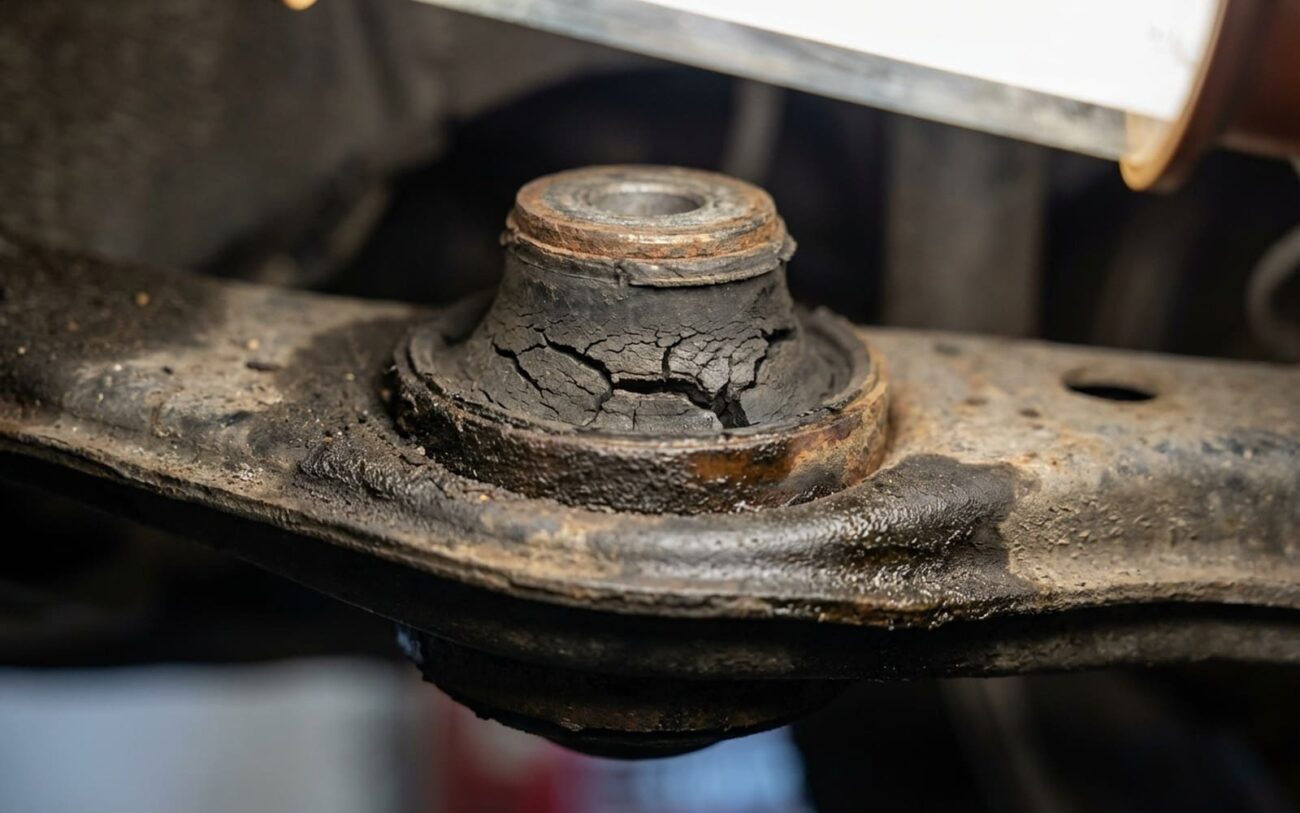
Alright, let’s talk suspension bushings. After 25 years under cars, I can tell you these little rubber or polyurethane pieces are often overlooked, but they’re absolutely critical. They’re what connect your suspension components—control arms, sway bars, shock mounts—to the vehicle frame, allowing controlled movement while absorbing road shock and noise. When they go bad, your car doesn’t just feel loose; it becomes a safety hazard. And trust me, ignoring them is a surefire way to turn a relatively simple fix into a much more expensive headache down the road.
What You’ll Notice & How I Pinpoint the Problem
When bushings start to give up, you’ll feel it, hear it, and sometimes even see it. The most common complaint I get is a solid, dull clunk. It’s not a light rattle or a squeak; it’s a heavy thud, usually from one corner, especially when you hit a bump or a pothole. It tells me something’s moving that shouldn’t be. Now, that same clunk can come from a bad ball joint or a worn strut mount, but if it’s isolated to a control arm, a bushing is often the first place I look.
Another big one is vague steering. The car might feel like it’s wandering a bit in its lane, or the steering wheel just doesn’t snap back to center like it used to after a turn. That looseness means your suspension geometry is shifting under load, which is bad for handling and, more importantly, safety. If the car pulls hard to one side when you hit the brakes, that’s a huge red flag. I see this often with a degraded front control arm bushing, where the whole arm shifts rearward under deceleration.
Visually, I’m always looking for cracked, split, or extruded rubber. On the aftermarket polyurethane bushings, you might see the material bulging or tearing out of its metal housing. But sometimes, the most telling clue isn’t direct; it’s uneven tire wear. Specifically, look for cupping or scalloping on the inner or outer edges. This happens because worn bushings let the alignment change dynamically as you drive, especially when cornering or accelerating. Just remember, worn shocks or unbalanced tires can cause similar wear, so always cross-check everything.
Diagnosing bushing wear isn’t about guessing; it’s about a systematic approach. You need the right tools: a good flashlight, a sturdy pry bar (I prefer a 24-inch minimum), and most importantly, the ability to safely lift the vehicle with a jack and jack stands. Always chock the wheels and work on a level surface. Never, ever rely on just a floor jack.
The key, in my experience, is isolating movement. A healthy bushing allows controlled flex. A worn one allows metal-to-metal contact or excessive deflection. This table is how I typically break down the symptoms and confirm the source:
| Symptom | Likely Bushing Culprit | Common Mimics (Other Parts) | My Go-To Test to Confirm |
|---|---|---|---|
| Clunking noise over bumps | Worn front or rear control arm bushings | Loose strut mount, failing ball joint, bad CV axle or driveshaft |
With the wheel off the ground, use a pry bar between the control arm and subframe. If you see more than 1/4 inch of visible movement at the bushing, it’s toast. |
| Vague steering, vehicle wandering | Front control arm bushings (especially the rear bushing on a trailing-type arm) | Worn tie rod ends, failing steering rack, low tire pressure |
With the vehicle on the ground (suspension loaded), have someone rock the steering wheel quickly back and forth. If the control arm shifts significantly before the wheels respond, your bushings are shot. |
| Vehicle pulls during braking | Degraded front lower control arm bushing | Seized brake caliper, collapsed brake hose, alignment toe error |
Lift the car safely. Use your pry bar to push and pull the control arm along its fore-aft axis. Any excessive play or a noticeable clunk points to a bushing failing under load. |
| Squeaking over slow bumps | Dry or cracked stabilizer bar link or frame-mounted bushings | Dry ball joint, failing strut mount |
Mist suspect bushings with water. If the squeak stops temporarily, it’s usually from dry rubber binding. This is a quick diagnostic, not a fix. |
| Uneven tire wear (inner edge cupping) | Failed rear trailing arm or control arm bushing | Worn shock absorber, AWD issues from tire mismatch |
While the car is on an alignment rack, measure camber. Then, lift the control arm slightly with a jack. If the camber changes significantly, the bushing isn’t holding geometry. |
Why Bushings Give Up the Ghost
Bushing failure is rarely sudden. It’s usually a slow breakdown, a cumulative effect of environmental and mechanical stress. Rubber naturally hardens and cracks over time. Ozone exposure, UV radiation, and temperature swings are the main culprits here. Polyurethane bushings, while often more durable, aren’t immune; they can suffer from hydrolysis, which is water absorption that breaks down the polymer bonds, causing them to swell and crumble from the inside out.
A Note on Contamination:
I’ve seen this too many times: using petroleum-based cleaners, brake fluid, or degreaser on or near bushings absolutely destroys them. These chemicals cause rubber to swell, soften, and lose all structural integrity. I’ve had brand-new control arms come back in months because someone hosed them down with engine cleaner during installation. Don’t do it.
Over-flexing is another silent killer. Aggressive driving, off-road use, hard cornering, or even just hitting a curb can force a bushing beyond its designed deflection limits. And sometimes, it’s just a weak factory design. I’ve seen certain models, like the Dodge Charger and Chrysler 300 from the early 2010s, where suspension bushings were a known weak point. Always check for technical service bulletins (TSBs) for your specific make and model; it’s a smart first step.
Getting the Job Done Right: Repair Options
Professional Equipment Required
Let me be clear: pressed-in bushings demand a hydraulic press and specific installation sleeves. Trying to hammer these in with a vice or a C-clamp is a recipe for disaster. You’ll either damage the control arm or pre-load the rubber incorrectly, causing it to fail almost immediately. Don’t waste your time or money.
Stabilizer Bar Link Bushings DIY Feasible
Pressed-in Bushings (Standalone) Professional Only
Complete Component Assembly Often Smartest Path
Temporary Squeak Suppression Short-Term Only
After the Wrenching: Validation is Key
After any bushing repair, validation is absolutely critical. For stabilizer bar links, I always take the car on a known rough road. The clunk or squeak should be completely gone. I also visually inspect the links through the full range of suspension travel, just to make sure they aren’t contacting the frame or brake lines. You’d be surprised what can rub.
For any control arm or pressed bushing repair, a professional wheel alignment is non-negotiable. I can’t stress this enough. The alignment printout must show all values—camber, caster, and toe—within manufacturer specifications. While the car is on the rack, I always do one last visual check of the new bushings at ride height. They should sit flat and centered. If the rubber looks twisted or stressed, it’s a sign the arm wasn’t torqued in the proper ride position, and that bushing will fail prematurely.
The Bottom Line: Costs & Smart Decisions
| Repair Type | DIY Cost (Parts) | Shop Cost (Parts & Labor) | Secondary Risk if Failed |
|---|---|---|---|
| Stabilizer Bar Links | $30 – $60 (pair) | $200 – $350 | Handling imbalance affecting cornering stability. |
| Front Control Arm Bushing (Pressed) | $40 – $80 | $300 – $500 | Bushing ejection, loss of steering control. |
| Complete Control Arm Assembly | $120 – $300 | $450 – $800 | Component separation if mounting bolts are under-torqued. |
Here’s my rule of thumb: if the estimated repair cost for a single component exceeds 40% of your car’s current market value, you need to pause and reassess. For high-mileage cars, I often recommend replacing full control arms with quality aftermarket units—brands like Moog or Energy Suspension are usually solid choices. They offer a good balance of durability and value, and you’re getting fresh ball joints at the same time.
Keeping Them Healthy: Prevention & Monitoring
My Best Practices for Bushing Longevity
-
Avoid chemical exposure. I’ve said it before, but it bears repeating: never spray brake cleaner, degreaser, or any petroleum-based product near rubber bushings. Stick to water-based or silicone formulas if you need to clean around them.
-
Routine visual checks. Every time you’re under the car for an oil change or tire rotation, take a few minutes. Look for cracks over 1/4 inch long or 1/8 inch wide—those are active failures.
-
Watch for “witness marks.” These are shiny, polished areas on metal parts near the bushing. They tell you there’s metal-on-metal contact happening due to excessive movement, which means the bushing isn’t doing its job.
-
Annual pry bar test. Once a year, safely get the car on jack stands and perform the pry bar test on your major suspension bushings. Anything more than 1/4 inch of deflection is a sign of trouble brewing.
