Alright, let’s talk about that rhythmic knock or click you’re hearing. The one that only shows up when you lift your foot off the gas to coast, and then vanishes the second you touch the throttle again. If that sounds familiar, you’re almost certainly dealing with a driveline issue, usually a worn Constant Velocity (CV) joint or a driveshaft U-joint. I’ve seen this exact pattern play out hundreds of times in the shop, and it’s a dead giveaway.
The key here is something we call load reversal. Think about it: when you’re accelerating, all the internal components of that joint are pressed tightly together, transmitting power. But when you let off the gas and the engine starts braking the vehicle, that load reverses. Any internal wear, any little bit of slop or backlash, suddenly gets exposed. That’s when those worn parts start clattering against each other, making that distinct knock.
Quick Check: Is it really the driveline?
Now, don’t get me wrong, other things can make noise when you decelerate. But they usually sound different. A failing wheel bearing, for instance, often gets mistaken for this, but it typically produces a constant low hum that changes with speed and might get louder or quieter when you turn the wheel. Suspension bushings or loose control arms? They’ll usually clunk over bumps, not in a smooth, repeatable rhythm that’s tied directly to your road speed. And a worn differential might knock during coasting too, but I often find it behaves differently when cornering – maybe louder on one side, quieter on the other. We’ll dig into how to really pinpoint it in a bit.
How I Pinpoint That Driveline Knock
Driveline noises are tricky, I’ll give you that. So many components rotate at road speed, and they can all mimic each other. But the goal in my shop is always the same: isolate whether that noise is coming from the CV axle, the driveshaft, a wheel end, or somewhere else entirely. The good news? With a logical approach, you can usually nail the culprit without just throwing parts at it.
Getting it on the Lift: The First Step
First things first, we get the vehicle safely up on a lift. This lets us get a good look and, more importantly, put our hands on the components. For that rhythmic knock during deceleration, I’m immediately focusing on the inner CV joints (for front-wheel drive or independent rear suspension) or the U-joints and center support bearing (for rear-wheel drive or 4×4).
My Go-To Diagnostic Moves:
-
Manual Rotation & Feel: With the vehicle safely supported and the drivetrain disengaged (or in neutral), I’ll grab the suspected axle or driveshaft and try to rotate it by hand, back and forth. I’m feeling for any excessive play, clunking, or roughness.
- For FWD/IRS CV Axles: I’ll grab the CV axle near the transmission (the inner joint) and try to wiggle it radially and axially. Any noticeable clunk or more than about 1.5mm (0.06 inches) of axial play usually means that inner tripod or plunge joint is worn out.
- For RWD/4×4 Driveshafts: I’ll rotate the driveshaft by hand, checking each U-joint. A worn U-joint often feels “notchy” or stiff when you rotate it through its arc, or you might feel distinct play. Don’t forget the center support bearing on two-piece driveshafts – sometimes that’s the culprit, and you’ll feel play or roughness there too.
- Chassis Ears & Stethoscope: These are invaluable tools. If I can safely run the car on the lift (some shops have specialized dynos for this, but often it’s just a careful technician), I’ll use chassis ears or a mechanic’s stethoscope to listen directly to the suspected joints while simulating the coasting condition. You can often hear the distinct clatter right from the source. It’s one of the most accurate ways to confirm where that noise is truly coming from.
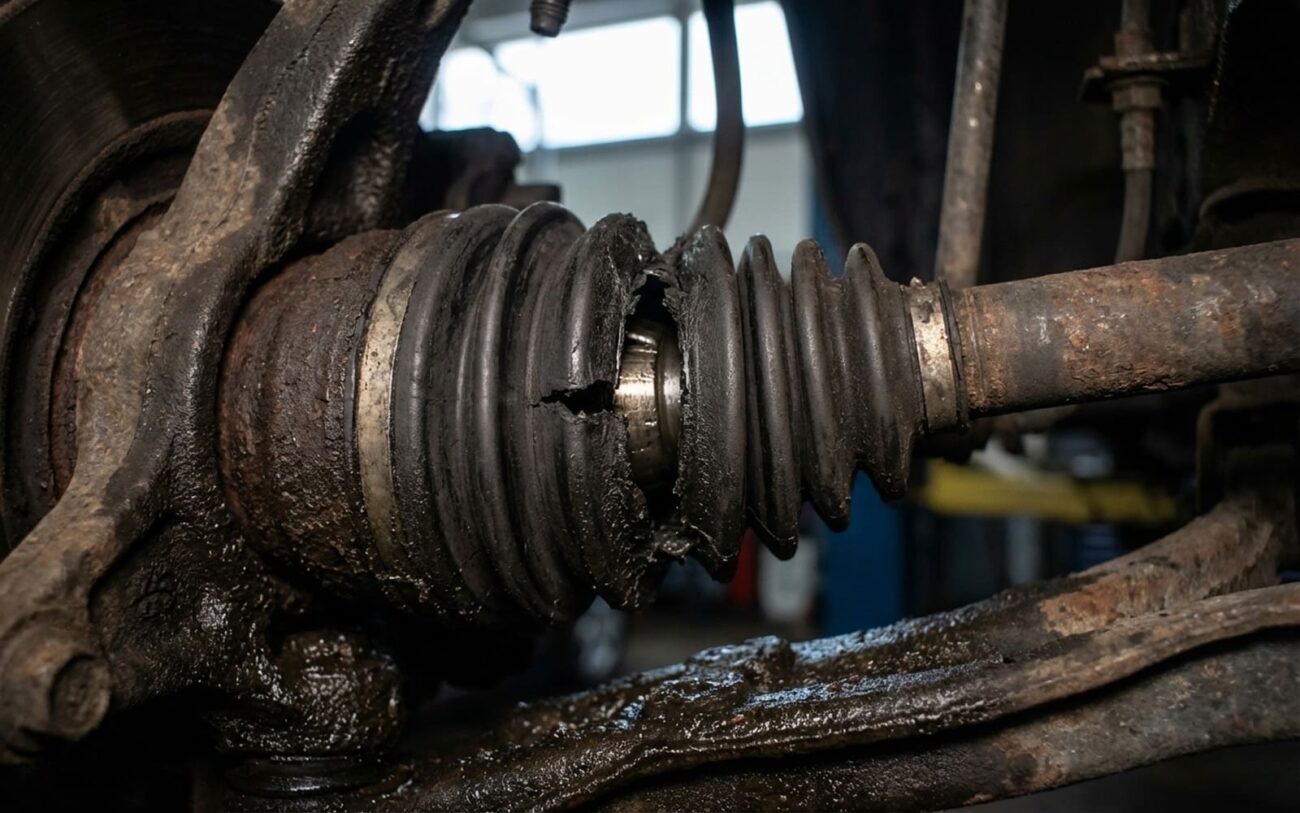
- Visual Inspection: While I’m under there, I’m always looking for torn CV boots (a huge red flag we’ll talk about more), rust, or any signs of impact damage to the driveshaft or axles.
Remember, the goal isn’t just to hear a noise, but to hear the noise, and confirm its location. If the noise disappears when you perform these tests, it might be something else entirely, or it might require the load of the vehicle on the ground to manifest. That’s when a road test with a passenger listening carefully becomes important.
Why Driveline Joints Fail: The Real Reasons
Once you’ve confirmed that rhythmic knock is definitely coming from inside a CV axle or driveshaft, it’s time to understand why it failed. I’ve pulled apart thousands of these assemblies over the years, and the failure modes usually fall into three well-defined categories. There’s no magic or bad luck involved, just physics and mechanics.
1. Manufacturing or Material Defects
While not super common, it does happen. You might get a batch of inner tripod joints that weren’t heat-treated quite right, leading to premature surface spalling (that’s when small pieces of metal flake off). Or maybe a U-joint cross had a casting flaw that led to fatigue cracking down the road. Some vehicle families even have documented issues like this – think known service bulletins covering specific model years with recurring inner joint wear. These aren’t isolated incidents; they’re patterns we see confirmed in the field, and a good technician will know about them.
2. Mechanical Wear Over Time (The Most Common)
This is by far the most frequent culprit. Inside every CV joint, you’ve got precision-machined tracks and rollers or ball bearings. In a U-joint, it’s needle bearings in a cross. These components are designed to move smoothly under load, but after years and hundreds of thousands of cycles, metal wears. It’s just a fact of life. Once that initial clearance builds up, you get backlash – a little bit of slop. That’s what turns into that knock when the load reverses during coasting. It’s rarely a sudden failure; it’s the end result of gradual wear that, for whatever reason, went unchecked.
3. Contamination Due to a Failed CV Boot (The Silent Killer)
This one’s a big deal. The CV boot is there for one critical job: keep the specialized grease in and keep dirt, grit, and water out. Once that boot cracks or splits – and they will eventually, especially in harsh climates – that grease leaks out, and moisture gets in. Water quickly causes rust on those highly polished bearing surfaces, which then leads to pitting and rapid, accelerated wear. I can’t tell you how many times I’ve seen joints that looked perfectly fine externally but were completely destroyed inside because a small boot tear went unnoticed for months. That’s why a torn boot isn’t just a “maybe fix later” scenario; it’s a ticking clock.
Just to be clear, we’re talking about failures that originate and reside within the axle or driveshaft assembly itself. If the noise is coming from a wheel bearing, differential gears, or a loose transmission mount, the diagnosis and repair path is completely different. We’re staying focused here.
Fixing the Knock: Your Repair Options
A Word on Safety & Precision
Look, driveline repairs involve high-torque fasteners and heavy components. You absolutely need to use jack stands, a reliable torque wrench, and always, always consult the vehicle-specific service manual for critical values like axle nut torque. Overtorquing or undertorquing can lead to bigger problems down the road. This isn’t where you cut corners.
Post-Repair Validation: Don’t Skip This Step
Replacing the part isn’t the end of the job; it’s just the beginning of the verification process. A proper validation ensures the noise is truly gone and that nothing else was compromised during the repair. This is where a good technician separates themselves from a parts changer.
After a CV Boot Replacement:
If you only replaced a CV boot, drive the car for about 50 miles, then get it back up and inspect it. There should be absolutely no grease leaking or slung onto the wheel, brake components, or suspension. Also, with the wheels off the ground, cycle the steering from lock to lock. The boot should flex smoothly without pinching, binding, or pulling out of its groove. If it does, your clamps might be too tight, or the boot wasn’t seated properly. You don’t want to do this job twice.
After a Full Axle or Driveshaft Replacement:
For a full CV axle or driveshaft replacement, the road test is non-negotiable. You have to replicate the original conditions: accelerate up to 35–45 mph, then completely let off the gas and coast in gear. That knock should be completely gone. But don’t just listen for the old noise. Listen for any new vibrations – especially at higher speeds – which could indicate a balance issue (common with some aftermarket driveshafts) or improper installation. In the shop, we’ll often recheck with chassis ears or a stethoscope to confirm silence across all components. If you hear anything new or unexpected, stop and investigate before you declare the job complete. Trust me, it’s worth the extra time.
The Bottom Line: Cost, Risk, and Making the Right Call
Let’s talk real numbers and real decisions. The cost of these repairs isn’t just about the part; it’s about labor, the inherent risks, and ultimately, what the car is actually worth to you. Here’s a quick breakdown of what you’re looking at:
| Repair Type | DIY Cost (Parts) | Shop Cost (Est.) | Success Rate | Secondary Risk if Failed |
|---|---|---|---|---|
| CV Boot Kit Replacement | $40–$100 | $250–$400 | 95% | Contamination leads to rapid joint wear; eventual full axle replacement needed. |
| CV Axle Assembly Replacement | $100–$300 | $500–$900 | 98% | Improper installation can damage transmission seal or wheel bearing. |
| Driveshaft Assembly Replacement | $200–$600 | $700–$1,500 | 98% | Improperly balanced shaft causes severe vibration; angle issues can damage transfer case. |
Here’s a rule of thumb I’ve used with countless customers over the years: if the total repair cost approaches or exceeds 40% of your car’s current private-party value (think Kelley Blue Book or NADA guide), it’s time to seriously question whether the repair makes financial sense. I’ve had people spend $1,200 on a driveshaft for a $3,000 truck, and while it’s not “wrong” to do that, it’s a choice you need to make with open eyes. Be honest with yourself about the car’s overall condition and your long-term plans. Sometimes, the smarter move is to invest that money into a more reliable vehicle. It’s a tough conversation, but it’s an important one.
Prevention: The Best Repair is No Repair
The best repair is always the one you never have to do. And when it comes to driveline components, your best defense is simple, regular inspection. It doesn’t take long, and it can save you a lot of money and headaches down the road.
- Get Under There: Twice a year – ideally when you’re rotating your tires or doing an oil change – get under the car and take a good, hard look at every CV boot and visible U-joint.
- Look for the Red Flags: You’re looking for cracks, splits, or any signs of grease flung all over the back of the wheel or suspension components. A damaged boot is the number one precursor to joint failure, and catching it early can make the difference between a cheap boot kit and an expensive axle replacement.
- Train Your Ears: Pay attention to your car’s sounds. A faint clicking during slow, tight turns (like pulling out of a parking spot) is classic outer CV joint wear. That’s a different noise than the inner joint knock we’ve been discussing, but it’s still a warning. Catching these early allows you to plan the repair on your terms, not when the part decides to fail on the highway.
Proactive Monitoring for Known Issues
If you’re driving a vehicle with known driveline issues – like certain CVT-equipped models that run hot, or older 4x4s with high-angle U-joints – stay extra vigilant. Heat and extreme operating angles accelerate wear significantly. Prevention isn’t just about routine maintenance; it’s about being aware of your specific vehicle’s vulnerabilities.
