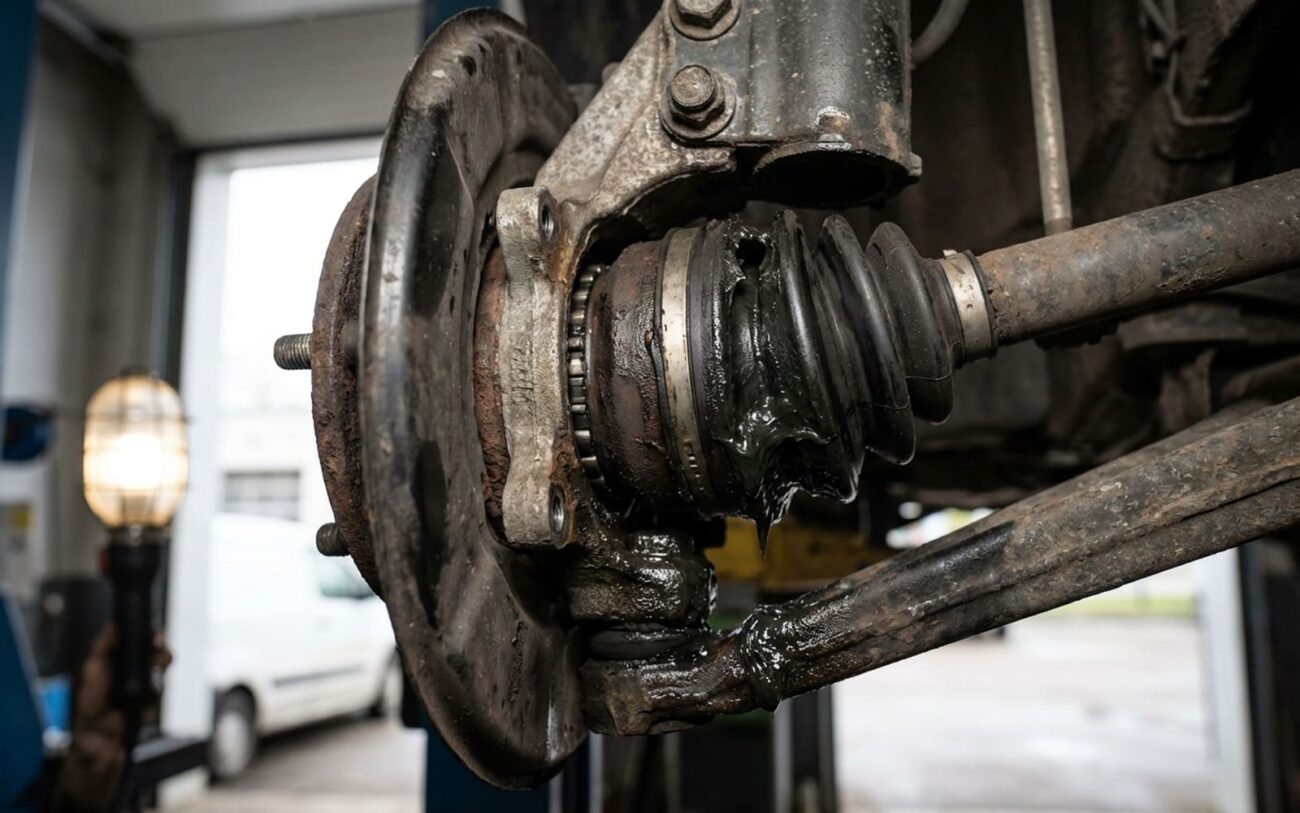
If you’re driving a Renault Duster or Kaptur and you’re hearing a clicking noise when you turn, you’re not imagining things. And you’re definitely not alone. In my 25+ years under the hood, I’ve seen a lot of patterns, but few are as consistent as the early CV joint issues on these models. We’re talking 40,000 to 50,000 miles, sometimes even less, when most cars should go twice that without a peep from the driveline.
Here’s the thing: it’s almost never the CV joint itself failing first. It always starts with the boot. That rubber cover, designed to keep the good stuff in and the bad stuff out, just doesn’t hold up. Once it goes, it’s a countdown to a much bigger problem.
My Take
“Think of a CV boot like a dive suit for a precision watch. If that suit gets a tiny tear, water and grit get in, and that watch is toast in no time. Same deal for your CV joint.”
What I Look For: The Telltale Signs of a Bad CV Joint
When a customer comes in with a suspected CV joint issue, there are three main things I’m listening and looking for. These usually tell the whole story.
1. That Rhythmic Clicking Noise
This is the big one, almost a dead giveaway. You’ll hear it most when you’re turning at low speeds, especially with the steering wheel cranked near full lock – think parking lots or tight U-turns. The sound is sharp, metallic, and it speeds up as your wheel speed increases. That clicking is the internal ball bearings, which should be rolling smoothly, clunking through worn or pitted tracks inside the outer CV joint. If you hear it, the joint is already damaged.
2. Grease Splatter
Get down and look behind the wheel. If you see thick, dark grease flung around in a radial pattern on the inside of your wheel, the suspension components, or even the brake caliper, that’s a huge red flag. It means the boot has torn or come loose, and the lubricant is escaping. That grease is supposed to be inside the joint, keeping everything happy.
3. Vibration Under Acceleration
This symptom often feels like a shudder or shake through the floorboard or seat, particularly when you’re accelerating from a stop or putting power down. It tends to get worse the more load you put on the drivetrain. This usually points to a worn inner CV joint, where the internal components are causing uneven rotation as they try to transmit power.
Is It Really the CV Joint? How I Confirm It.
Sometimes other things can mimic CV joint symptoms. Here’s my quick checklist to make sure we’re not chasing the wrong problem.
-
Clicking in Turns: If it’s a CV joint, the clicking will usually increase significantly with steering angle and load. I’ll drive the car in tight circles, both forward and reverse, listening carefully. If it’s a loose wheel bearing or something caught in the brakes, the sound often won’t change as dramatically with steering input.
-
Grease Slinging: This one’s pretty obvious. If you see grease, clean the area thoroughly, then take a short drive and re-inspect. CV grease will spray out from the center of the axle in a distinct radial pattern. If it’s a steering rack boot or wheel hub seal, the grease pattern will typically be different, often more localized.
-
Vibration Under Acceleration: This is the trickiest one to diagnose, as many things can cause vibration. For a CV joint, the vibration will be distinctly load-dependent – it gets worse when you’re on the throttle and often lessens or disappears when you coast. An imbalanced driveshaft, bad engine mount, or tire imbalance might vibrate constantly or at specific speeds, regardless of acceleration.
Why These Renaults Are Prone to Early Failure
Like I said, the failure sequence is almost always the same: boot first, then the joint. A CV joint is a sealed unit, packed with special high-temperature molybdenum grease. It’s designed to last the entire life of the vehicle, assuming that boot stays sealed up tight. But on the Duster and Kaptur, we consistently see premature degradation of those boots.
The “Grinding Paste” Effect:
Once that boot is breached, it’s game over. Road salt, water, dirt, and grit get in and mix with the remaining grease. What you end up with isn’t a lubricant anymore; it’s an abrasive grinding paste. This paste rapidly accelerates wear on those precision ball bearings and their race tracks. That’s why a joint designed for 150,000 miles can be completely destroyed in 40,000 or less.
Another factor I’ve noticed is the boot clamping system. Sometimes, the original clamps just don’t hold tension well, or maybe they weren’t installed perfectly from the factory. A loose clamp lets the boot pull away, even without a tear, and the result is the same: contamination gets in, grease gets out. It’s a recognized weak point in the design or the component supply chain for these specific Renault models.
Your Repair Options: What I Recommend
Once you’ve confirmed a CV joint problem, you’ve got a few ways to go. Here’s how I approach it, from the simplest check to a full replacement.
Critical Torque Spec: The Axle Nut
This isn’t just any nut. The final drive axle nut is a torque-to-yield fastener, meaning it stretches when tightened. Renault specifies a high torque value (often around 175 Nm) followed by an additional angle turn. You absolutely must replace this nut with a new one every time the axle is removed. Reusing the old nut risks it backing off, which can lead to catastrophic wheel separation. Don’t cheap out here – it’s a major safety item.
Visual Inspection & Cleaning My First Step
CV Boot Kit Replacement Advanced DIY / Pro
Complete Axle Assembly Replacement DIY-Feasible
My Final Checks: Making Sure the Repair Actually Worked
Once the repair is done, don’t just drive off and assume everything’s perfect. I always do a few things to make sure the job’s solid.
-
For a Boot Replacement: Drive about 50 miles, then get the car back on the lift. Inspect the boot carefully. Look for any fresh grease leaking out, and make sure the accordion folds aren’t twisted or binding. A properly installed boot should look neat and stay sealed.
-
For a Full Axle Replacement: Perform a thorough road test. Drive it hard, accelerate quickly, and make tight turns in both directions. Listen for any clicking, clunking, or new vibrations. If everything sounds and feels good, I’ll advise the customer to bring it back after the first 100 km (about 60 miles) so I can re-torque that axle nut. It’s a good habit to account for any settling of the components.
Cost, Warranty, and What to Expect
Let’s talk about what this usually costs. These are rough numbers, but they’ll give you an idea of what to expect from a professional shop.
CV Boot Kit
This is the shop cost, including labor. The kit itself is usually $30–$80. It’s labor-intensive, but cheaper than a full axle if the joint is still good.
Full Axle Replacement
This is the typical professional shop rate per side. Quality aftermarket axles usually run $100–$250. This is the go-to fix once the joint is making noise.
Temporary Split Boot
I don’t recommend these. They’re cheap and easy, but I’ve seen a very low success rate. They often fail quickly, leading to rapid joint destruction anyway. Save your money and do it right.
Most quality aftermarket axles come with a decent warranty, often 1-3 years. Just make sure you’re getting a reputable brand, not the cheapest thing you can find online. The labor warranty from a good shop is usually 90 days to a year.
How to Keep This From Happening Again So Soon
Nobody wants to pay for this repair twice. Here’s what I tell my customers to look out for to prevent premature CV joint failure.
My Prevention Checklist
-
Inspect the boots at every oil change. Seriously, just a quick look. Check for any cracks, splits, or that telltale grease misting on the inner rim of the boot. Catching a small tear early can save the whole joint.
-
Listen for faint clicking. Pay attention during low-speed turns. If you hear even a hint of clicking, get it checked out. Early detection means you might just need a boot, not a whole axle.
-
Avoid aggressive off-roading or deep water crossings. These can overstress the boots, causing them to tear, or allow water and contaminants to get past the seals.
-
Use high-quality replacement boots. If you do replace a boot, make sure it’s a good one. Cheap aftermarket rubber can become brittle much faster, especially in cold climates, and you’ll be right back where you started.
