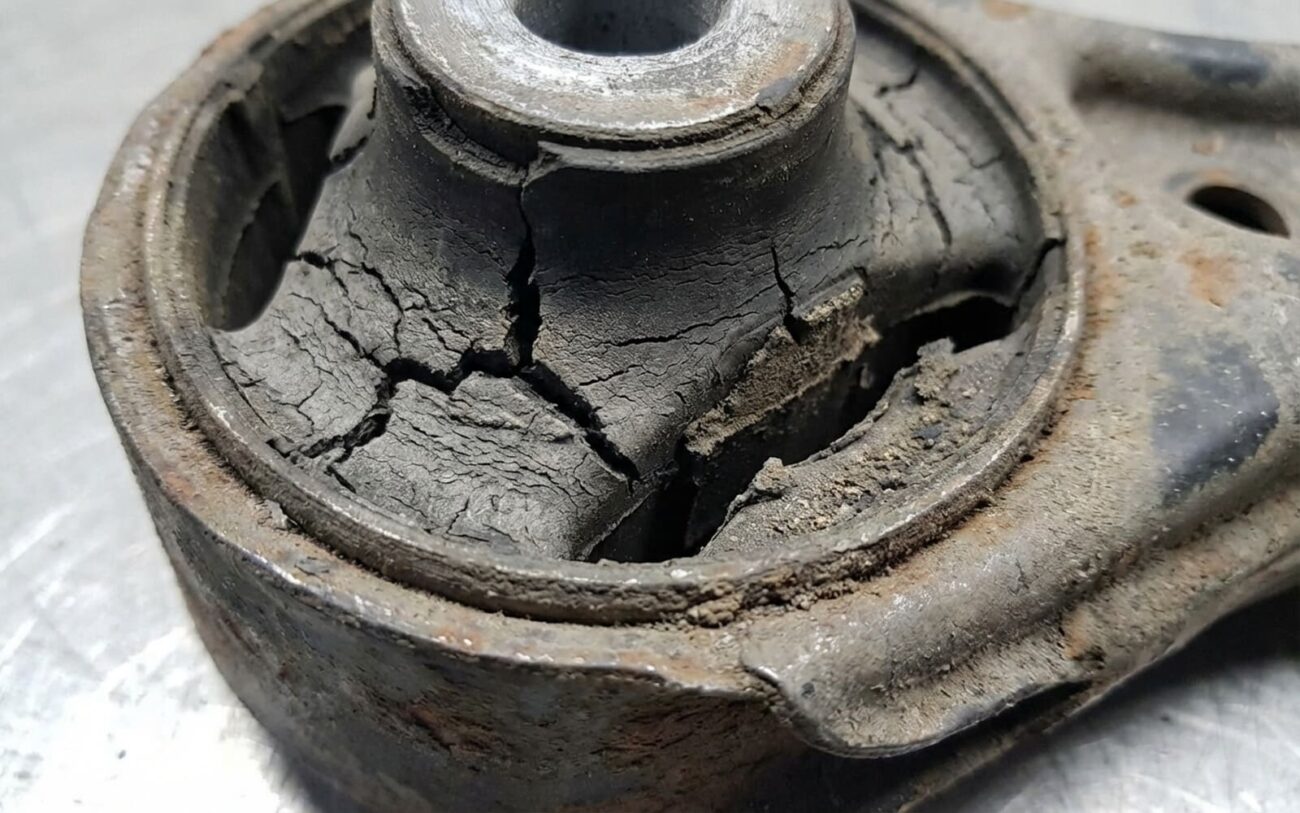
Alright, let’s talk about that bone-jarring ride. After 25 years turning wrenches, I can tell you that when a car starts feeling like it’s got wooden wheels, and you’ve already checked the easy stuff like tire pressure, the first place my mind goes is the suspension bushings. They’re small, but they make a world of difference, and when they go bad, your car will let you know.
What Your Car’s Telling You: The Symptoms
The most common complaint I hear? A ride that’s just plain harsh. It’s not “firm,” it’s a jarring, unfiltered thump that comes straight through the chassis, even over small cracks and bumps. You’ll feel every imperfection in the road. This is what engineers call NVH – Noise, Vibration, and Harshness – and it’ll be cranked up to eleven. I often notice customers complaining about it getting worse on cold mornings or in colder weather, which is a big diagnostic clue right there.
Beyond the ride quality, you might notice your steering feels less precise. The car might start “tramlining”—that’s when it seems to want to follow every rut or groove in the pavement, pulling you left and right. You’ll be making constant small corrections, and that smooth, centered feel you used to have? Gone. It’s like the steering has developed a mind of its own.
Another thing I see a lot is what I call “suspension binding.” When you roll over a driveway curb or a speed bump, the suspension doesn’t just smoothly compress and rebound. It feels like it catches, hesitates, or even sticks for a second before it moves. It’s particularly noticeable first thing in the morning when the car’s been sitting overnight.
NVH MONITOR
Status: CRITICAL
The Concept
Think of it like running a marathon in wooden clogs instead of good sneakers. Those clogs aren’t absorbing anything; every impact goes straight to your joints. That’s what your car’s suspension is feeling.
How I Pinpoint the Problem: My Diagnostic Approach
A stiff, noisy ride can come from a few places, and misdiagnosing it can cost you time and money. Worn shocks, tired springs, or even just bad tire condition can mimic bushing failure. So, I always approach this systematically. No guessing games in my shop.
Checking for Harsh Ride & Impact NVH
If the main complaint is a harsh ride and loud thumps over bumps, I start by checking the shocks. Give each corner of the car a good bounce. If it settles quickly without bouncing more than once or twice, your shocks are probably fine. If it keeps oscillating, you’ve likely got a shock issue. Next, I’ll get the car on a lift and use a padded pry bar. I’ll carefully try to move the control arms or sway bars where the bushings are. A healthy bushing will have a little give, a bit of flex. A hardened one? It’ll feel solid, like metal-on-metal, with no deflection at all. That’s a dead giveaway.
Common mimics here: Worn-out shock absorbers, overinflated tires (check the door jamb sticker!), or even a collapsed coil spring.
Diagnosing Tramlining & Vague Steering
For steering complaints, I usually perform a “dry park test.” With the car on the ground and the engine running, I’ll rock the steering wheel gently from side to side. While doing this, I’m watching the front end components. I’ll have a helper do it if I’m under the car. I’m looking for any play in tie rod ends or ball joints. If those are tight, I’ll mark the bushing sleeve on the control arm (especially the lower ones) and then watch closely. If the control arm moves without any delay or flex in the rubber, it means the bushing’s compliance is gone. It’s just a solid connection, transferring all that road input straight to your steering.
Watch out for: Worn tie rod ends, loose ball joints, incorrect toe alignment (especially after hitting a pothole), or uneven tire wear patterns.
Investigating Suspension Binding
When a customer describes that “sticking” feeling, I get the car on the lift and unload the suspension. I’ll then try to move the suspension components by hand or with a pry bar, paying close attention to the bushings. If you feel a high initial resistance—what we call “stiction”—that then eases up once the movement starts, that’s almost certainly the bushing material binding to its metal sleeve. The rubber has lost its internal lubricity and flexibility.
Don’t confuse this with: A seized shock absorber (which usually won’t move at all), a worn ball joint (which will have play), or a bent suspension component (which will be visibly deformed).
Why Bushings Fail: The Science Behind the Stiffness
So, why do these rubber bushings go from flexible to rock-hard? It’s almost never physical damage, at least not initially. The core issue is something called polymer degradation. Suspension bushings are made from synthetic rubber compounds, and these compounds contain special chemicals called plasticizers. Their job is to keep the rubber soft and elastic, allowing it to flex and absorb vibrations.
Over time, these plasticizers start to evaporate or oxidize, especially with constant exposure to heat—think engine heat, brake heat, and just the general underhood environment. Without these chemicals, the rubber reverts to a stiffer, more brittle state. It’s like a piece of old chewing gum that’s lost its chew.
About that Cold Weather:
That dramatic stiffness you feel when temperatures drop below 40°F? That’s a phenomenon called vitrification. It’s when the polymer chains in the rubber lose their mobility. On a healthy bushing, it’s usually temporary; the rubber regains its flexibility as it warms up. But on an aged, degraded bushing, the cold just exposes how little elasticity is left. It doesn’t rebound; it just turns brittle.
Thermal cycling—the repeated expansion and contraction from daily temperature swings—accelerates this breakdown. It creates tiny microfractures in the rubber that grow over time. Add in environmental factors like ozone exposure, which causes surface cracking, and fluid contamination (oil or power steering fluid leaks are notorious for this), which makes rubber swell up and then dry out, and you’ve got a perfect recipe for premature bushing failure.
Getting It Fixed: Repair Options and What I Recommend
Safety First, Always.
Look, suspension work involves heavy components, often under tension. Always use jack stands, and for crying out loud, never get under a car supported only by a jack. And here’s a critical tip: never tighten suspension bushings while the suspension is hanging freely. You must have the vehicle at normal ride height before torquing those bolts down. If you don’t, you’ll preload the bushing, and it’ll fail again in no time.
Replacing Individual Accessible Bushings DIY FEASIBLE
Press-Fit Bushing Replacement Professional Only
Complete Assembly Replacement RECOMMENDED
After the Repair: Making Sure It’s Done Right
Don’t assume the job’s done just because the tools are put away. Validation is critical. First, with the car back on the ground, do a visual inspection of each new bushing. Make sure the rubber is seated properly, not twisted, pinched, or bulging in any weird way. Then, and this is important, take it for a road test. Drive it on the same roads that revealed the issue in the first place. The goal is to eliminate those sharp impacts and that binding feeling. The ride should feel damped and controlled, not dead or overly soft. Your steering should return to center smoothly, and that tramlining should be significantly reduced or gone.
Final Check and Pro Tip
After your test drive, get back under the car and use a torque wrench to recheck all the suspension fasteners you touched. Sometimes things settle a bit, and a quick re-torque ensures everything stays tight. For really advanced validation, some shops (mine included) might use a chassis ear to measure NVH levels before and after the repair, giving you a quantifiable improvement.
Making the Call: Costs, Risks, and When to Walk Away
Here’s a quick breakdown of what you can expect in terms of cost and risk for each repair type. These are general ranges, of course, and can vary wildly by vehicle make, model, and your location.
| Repair Type | DIY Parts Cost | Shop Cost (Parts + Labor) | Success Rate (if done right) | Key Risk |
|---|---|---|---|---|
| Individual Accessible Bushing | $20 – $100 | $150 – $300 | High | Noise might return if other bushings are also bad; minimal safety risk if torqued correctly. |
| Press-Fit Bushing | $50 – $150 | $200 – $600 | Medium-High | High risk of damaging the control arm or improper installation if done without specialized tools. |
| Complete Assembly | $100 – $400 | $300 – $800 | Very High | Skipping the mandatory wheel alignment will lead to rapid tire wear. |
Keeping Them Healthy: Prevention & Monitoring
Slowing the Aging Process
-
Wash your undercarriage regularly. Especially if you live where they use road salt or other corrosive chemicals. It helps prevent rust and washes away grime that can degrade rubber.
-
Avoid harsh chemicals. Don’t spray petroleum-based degreasers or dressings directly onto rubber components. They might make things look shiny for a minute, but they’ll accelerate degradation.
-
Fix fluid leaks promptly. Oil, power steering fluid, even brake fluid—these are rubber killers. If you see a leak, get it fixed before it ruins your bushings.
-
Regular visual inspections. Every 6 months, or during an oil change, take a peek under there. Look for cracks, splitting, or rubber separating from the metal sleeves. Catching it early can save you headaches.
And if you’re hearing other strange noises and aren’t sure if it’s suspension or something else, I’ve got a guide on knocking noises when coasting that might help you narrow it down.
