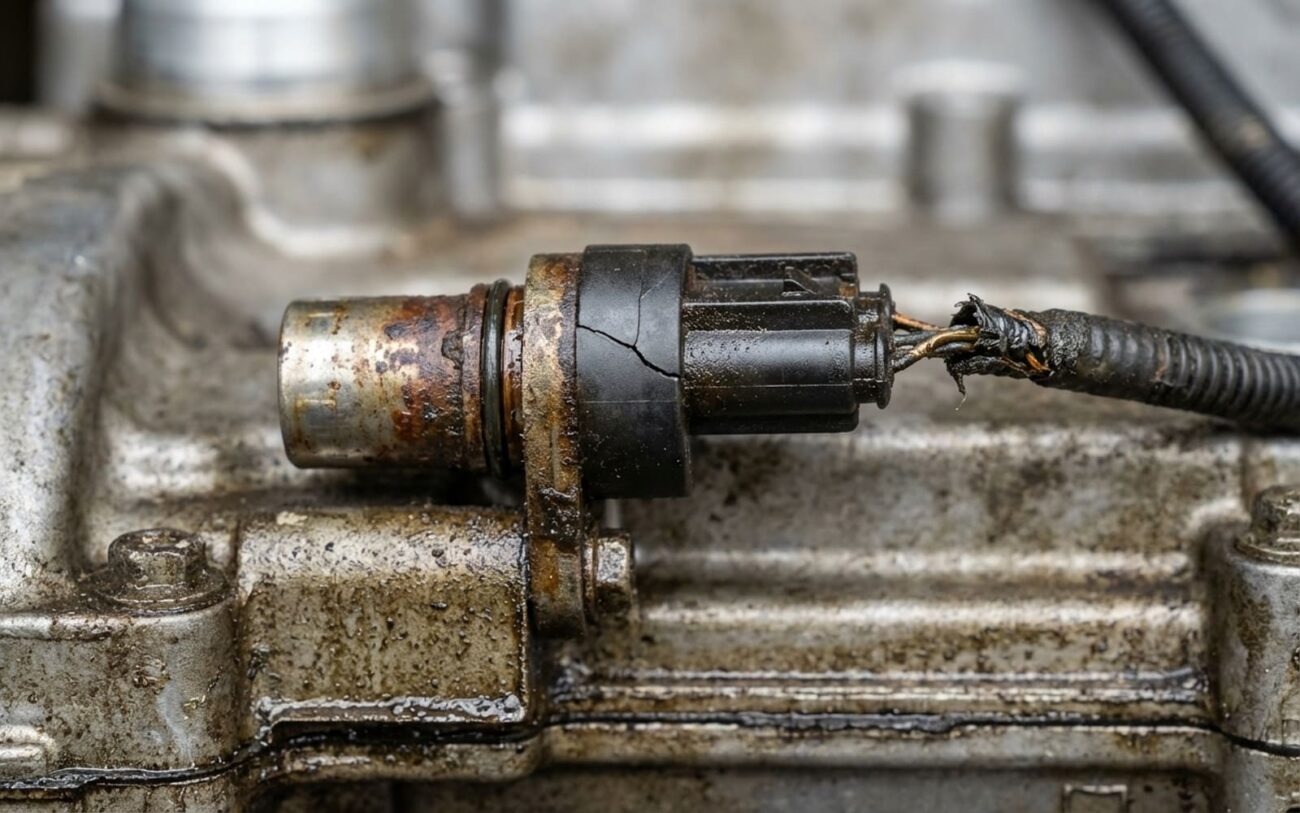
Alright, let’s talk camshaft position sensors. When that check engine light pops on and your scanner spits out a code like P0340 or P0341, it’s mighty tempting to just swap the sensor and call it a day. I get it. But after 25 years under the hood, I can tell you that’s the quickest way to a comeback. That diagnostic trouble code (DTC) just means the engine computer (ECM) isn’t seeing the signal it expects. It doesn’t tell you why—and that ‘why’ is where the real diagnosis happens.
Symptoms I See & What They Really Mean
When a camshaft position (CMP) sensor truly goes south, you’ll often see some pretty clear signs. One of the most common is a no-start condition. The engine cranks and cranks, sounds normal, but just won’t fire up. That’s because the ECM needs that CMP signal to know which cylinder is ready for fuel and spark. No signal, no start. But here’s the kicker: a bad crankshaft position (CKP) sensor can cause the exact same thing, so don’t jump to conclusions yet.
Another classic symptom is an engine that starts briefly, then immediately stalls. It’ll catch for a second, maybe two, then just die. I see this a lot with sensors that are failing intermittently—they work for a split second, then drop out, and the ECM shuts things down as a safety measure. Heat and vibration are often the culprits here.
Of course, you’ll get the straight-up check engine light with those P0340-P0344 codes. These are circuit or signal-related codes. While they point to the CMP sensor, they’re just as likely to be caused by damaged wiring, a corroded connector, or even a poor ground. I can’t tell you how many times I’ve chased a P0340 only to find a wire chafed through, rubbing against an exhaust manifold or a sharp bracket.
Then there’s the performance side: misfires, a rough idle, and a noticeable loss of power. Sometimes you’ll even get random misfire codes (like P0300) alongside the CMP code. This happens because the ECM, without accurate cam position data, either defaults to a fixed, less efficient timing strategy or locks the variable valve timing (VVT) system into a fail-safe mode. The engine runs, but it feels sluggish and just isn’t happy.
My Diagnostic Approach: Don’t Just Guess
In my shop, diagnosing a CMP sensor issue is never about throwing parts at it until the code goes away. That’s a rookie move. It’s about systematically verifying the entire circuit and ruling out everything else that could be mimicking the problem. I’ve seen too many people replace a sensor for a P0340, only for the code to come back a week later. That’s wasted money and time. Here’s how I cut through the noise.
The ECM isn’t just looking for a signal; it’s checking its timing, voltage, and how it correlates with the crankshaft position. So, if you get a code like P0016 (crankshaft/camshaft timing correlation), most folks immediately think “bad CMP sensor.” But usually, that’s a mechanical issue—a stretched timing chain, a clogged VVT oil passage, or low oil pressure preventing the cam phaser from moving. A new sensor won’t fix any of that.
I always start with the basics: power and ground at the sensor connector. Unplug it, turn the key to “on,” and use a multimeter. You should see reference voltage (usually 5V or 12V, check your wiring diagram) and a good ground. If you’re missing either, the sensor isn’t the problem—it’s the wiring, a blown fuse, or even a failing ECM. This simple voltage test can save you hours of head-scratching.
Next, I use a scan tool to monitor the CMP PID (Parameter ID) while cranking or running. If you’re getting a no-start, crank the engine and watch the CMP signal. If it’s flatlining or erratic, that points to the sensor or its immediate circuit. But the gold standard? An oscilloscope. It lets you see the actual waveform. You can compare the CMP signal to the CKP signal, looking for proper shape, amplitude, and—most importantly—correlation. If the waveforms are out of sync, or one is missing, you’re getting closer to the truth.
Here’s a quick guide I use to narrow things down:
| Symptom | Likely in Named Component (CMP Sensor) | Common External Mimics | Definitive Test to Confirm Source |
|---|---|---|---|
| No-start/Extended crank | Internal sensor element failure (Hall-effect, magnetoresistive) | Failed CKP sensor, faulty fuel pump relay, low battery voltage |
Monitor CMP PID while cranking. No signal change confirms sensor/circuit fault. Always verify CKP signal too.
|
| Engine stalls after start | Intermittent internal sensor failure, damaged tone wheel on camshaft | Poor CKP sensor connection, failing ignition switch, weak ECM power supply |
Back-probe CMP signal with an oscilloscope during stall. An erratic or dropping waveform confirms sensor/tone wheel.
|
| CMP Circuit DTCs (P0340–P0344) | Failed sensor, internal short/open, contamination on sensor tip | Open/shorted wiring, corroded connector, poor ECM ground, voltage drop |
Test ref voltage and ground at the sensor connector. Check the signal wire for shorts to power/ground. Swap with a known-good sensor if easily accessible.
|
| Misfire/Power Loss | CMP sensor providing erratic or biased signal | VVT solenoid stuck, low engine oil pressure, timing chain stretch or jump |
Command VVT via scan tool (bidirectional control). Monitor desired vs. actual cam position. Verify oil pressure with a mechanical gauge.
|
When It Is the Sensor: Root Causes
Okay, so you’ve done your due diligence. You’ve checked the wiring, the power, the ground, and compared signals. Everything points to the sensor itself. Now what? What actually fails inside these things?
Most modern CMP sensors are Hall-effect or magnetoresistive. They’re solid-state, no moving parts, but they’re not indestructible. The internal sensing chip can degrade over time, especially with repeated heat cycles. Think about it: they’re often stuck right on the engine, getting baked. I’ve also seen them fried by voltage spikes—maybe a failing alternator, or someone tried to jump-start the car incorrectly.
On older magnetic reluctance sensors, the internal magnet can weaken or even crack from thermal stress or physical shock. That weakens the signal, making it tough for the ECM to read accurately. And then there’s contamination. If your engine is shedding metal—say, from a worn timing chain or a failing camshaft bearing—those ferrous particles will stick right to the sensor tip. They disrupt the magnetic field, essentially “blinding” the sensor. The sensor isn’t broken, it’s just covered in junk.
Another common failure mode is internal moisture. The sensor’s O-ring or seal can harden and degrade, allowing oil or coolant to seep into the housing. That leads to corrosion on the circuit board or shorts between the traces. This isn’t a valve cover leak; it’s a sensor seal failure. I’ve pulled sensors with sludge inside the electrical connector side, and it’s always from oil migrating past a compromised seal.
And yes, overtightening is a real issue. The sensor housing is often plastic or a brittle composite. Torque specs are usually pretty low—think 5 to 10 Nm. Using a standard ratchet without a torque wrench can easily crack the base. I’ve seen more than one “bad sensor” that was actually broken during installation. Always use the right size Torx or hex bit, and don’t crank down on it like it’s a lug nut.
Manufacturer Patterns: What I’ve Seen
On certain Chrysler 3.6L Pentastar engines, for example, there’s a known history of P0340 codes due to heat-related sensor degradation. Chrysler even issued service guidance recommending an updated sensor with improved thermal resistance. Knowing these common failure trends for specific makes and models can save you from replacing the same part twice. I’ve seen this on the 2011-2015 models quite a bit.
Fixing It Right: Your Repair Options Explained
Access & Complexity: It’s Not Always Simple
How you fix this depends entirely on where the sensor is and, more importantly, what you found during your diagnosis. Not all camshaft sensors are created equal in terms of access or the complexity of the underlying problem.
Accessible Sensor Replacement DIY-FEASIBLE
Buried Sensor Replacement Professional Only
Systemic Repair Associated Component
Cleaning Temporary / Last-Resort
Don’t Skip This: Post-Repair Validation
You’re not done when the new sensor is bolted in. Not by a long shot. You have to prove the repair worked and that you didn’t introduce any new issues. This step is critical for avoiding comebacks.
For an accessible sensor replacement, the validation is pretty straightforward. With the key on and engine off, use your scan tool to check the camshaft position PID. It should show a valid, stable reading. Start the engine—it should fire immediately and idle smoothly. Clear any codes, then take it for a full drive cycle. If no codes return and performance is back to normal, you’re good to go.
If you had to tackle a buried sensor that required major disassembly, your validation goes much further. Beyond the steps above, you need to check for vacuum leaks (listen for hissing, scan for MAF or fuel trim issues), coolant leaks from any disturbed hoses, and any new DTCs from connectors you unplugged. A smoke test on the intake system is always a smart move after an intake removal.
And if you did a systemic repair—camshaft, timing chain, VVT components—validation is absolutely critical. Use the scan tool to monitor camshaft correlation or deviation angles at idle, 2000 RPM, and under load. It should stay within a few degrees of spec, according to the service manual. An oscilloscope comparison of the new vs. old waveform (if you saved it) is the gold standard for confirming signal integrity. And always listen carefully with a mechanic’s stethoscope at the timing cover—any rattle could mean a loose chain or a failing tensioner you missed.
The Bottom Line: Cost, Risk & Making the Call
Let’s talk real-world costs and decisions. The part itself is rarely the expensive bit—it’s the labor and what the diagnosis really reveals. Here’s a rough breakdown:
| Repair Type | DIY Cost (Parts) | Shop Cost (Est.) | Success Rate | Secondary Risk if Failed |
|---|---|---|---|---|
| Accessible Sensor Replacement | $50 – $150 | $200 – $400 | >95% | Stranding if misdiagnosed (e.g., CKP or wiring) |
| Hard-to-Reach Sensor Replacement | $50 – $150 + gaskets | $400 – $800 | >90% | Vacuum leak, coolant leak, or new codes if not careful |
| Systemic Repair (Cam/Timing) | $500 – $2000+ | $1500 – $3000+ | Varies | Catastrophic engine damage if timing is off or debris isn’t cleared |
This is where judgment really matters. If your diagnostics show a jumped timing chain or a failing cam phaser, and the repair is going to cost $2,500 on a car that’s only worth $4,000, you’re at a crossroads. Is it worth it? Maybe—if the rest of the car is solid and you plan to keep it for years. But if there are other age-related issues starting to crop up (transmission, suspension, rust), it might make more sense to consider a used engine swap or even replacing the vehicle entirely. Be honest about the long-term outlook before you sink a bunch of money into it.
Keeping It Running: Prevention & Monitoring
You can’t prevent every electronic failure—they just happen sometimes. But you can certainly avoid the conditions that accelerate them or mimic them. Good maintenance is your best defense.
My Maintenance Checklist
-
Oil Changes: Stick to regular oil changes using the manufacturer-recommended viscosity and quality. Clean oil at proper pressure is absolutely critical for the VVT system to work correctly and prevents sludge buildup that can clog passages or contaminate sensors. Poor maintenance and overheating are huge contributors to premature sensor and VVT failure.
-
Early Detection: Use an OBD2 scanner, especially one that can read live data. During routine maintenance, check for camshaft deviation or correlation values. If you start seeing the actual cam position consistently lagging behind the desired position, that’s an early warning sign of timing chain stretch or VVT issues, long before a hard code sets.
-
Look at the Bigger Picture: If you’re chasing intermittent codes, don’t just focus on the sensor. Consider mechanical wear, coolant contamination, or bearing wear that could be generating metallic debris. These are the underlying issues that often take out a sensor.
