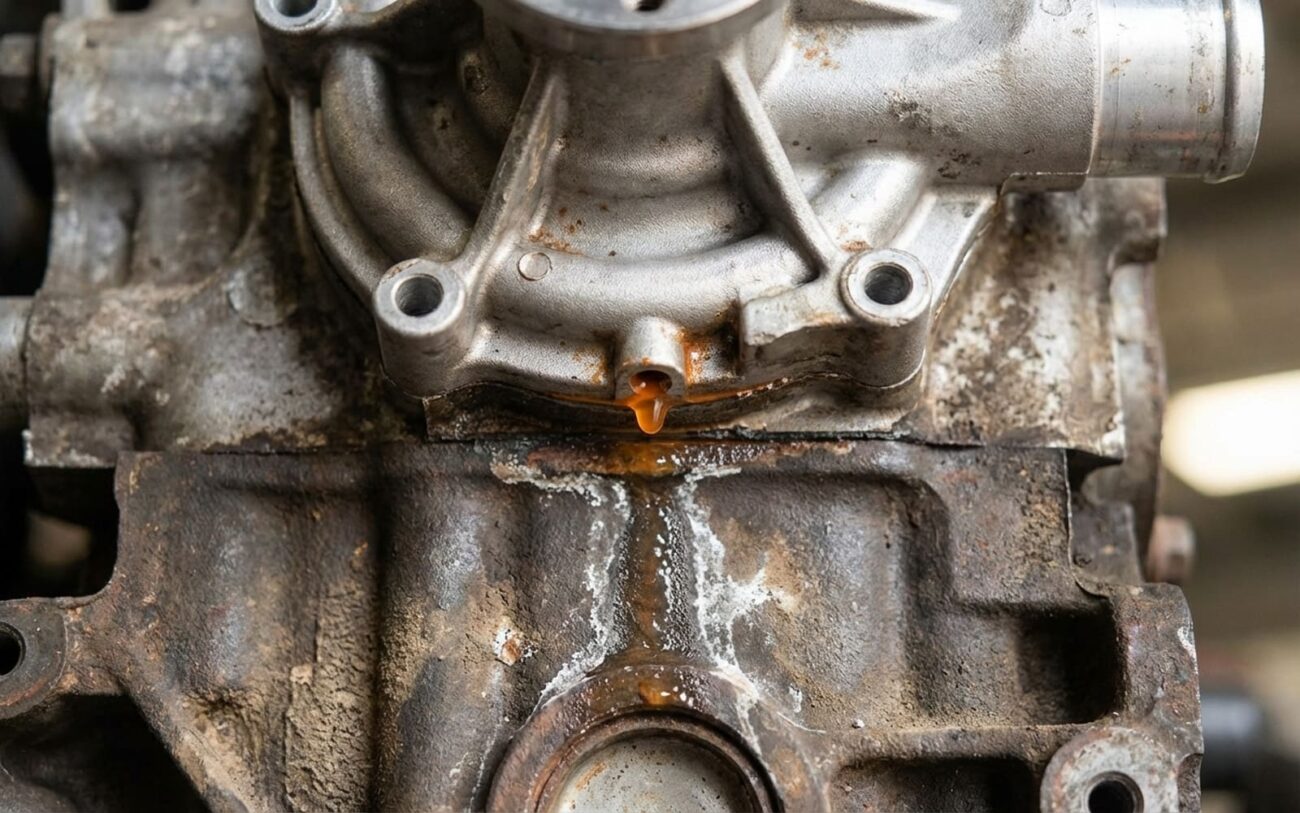
Alright, let’s talk about the Ford Duratec 2.0L and 2.3L water pump. If you own a Focus, Fusion, Escape, or Ranger with one of these engines, listen up. This isn’t your daddy’s easily accessible, belt-driven pump. No, Ford tucked this thing deep inside the engine, driven by the timing chain. That design saves space, sure, but it turns a routine replacement into a full-blown timing job. And when it goes bad, it can be subtle, or it can be catastrophic. I’ve seen both, and neither is pretty.
What a Failing Duratec Water Pump Looks (and Sounds) Like
When these pumps start to fail, they usually give you a few warnings. The trick is knowing what you’re looking for, and more importantly, what not to confuse it with.
The Coolant Leak: Location is Key
The most common early sign I see is a coolant leak. But here’s the critical detail: it’s not always obvious. You’ll typically find orange or green residue (depending on your coolant type) streaking down the front of the engine block, usually just below the thermostat housing and above the oil pan. It looks like it’s coming from the thermostat, but it’s often lower, originating from behind the accessory drive components, near the crankshaft pulley. A true thermostat housing leak usually appears higher up, right around the housing itself. If you’re seeing a drip from behind the pulley, even a small one, that’s a red flag for the water pump gasket or a weep hole indicating an internal seal failure.
Don’t confuse a leak from the thermostat housing gasket with a water pump leak. The thermostat housing bolts directly to the pump body, and its O-ring or gasket can fail independently. Clean the area thoroughly and pinpoint the exact source.
The Bearing Noise: A Deep Whine or Rumble
Another dead giveaway is noise. I’m talking about a low-pitched whirring, rumbling, or grinding sound that comes from deep in the front of the engine. It’ll usually get louder as the engine RPMs increase. This isn’t a squealing serpentine belt or a chirping idler pulley – those are usually higher pitched and often more intermittent. This water pump noise is a consistent, mechanical sound, often indicating the pump’s internal bearing is failing, likely due to coolant intrusion or just plain wear. When I hear that specific rumble, I know what I’m dealing with almost every time.
Unexplained Coolant Loss and Overheating: The Tricky One
Sometimes, there’s no visible leak at all, just a mysterious loss of coolant and the engine starts running hot, especially when you’re idling or stuck in traffic. This can mean the plastic impeller inside the pump has cracked, eroded, or even separated from its shaft. The pump shaft spins, but the impeller isn’t moving coolant effectively. Now, this is where it gets tricky: these symptoms can also point to a bad thermostat, a clogged radiator, or even a head gasket issue. You can’t just assume it’s the pump without proper testing.
Coolant in the Oil: The Absolute Worst-Case Scenario
The most serious symptom, and one you absolutely cannot ignore, is coolant mixing with your engine oil. You’ll see a milky, frothy film on the dipstick or inside the oil filler cap. While a failed internal seal in the water pump can allow coolant to seep into the engine’s oil return passage, this symptom can also indicate a cracked cylinder head, a warped block, or a blown head gasket. Misdiagnosing this as “just a pump issue” can lead to far greater engine damage or even total failure. This requires immediate, precise diagnosis.
Why These Pumps Fail (and Why It’s So Serious)
Understanding why these pumps go bad helps you prevent it or catch it early. There are three main failure modes, and ignoring any of them is a gamble with extremely high stakes.
1. Plastic Impeller Degradation
Many of these Duratec pumps use a plastic impeller molded onto a metal shaft. Over time, constant heating and cooling cycles, combined with chemical breakdown from incorrect or old coolant, make that plastic brittle. I’ve pulled pumps where the blades were cracked, or the entire impeller had simply separated from the shaft. The pump spins, but it’s not moving any coolant. Ford even issued service guidance on this for some 2.3L Duratec engines from the mid-2000s, acknowledging premature impeller failure and recommending updated designs. Using non-spec coolant, especially if it’s mixed with incompatible types, will absolutely accelerate this failure mode.
2. Bearing and Seal Failure
The pump has a sealed bearing, protected by a dual-lip seal that keeps coolant and engine oil separate. When that seal wears out or gets damaged (sometimes during a botched installation), coolant can leak into the bearing area. Once moisture and debris get in there, the bearing loses lubrication, develops play, and starts making that tell-tale noise. Eventually, it seizes. Contaminated coolant from mixing types or overdue changes is a huge contributor here. I’ve seen pumps with visible rust in the bearing race, which should never happen in a properly maintained, sealed system.
3. Casting or Gasket Seepage
Sometimes, the aluminum housing itself can have porosity, or the mounting gasket just fails. This usually starts as a slow weep at the pump-to-block interface. It’s not always catastrophic immediately, but it’s a clear sign the pump is nearing the end of its life. A small leak can quickly become a big one.
How I Pinpoint the Problem: Real Diagnostic Steps
This is where many mechanics, and certainly most DIYers, go wrong. They see a leak and blame the pump without proper investigation. Don’t guess. Here’s how I isolate the real source:
For Front-Engine Coolant Leaks:
First, clean the entire front of the engine, especially the area below the thermostat housing and around the crankshaft pulley. I mean thoroughly clean it. Then, use a cooling system pressure tester. Pressurize the system to about 16 psi (when the engine is cold). Let it sit for a while, then get in there with a bright LED light and a borescope if you have one. Look directly behind the crankshaft pulley. If you see coolant emerging from that area, it’s almost certainly the water pump gasket or the pump’s weep hole. If it’s higher up, near the thermostat housing, then you’re likely looking at a thermostat housing gasket or an O-ring on a coolant crossover pipe.
For Coolant Loss with Overheating (No Visible Leak):
This is trickier. A stuck thermostat, clogged radiator, or even an airlock can cause these symptoms. What I do is use an infrared thermometer. After the engine is warmed up and the thermostat should be open, check the temperature of the top and bottom radiator hoses. A healthy cooling system with a functional water pump should show a noticeable temperature drop – usually 20-30°F – between the top (hot) and bottom (cooler, after passing through the radiator) hoses. If the temperatures are nearly identical, or the bottom hose is still very hot, that pump isn’t circulating coolant effectively. You’ll also want to check for combustion gases in the coolant (head gasket test kit) and ensure the thermostat is opening correctly.
For Coolant in Engine Oil:
This is the big one. You can’t just look at the dipstick and say “water pump.” While it can be the pump’s internal seal, it’s often a much bigger problem. My definitive test here is to drain the oil and remove the oil pan. Then, lightly pressurize the cooling system to 10-12 psi. With the pan off, you can visually inspect for coolant seepage. If you see it dripping from the area of the water pump drive shaft or its mounting, then the pump is the culprit. If it’s coming from elsewhere, like between the block and head, you’re looking at a head gasket or worse. This isn’t a job for a driveway mechanic, and it’s not a diagnosis to take lightly.
The Fix: It’s a Timing Job, Not Just a Pump Swap
Let me be clear: this repair is not for beginners. If you’re not comfortable with timing chain work, this is a job for a professional. You’re not just unbolting a pump; you’re getting deep into the engine’s timing system. One mistake, and you’re buying a new engine.
Mandatory Replacement: No Repairs for Internal Failures
If you have bearing noise, impeller failure, or an internal seal leak (coolant in oil), the pump is a sealed unit and cannot be repaired. Replacement is mandatory. Even a minor external leak from the pump body or mounting surface means the unit has to come out. You can’t reseal it in place.
The Process and Critical Tools:
To do this job right, you’ll need specific tools: a timing chain tensioner lock tool, camshaft locking pins, and a crankshaft pulley holding tool. A good torque wrench (both inch-pound and foot-pound capable) is non-negotiable. You’ll be removing the timing cover, locking the camshafts, relieving chain tension, and then reassembling everything with exacting torque specs. This is why the labor cost is so high – it’s essentially a timing chain job.
- Pump Mounting Bolts: These are delicate. Torque them to 89 in-lbs (10 Nm). Overtightening will crack the aluminum housing, and you’ll be buying another pump.
- Crankshaft Pulley Bolt: This is a one-time-use stretch fastener. Torque it to 85 ft-lbs (115 Nm) plus an additional 90-degree turn. Do NOT reuse it. If it comes loose, it’ll destroy the front of your engine.
While You’re In There:
Since you’re already doing all that work, it’s smart to replace a few other things. The crankshaft front seal is right behind the pulley, so swap it out. Use fresh coolant – Motorcraft Orange VC-3DIL-B or an equivalent that meets Ford spec WSS-M97B44-D is critical. And inspect the timing chain guides and tensioners. On high-mileage engines, these are often worn and should be replaced to prevent future timing issues. Always, always follow Ford’s workshop manual (Section 303-01) exactly. One missed step, like not properly locking the camshafts, can result in valve-to-piston contact and bent valves. I’ve seen that mistake cost people thousands.
The “Temporary” Fix (Use with Extreme Caution):
If you have a minor external weep from a casting porosity leak (not a seal or gasket failure) and you absolutely need to get the car to a shop, a high-quality sealing agent designed for aluminum cooling systems might slow the leak temporarily. But I’m telling you now, these products are a last resort. They can clog radiator tubes, heater cores, and thermostat passages. They are NOT a fix for bearing noise, impeller failure, or coolant in oil. This is strictly a “get you home” measure. Once you use one, plan to flush and potentially replace other cooling system components down the road, as the residue can interfere with future repairs.
Confirming the Job’s Done Right
Just bolting everything back together isn’t enough. You need to validate the repair. I always perform these three tests:
1. Cooling System Pressure Test:
After refilling and bleeding the system, pressurize it to 16 psi (cold engine) and let it sit for at least 20 minutes. There should be zero pressure drop and absolutely no seepage at the pump or timing cover. Any leak means something wasn’t sealed or torqued correctly. Go back and check your work.
2. Thermal Cycle Validation:
Properly fill and bleed the system again – air pockets are common on these engines. Run the engine to full operating temperature with the radiator cap on, confirming both electric cooling fans cycle on and off. Then, let the engine cool completely overnight. Check the coolant level in the degas bottle. Repeat this cycle two more times. There should be no coolant loss. If the level drops, you’ve either got a missed leak or an airlock you need to purge.
3. Bearing Noise Check:
Use a mechanic’s stethoscope on the timing cover near where the pump sits. Listen at idle, 1500 RPM, and 2500 RPM. You should only hear normal mechanical engine noise. Any rumble, grind, or whine suggests a bad bearing in the new pump (yes, it happens) or an installation issue. These tests require a pressure tester, infrared thermometer, and a stethoscope – basic tools for any serious work.
Costs, Risks, and the Tough Decisions
This repair isn’t cheap, and it’s not easy. You’re looking at significant time and money.
| Repair Type | DIY Cost (Parts) | Shop Cost (Est.) | Success Rate | Secondary Risk |
|---|---|---|---|---|
| Complete water pump replacement | $120–$250 | $900–$1,600 | 99% (with precision) | Incorrect camshaft timing leads to valve-to-piston interference and catastrophic engine damage. |
That labor cost is high because, as I said, it’s a timing job. You’re paying for precision and expertise. One wrong move, and that $900-$1,600 bill turns into a $3,000+ engine rebuild or replacement. I’ve seen too many DIYers get in over their heads on this one.
Here’s the reality check I give my customers: if your car is pushing over 150,000 miles and this repair is going to cost more than 40% of the vehicle’s current value, you need to weigh your options carefully. Sometimes, a good used long-block or a crate engine might be more cost-effective in the long run, especially if other components like the oil pump or timing chain are also showing their age. It’s a tough decision, but it’s a necessary one.
Prevention and Early Detection: My Best Advice
You can’t stop wear and tear, but you can definitely slow it down. It all comes down to smart maintenance.
Use the Right Coolant, Period.
This is non-negotiable. Only use the coolant specified for your engine: Motorcraft Orange VC-3DIL-B or a premium equivalent that explicitly meets Ford specification WSS-M97B44-D. I can’t stress this enough. Mixing coolants, even ones that claim to be “compatible,” can cause chemical reactions that form sludge, corrosive acids, and abrasive particles. That stuff eats away at seals and bearings, accelerating pump failure. I’ve seen the damage firsthand.
Check Your Belt Tension:
Regularly check your serpentine belt tension. A loose or glazed belt can cause harmonic vibrations that transfer directly into the crankshaft and, you guessed it, prematurely damage the water pump bearing. If you start hearing a whining noise during acceleration, don’t ignore it. It could be a sign of a failing accessory, or it could be your water pump starting to go. (Here’s more on that.)
My Early Detection Checklist
-
Monthly Visual Check: Grab a flashlight and inspect the area below the thermostat housing for any white or orange residue. Even a tiny crust is a sign of a slow leak that needs attention.
-
Cold Start Listen: When you start the engine cold, listen for a brief 1-2 second whine or rumble that quickly disappears as the engine warms up. This can be an early indicator of a failing pump bearing that’s just starting to show play.
-
Regular Coolant Level Checks: Get into the habit of checking the coolant level in the degas bottle when the engine is cold. Every other fuel fill-up is a good rhythm. Any unexplained drop needs immediate investigation. Don’t just top it off and forget it.
And finally, if you’re dealing with overheating after any engine work, especially if you’ve been cleaning the engine bay, consider moisture or contamination in electrical components. Modern engine bays are packed with sensitive electronics, and sometimes the simplest things can cause the weirdest problems. (Check out this article on washing the engine bay, or this one on moisture and power inverters for related issues.)
