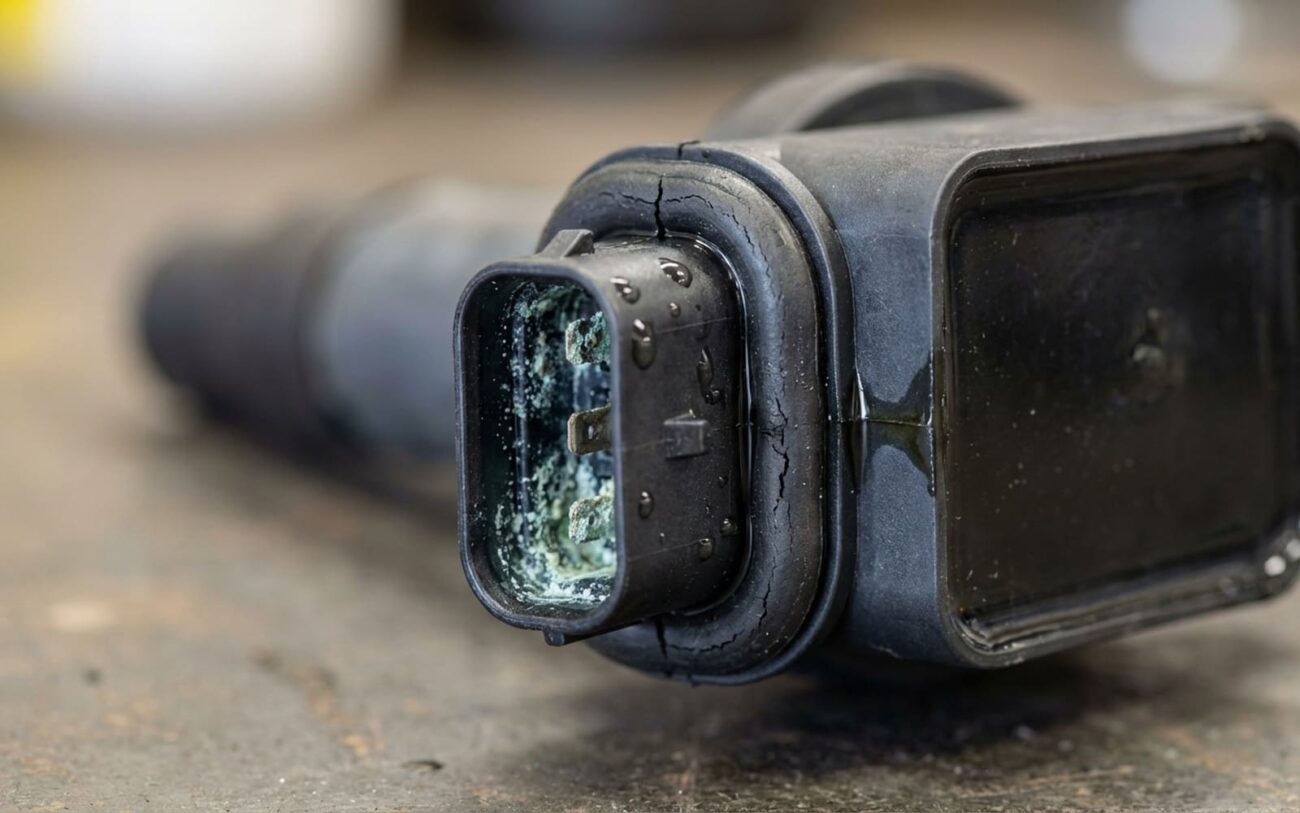
Believe it or not, this is a call I get more often than I’d like to admit. Someone decides to tackle that grimy engine bay – maybe for the first time in years – and within minutes, the car won’t start, runs like garbage, or just plain dies. The immediate timing is your biggest clue: water got where it absolutely shouldn’t have.
Good news first: usually, it’s not the end of the world. Most times, it’s not an internal engine failure. Bad news: water and modern electronics don’t mix, and if it got into a cylinder, well, that’s a whole different ballgame. But if you know what you’re looking for and how to approach it, you can often save yourself a major headache – and a major repair bill.
Symptoms: What Your Car is Trying to Tell You
The immediate onset of problems after an engine wash is your biggest clue. If you’re dealing with a misfire, rough idle, a no-start condition, or a sudden loss of power within minutes – or even hours – of washing, water intrusion is the prime suspect. Most of the time, it’s electrical. Water finds its way into a sensor connector, a coil pack, or a harness and creates a short circuit or a ground path. That confuses the ECU, which then can’t manage ignition or fuel properly. I see this weekly on everything from a Honda Civic to a Ford F-150.
But sometimes, the issue doesn’t show up right away. You wash, everything seems fine, and a few days later you get a random misfire or a check engine light. That’s usually moisture trapped in a connector that’s slowly corroding the terminals. The resistance increases over time, weakening the signal until the sensor fails. It’s still traceable to the wash, just delayed.
Diagnosis: Pinpointing the Problem
You need to determine whether the problem is electrical or physical. The symptoms can look similar, but the causes and fixes are very different. This table outlines common scenarios I’ve encountered, helping you narrow down the source efficiently.
| Symptom | Likely Electrical Intrusion Point | Common External Mimics | Definitive Test to Confirm Source |
|---|---|---|---|
| Intermittent misfire or stalling on one cylinder | Water trapped in ignition coil boot or spark plug well | Faulty spark plug, failing fuel injector |
With engine running, lightly mist the coil boot with water. If misfire returns, that’s the culprit. Monitor live misfire counts on a scan tool. |
| Crank/no-start, no RPM signal on scan tool | Crankshaft Position Sensor (CKP) connector or seal | Failed CKP sensor, damaged reluctor wheel, faulty PCM |
Disconnect CKP and inspect for moisture. Test sensor output voltage during cranking (use an oscilloscope if you have one). Dry and retest. |
| Rough running across all cylinders, possible backfire | Main engine harness connectors (e.g., at PCM, fuse box) | Major vacuum leak, failed Mass Air Flow (MAF) sensor |
Inspect large harness connectors for moisture. Perform voltage drop test on PCM power/ground circuits – this can reveal hidden resistance. |
| Sudden loss of power, possible “bang” from intake | Water ingestion via air intake duct | Severe mechanical failure (e.g., timing belt break) |
Remove spark plugs and crank (briefly!). If water sprays out, hydrolock is confirmed. Rotate crank manually (with a breaker bar on the crankshaft bolt) to check for resistance. |
For electrical concerns, a good scan tool is essential. Codes like P0300 (random misfire), P0301–P0308 (cylinder-specific misfires), or P0335 (crankshaft position sensor circuit) will guide your diagnosis. If the engine cranks normally but won’t start, and you’ve got spark and fuel pressure, the issue is likely sensor-related and water-induced. If it won’t crank or binds, that’s mechanical—and likely hydrolock.
Why This Happens: The Root Causes
Water doesn’t just “find a way in” – it exploits weaknesses. There are three primary pathways I see in the shop, each with its own risk level.
-
1. Failed or aged seals on sensors. Sensors like the crankshaft position sensor (CKP), camshaft position sensor (CMP), or knock sensor rely on O-rings or gaskets. Over time, those O-rings harden, crack, or just get brittle. A high-pressure rinse can easily force water past the seal and right into the connector. I’ve seen this on older Toyota V6s where the cam sensor O-rings are rock hard.
-
2. Capillary action in connectors. Even a connector that looks sealed can wick in moisture if the rubber boot is slightly split or the wire insulation is compromised. Water travels along the wire like a sponge, creeping into the terminals. This is especially common on older GM Ecotec and Ford EcoBoost models where the wiring harnesses can become stiff and crack.
-
3. Air intake water ingestion. This is the most dangerous scenario. If the air intake snorkel is damaged, disconnected, or you sprayed directly into the air filter box, water can get sucked straight into the engine. Once water hits the throttle body, it’s a straight shot to the cylinders. And remember, water doesn’t compress.
The Fix: Getting Your Car Back on Track
Your repair path depends entirely on what you find during diagnosis. Let’s break it down by severity and what you can realistically tackle yourself.
Wet Electrical Connections DIY-FEASIBLE
Corroded Connectors or Damaged Sensors PROFESSIONAL-ONLY
Hydrolock or Water Ingestion – PROFESSIONAL-ONLY
Do not attempt this without proper tools and knowledge. Seriously. Disable fuel and ignition systems (pull the fuel pump fuse and ignition relay). Remove all spark plugs and crank the engine briefly (just a few seconds) to expel any water. Change the oil and filter immediately, as water ruins lubrication and can damage bearings. Run the engine for a few minutes, then change the oil and filter again. Use a borescope to inspect cylinder walls for damage, and perform a compression test to check for bent rods. If compression is low on one cylinder, you’ve likely bent a rod. At that point, you’re looking at a major engine repair or replacement.
A quick note on “drying it out”:
I’ve had customers tell me, “I just let it run for 20 minutes and it cleared up.” That might work temporarily for a slightly damp coil – but it’s risky. While misfiring, unburned fuel washes past the piston rings, diluting the oil and accelerating engine wear. Even worse, raw fuel entering the exhaust can overheat and destroy the catalytic converter, which is a very expensive repair. Don’t count on heat alone to fix a significant water issue.
Confirming the Repair
Don’t assume it’s fixed just because the engine runs. Validation is critical, especially after a water intrusion event.
For electrical repairs: Clear all trouble codes with your scan tool. Then, perform a 10–15 minute test drive that includes idle, acceleration, and engine braking. Monitor live data with your scan tool – especially RPM signal stability and cylinder-specific misfire counters. If they stay at zero, you’re good. If you have access to Mode $06 data, check for pending misfire events that haven’t triggered a MIL yet. This is a pro-level check that can catch intermittent issues.
For hydrolock repairs: A compression test must show all cylinders within 10% of each other. A leak-down test should read under 10% loss. Visually confirm via borescope that no water or coolant remains in the combustion chambers. If you see pooling, that could indicate a deeper issue like a cracked head or blown head gasket – unrelated to the wash, but now exposed. This is where you might need a professional to confirm the engine’s health.
The Cold, Hard Numbers: When to Walk Away
Cost and risk determine whether a repair makes sense. Sometimes, a clean engine isn’t worth a new one.
| Repair Type | DIY Cost | Shop Cost | Success Rate | Secondary Risk if Failed |
|---|---|---|---|---|
| Drying/cleaning connectors | $15–$25 | $120–$180 | 95% | Residual moisture leading to corrosion and repeat failure |
| Replacing one sensor/connector | $50–$200 | $300–$500 | 98% | Incorrect torque or sealing causing recontamination |
| Hydrolock diagnosis/repair | N/A | $500–$3,000+ | Varies | Undetected internal damage leading to complete engine failure |
If hydrolock caused a bent rod or damaged bearings, the repair escalates fast. I’ve seen engines that looked fine on the surface but had compromised bearings that failed months later. As a rule of thumb: if the estimate for repair exceeds 40% of your car’s market value, it’s time to seriously consider a used or remanufactured engine. Rebuilding a severely damaged engine often costs more than the car is worth, especially on high-mileage vehicles. Don’t throw good money after bad.
Prevention: Avoiding This Headache Next Time
Prevention beats repair every single time. Follow these steps to keep your engine bay clean and functional without causing a breakdown.
Pro Tip: Use Silicone Grease
Use only silicone-based dielectric grease on connectors—never petroleum-based. The latter can swell or degrade rubber seals over time, making them more prone to leaks. Permatex 22058 is a solid choice and what I keep in my toolbox.
After any wash, start the engine and let it reach full operating temperature. The heat helps evaporate any stray moisture before it seeps into connectors, but it’s not a substitute for proper drying.
