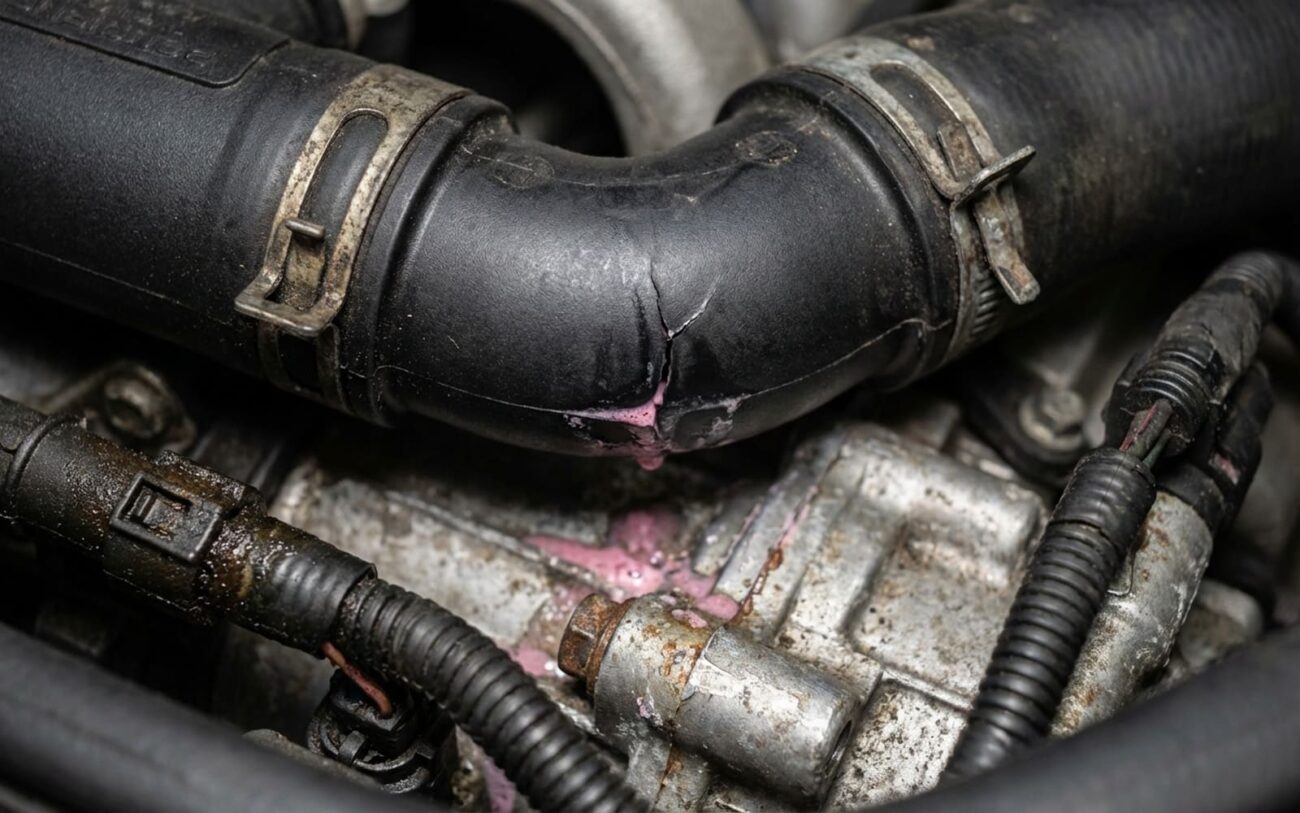
Alright, let’s talk about a real common headache on the Porsche Cayenne, especially those 2011 to 2018 V6 and V8 models, the ones built on the 9PA platform. When one of these rolls into my shop with a mysterious coolant leak, my mind immediately jumps to one place: the intake manifold heat exchanger. I’ve seen this fail so many times over the years that I usually keep a replacement on the shelf. It’s just that common. You’re typically going to see one of three main scenarios play out.
Spotting the Leak: What I Look For
The first sign, and often the trickiest, is when the coolant level drops, the dashboard light comes on, but you can’t find a single puddle under the car. Nothing on the garage floor, no drips. This one’s deceptive because the leak is internal. The heat exchanger is letting coolant seep directly into the intake manifold plenum. From there, it gets sucked into the combustion chambers and burned off. You might notice a bit of white smoke from the exhaust, especially on startup, but it’s often so subtle you miss it. This can leave you scratching your head until you realize the problem is hidden right in the engine valley.
Second, you might actually see wetness or fresh coolant pooling in the center of the engine, right in that valley between the cylinder banks. Since the heat exchanger sits dead center there, any external leak from it will collect and run down in that exact spot. Now, don’t jump to conclusions just yet. Plenty of other components live in that valley too, so while this is a strong clue, it’s not the definitive answer on its own.
And third, sometimes you’ll catch that sweet, distinct smell of coolant inside the cabin, even when the HVAC system is off. People often think “heater core” immediately, but on these Cayennes, it’s often vapor from a leaking heat exchanger in the engine valley getting pulled into the fresh air intake for the HVAC. If you’ve already ruled out the heater core and its hoses, that cabin smell is a really strong indicator of a valley leak.
My Diagnostic Approach: Pinpointing the Real Culprit
Just because you see coolant pooling in the engine valley doesn’t automatically mean the heat exchanger is toast. I’ve seen plenty of other components in that area — water pump, thermostat housing, coolant crossover pipes, even just a deteriorated O-ring — leak in the exact same spot. That’s why a quick glance isn’t enough. You need a systematic approach to really nail down the source.
Here’s how I break it down, based on the symptoms:
Symptom 1: Coolant loss, no visible external leak. This is the internal leak scenario. My first step is always to pressure test the cooling system, typically to about 1.5 bar (around 22 PSI). If the system holds pressure but the coolant still disappears over time, or if I see a rapid pressure drop, I’m immediately suspicious of an internal leak. I’ll then remove the intake manifold. Once it’s off, I inspect the heat exchanger core and the intake plenum for any active seepage or pooled coolant. If it’s there, that’s your heat exchanger. Now, I’ve also seen leaking head gaskets, intake manifold gaskets, or even an oil cooler cause similar internal coolant loss, so I keep those in mind as possibilities if the heat exchanger looks good. But on these Cayennes, the heat exchanger is usually the first place I look with this symptom.
Symptom 2: Visible coolant in the engine valley. This is where it gets tricky because of all the mimics. First, I clean the area meticulously. I mean spotless. Then, I pressurize the cooling system again. With the system under pressure, I use a borescope and an inspection mirror to carefully look for the very first sign of seepage. The trick here is to trace the leak upward to its source. Coolant always flows down, so finding the highest point of wetness is key. Common culprits that mimic the heat exchanger here include the water pump, the thermostat housing, those plastic coolant crossover pipes, and any O-rings associated with them. Don’t just assume it’s the heat exchanger because it’s wet in the valley; verify it.
Symptom 3: Coolant odor in the cabin. If a customer reports this, I first rule out the heater core and its hoses. That’s usually a quicker check. If the cabin smell persists and I’ve got other signs of coolant loss, I’ll then use an ethylene glycol-specific combustion gas sniffer around the engine valley. This tool can detect coolant vapor that might be getting drawn into the HVAC system from an external leak. If the sniffer lights up, and I’ve already checked the heater core, then I’m back to looking for a valley leak, likely from the heat exchanger.
And just a quick note: if you’re also experiencing hesitation or the car won’t accelerate properly, that’s usually a separate issue, often related to airflow, fuel delivery, or the throttle body. But, if that coolant loss leads to severe overheating, the engine management system will put the car into limp mode, which definitely affects performance. So, one problem can certainly lead to another.
Why These Things Fail (It’s Not Always What You Think)
It’s important to understand the difference between a failed heat exchanger and a failed O-ring seal. The O-ring that seals the exchanger to the intake manifold is a wear item, and you can replace it independently. But when the exchanger itself fails, the damage is structural, and you’re looking at a full replacement.
From what I’ve seen, the most frequent failure point is those plastic end tanks. They’re crimped or bonded to the aluminum core. Over years of constant thermal cycling — expanding when hot, contracting when cold — that plastic gets brittle. Eventually, it cracks or delaminates right at the joint. This is especially common on units where those plastic end caps are just baked by prolonged engine heat.
Another big cause is internal corrosion within the aluminum core. This almost always happens when the wrong coolant is used. I’ve seen it from mixing G40 with G48, using tap water instead of distilled, or just plain old neglecting the recommended service interval. Electrolytic and galvanic corrosion literally eat away at those thin-walled aluminum tubes, leading to tiny pinhole leaks. These can be really tough to spot until coolant starts actively escaping under pressure.
Porsche themselves have acknowledged this pattern in their service literature for certain model years. They’ve noted that thermal stress and material incompatibility contribute to these premature failures. While a physical impact or a botched installation can certainly cause damage, the vast majority of failures I see come down to age, those repeated heat cycles, and, critically, poor coolant maintenance. It’s not usually a design defect, just a wear item that eventually gives up the ghost.
The Only Real Fix: Full Replacement
This Is Professional Territory
Let me be absolutely clear: if that heat exchanger is leaking from the plastic end tank or the core itself, there is no repair. You’re replacing the entire unit. This isn’t a quick job; it’s a pretty involved process that requires removing the intake manifold. That means disconnecting throttle bodies, various sensors, and vacuum lines. For most DIYers, unless you’ve got solid experience with complex engine disassembly, this is a PROFESSIONAL-ONLY repair.
You’ll need some specific tools for this job: a T30 Torx bit, an E12 external Torx socket, and, critically, a torque wrench capable of precise settings. The essential parts include the new heat exchanger itself (double-check the part number for your specific engine, something like 958-106-175-xx is common, but verify!), a new O-ring for the mounting flange, and fresh intake manifold bolts. These intake manifold bolts are torque-to-yield, or “stretch” bolts. They are designed for one-time use and must never be reused — they lose their clamping force after being torqued down once.
When it comes to coolant, stick with only Porsche-approved G40 or G48, mixed 50/50 with distilled water. Don’t even think about substituting generic antifreeze. The wrong chemistry will accelerate corrosion in your new part and can absolutely void any warranty.
Reassembly torque is absolutely critical here. The intake manifold bolts typically require 8 Nm plus an additional 90-degree turn. The heat exchanger mounting bolts themselves are usually torqued to 8 Nm — no more. You’ve got to follow the factory sequence for these bolts and use a properly calibrated torque wrench. Skipping these steps is how you end up with vacuum leaks, coolant seepage, or even a warped intake manifold, leading to a comeback job.
Now, about stop-leak products: I’ve had customers try them, hoping to buy some time. While a product like Bar’s Leaks might temporarily seal a tiny pinhole, it’s a TEMPORARY / LAST-RESORT measure with real risks. These sealants can clog the narrow passages not just in the heat exchanger, but also in your heater core or oil cooler, potentially leading to overheating or even lubrication failure down the road. I only ever recommend this if you’re stranded and absolutely need to limp to a repair facility. It’s not a fix; it’s a bandage, and a risky one at that.
Don’t Skip This: Verifying the Repair
Installing the new heat exchanger is only half the battle. Proper validation is just as important, if not more so. After everything is reassembled, I always pressure-test the entire cooling system again to 1.5 bar and let it sit for at least 30 minutes. Any pressure drop greater than 0.1 bar tells me there’s still a leak somewhere — maybe a mis-seated O-ring or a component that wasn’t torqued correctly.
Once it holds pressure and is filled, the system absolutely has to be bled correctly. Air pockets in the heater core or engine block can cause false overheating readings or, just as frustrating, poor cabin heat. Use the factory bleed procedure: open the bleed valves (you’ll usually find them near the thermostat housing and sometimes near the heater core), run the engine to operating temperature with the heater on high, and cycle the RPMs to help purge that air. You might need to repeat this a few times.
Then, I like to thermal cycle the engine. Run it up to full operating temperature, shut it off, and let it cool completely — ideally overnight. Repeat this process two or three times. Check the coolant level each time and top it off as needed. During this whole period, I’m scanning for live data using my Porsche PIWIS scanner, or at least a capable OBD2 tool. I’m monitoring coolant temperature directly from the ECU and watching for any P12A1 or similar codes that could indicate overheating or air still trapped in the system.
If everything stays stable through all those steps, you’ve done it right. But trust me, rushing this validation step is the quickest way to a comeback job.
Cost vs. Value: A Realistic Look
This repair isn’t going to be cheap, but it’s a predictable and effective fix when it’s done right. The cost really depends on whether you tackle it yourself or bring it into a shop. Here’s a realistic breakdown based on what I see.
| Repair Type | DIY Cost (Parts Only) | Shop Cost (Parts + Labor) | Success Rate | Secondary Risk if Failed |
|---|---|---|---|---|
| Heat Exchanger Replacement | $400–$600 | $1,200–$2,000 | Near 100% with OEM part | Improper torque or bleeding can cause vacuum leaks, continued coolant loss, or repeated overheating. |
You’ve got to consider the bigger picture here. If the repair cost starts creeping up to 35-40% of your Cayenne’s wholesale value, it’s time to weigh that against other aging components. I mean, air suspension struts, transfer case issues, or transmission wear could be right around the corner on these vehicles. That doesn’t mean you shouldn’t fix it — if the rest of the car is solid and you plan to keep it, it’s a sound investment. But it is a moment to step back and assess the long-term prognosis for your vehicle.
Preventing the Next One
Look, you can’t stop plastic from aging, but you can absolutely extend the life of your new heat exchanger dramatically. The key is strict coolant discipline. Use only Porsche-specified G40 or G48 coolant, mixed precisely 50/50 with distilled water. And change it every 120,000 miles or 12 years, whichever comes first. This isn’t just an arbitrary number; that specific coolant mix is designed to control pH and prevent the electrolytic reactions that eat away at aluminum.
For early detection, make it a habit to inspect that engine valley during routine maintenance — oil changes, spark plug swaps, or air filter replacements. Shine a good flashlight down between the banks and look for any pinkish residue, crusty deposits, or that tell-tale smell of coolant. A small seep caught early can be addressed before it turns into an overheating situation or internal engine damage.
Vigilance Pays Off
Think of it like checking your differential fluid — a small, consistent maintenance habit that can prevent catastrophic failure. On a complex machine like a Cayenne, vigilance isn’t optional. It’s what keeps you driving those miles, instead of waiting for a tow truck.
