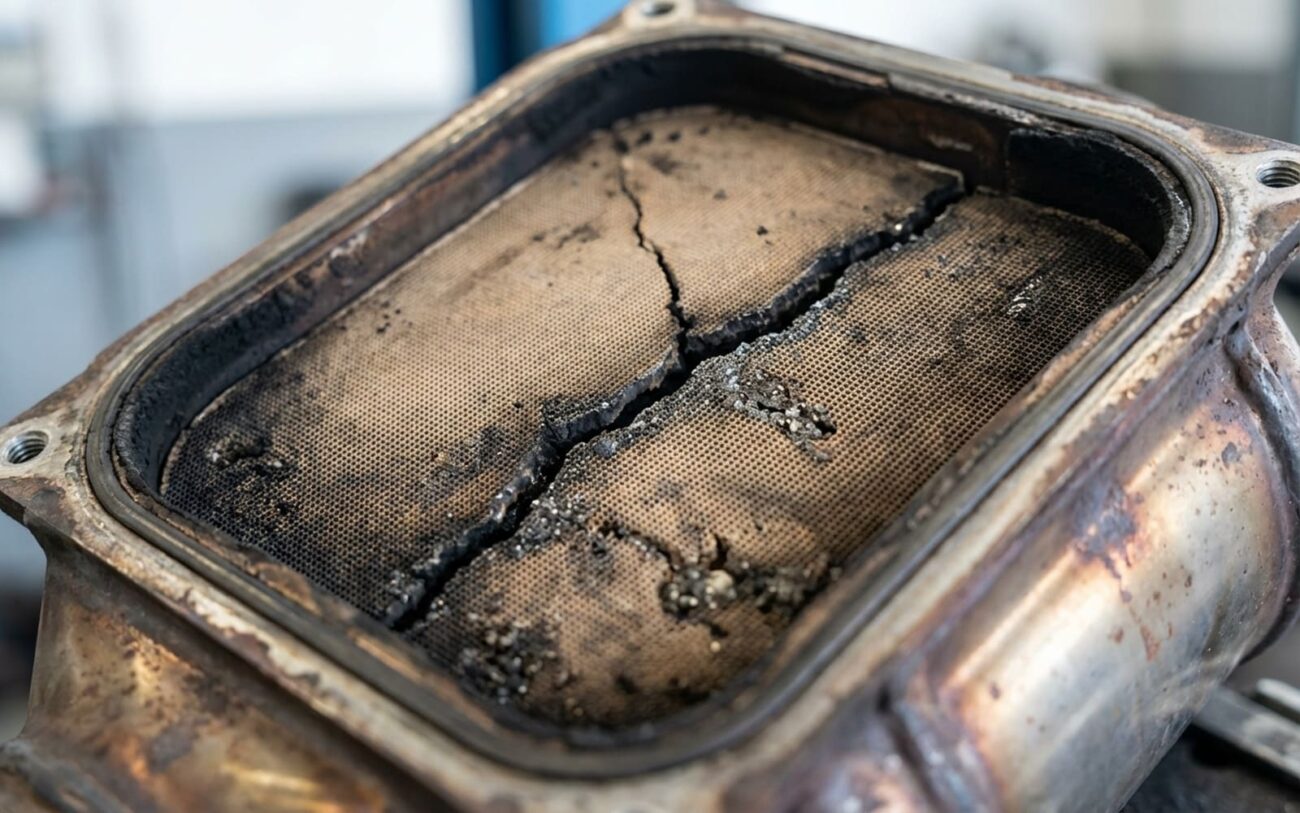
Alright, let’s talk DPFs. Diesel Particulate Filters. If you’re running a modern diesel, you know these things can be a real headache. After 25 years turning wrenches, I’ve seen more DPF failures and misdiagnoses than I can count. The truth is, when a DPF starts acting up — or worse, if someone’s yanked it out — the symptoms often look like a dozen other serious engine problems. Jumping to conclusions here will cost you big money and time. My job is to help you cut through the noise and figure out what’s really going on.
Symptoms: What You’ll See, Hear, and Smell
When a DPF goes south, your truck usually tries to tell you. But you gotta listen carefully, because the engine’s got a lot of ways to complain, and not all of them point to the DPF.
The most obvious sign, the one that screams “something’s wrong,” is thick, black smoke pouring out of the tailpipe, especially when you hit the throttle. A healthy DPF traps over 90% of soot, so if you’re seeing smoke, that filter isn’t doing its job. It could be cracked, completely choked with soot, or just plain missing. But hold on — don’t condemn the DPF just yet. I’ve seen plenty of failed turbocharger seals dumping oil into the exhaust, or a fuel injector stuck wide open, that’ll make just as much black smoke. The difference? Fuel-related or turbo smoke usually comes with obvious performance issues like misfires or serious power loss. DPF-related soot, on the other hand, often shows up when the truck is trying (and failing) to regenerate.
Another big red flag is the engine constantly trying to regenerate but never finishing. You’ll notice the engine idling high for extended periods, a strong diesel smell, and sometimes a hot, metallic odor from the back of the vehicle. What’s happening is the engine control module (ECM) is injecting extra fuel to crank up exhaust temperatures and burn off soot. But if the DPF is too clogged or damaged, that soot just won’t combust. This cycle repeats every few hundred miles instead of the normal 500–800-mile interval. While this pattern screams DPF trouble, it can also be caused by failed exhaust temperature sensors or a faulty fuel doser injector that isn’t spraying fuel correctly into the exhaust.
Of course, not every power loss or dip in fuel economy means your DPF is shot. Those are broad-spectrum symptoms. A failing EGR valve, a completely clogged air filter, or even a weak fuel pump can cause similar drivability problems. That’s why you always, always need to validate your diagnosis with hard data before you condemn the DPF. I’ve seen too many good DPFs replaced because someone didn’t do their homework.
My Diagnostic Approach: Isolating the Real Problem
Diagnosing a DPF isn’t about guessing. It’s about systematically ruling things out. I’ve seen shops throw new filters at trucks based on a smoke cloud or a single code, only to find the real issue was a bad sensor or a leaky injector. You need the right tools: a professional-grade scan tool that can talk to the emissions module and command regeneration cycles, plus some basic physical checks. Your cheap OBDII reader won’t cut it here.
Here’s how I break down the most common DPF-related complaints, what they really might mean, and the definitive tests I use to confirm the root cause. This is the exact process I follow in my shop every day.
Status: CRITICAL
Scenario 1: Excessive Soot in the Exhaust
If you’re seeing more black soot than usual, especially under load, the DPF might be removed, have a cracked ceramic substrate, or regeneration has simply failed. But I’ve also seen this with faulty fuel injectors, low turbo boost, or incorrect injection timing. To confirm, I’ll command a forced regeneration with the scan tool and monitor exhaust temperatures. The outlet temp should get above 550°C. If it doesn’t, or if it smokes like a chimney during regen, I’ll pull the DPF and visually inspect the ceramic core for cracks. If it’s cracked, it’s done.
Scenario 2: High Exhaust Backpressure DTCs
Codes like P2463 or P242F usually point to high exhaust backpressure. This means the DPF is clogged with ash, melted, or collapsed. However, it could also be a faulty differential pressure sensor, blocked or disconnected hoses to that sensor, or even a software glitch in the ECM. My go-to test here is to check live differential pressure readings at 2500 RPM. A healthy DPF should read below 15–20 kPa max. If it’s spiking much higher, you’ve got a restriction.
Scenario 3: Failed or Incomplete Regeneration
If your truck is constantly trying to regen but never completing the cycle, the DPF is likely saturated, thermally damaged, or has blocked channels. But again, don’t jump. A failed exhaust temperature sensor (which tells the ECM it’s not hot enough), a faulty fuel doser injector (which isn’t spraying fuel for regen), or even an ECM software issue can mimic this. To diagnose, I graph the pre- and post-DPF temperatures during a commanded regen. If the post-DPF temp doesn’t rise significantly, or if there’s no differential, the problem is upstream of the filter itself—likely a sensor or the doser.
The bottom line is you can’t rely on a single data point. You need a professional-grade scan tool with bidirectional control capabilities. An infrared pyrometer and an exhaust backpressure gauge are also invaluable for cross-checking sensor readings. Without these, you’re just troubleshooting blind, and that’s how you end up replacing perfectly good parts unnecessarily.
Root Cause Analysis: Why Your DPF Failed
Once you’ve confirmed the DPF is the problem, the next step is figuring out why it failed. Most DPF issues boil down to one of three things: ash buildup, thermal damage, or physical damage. Knowing the root cause dictates your repair path. Trust me, you don’t want to fix the symptom without fixing the cause, or you’ll be doing the job twice.
First up is ash accumulation. This is the most common long-term failure I see. Unlike soot, which burns off during regeneration, ash is non-combustible residue from engine oil additives and fuel impurities. It builds up slowly over time, clogging the filter’s channels like concrete in a pipe. Short-trip driving and excessive idling make it worse because the engine rarely gets hot enough for a complete, effective regeneration. I see this constantly in delivery vans, city buses, and even some older pickup trucks that spend too much time in traffic.
Then there’s thermal damage. This happens when the DPF overheats, usually from an uncontrolled regeneration. This can occur if the ECM misjudges the soot load and dumps too much fuel, or if a leaking fuel injector introduces raw fuel into the exhaust. When that fuel ignites in the already hot exhaust stream, temperatures can skyrocket past 1,200°C, melting the ceramic substrate. When I pull these, I often see a warped, glazed, or completely collapsed filter. Sometimes the entire core looks like a molten mess. Once this happens, cleaning isn’t an option—you’re looking at a full replacement.
Finally, physical damage is less common but just as serious. The ceramic monolith inside the DPF is brittle. A hard road impact, improper handling during service, or even thermal shock—like driving through deep water with a scorching hot DPF—can crack or shatter it. A cracked filter means exhaust gases can bypass the filtration media, rendering it useless. You might still pass a pressure test under light load, but under acceleration, you’ll see soot escaping freely. On the 2011-2016 Duramax, I’ve seen these crack from simply hitting a large pothole.
One critical point: A clogged EGR cooler or a failing turbo isn’t a DPF failure, but both can accelerate DPF problems like crazy. Oil from a blown turbo or excessive soot from a rich-running engine will overload the filter far faster than normal. Always inspect upstream components before you blame the DPF itself. If you don’t fix the root cause, your new DPF won’t last.
Fixing It Right: Your Repair Options Explained
Your repair options depend entirely on the type of failure and whether someone’s been tampering with the system. There’s no magic bullet here, and definitely no one-size-fits-all fix.
This is Professional Territory Only
DPF restoration isn’t a DIY job. It needs specialized thermal cleaning equipment or J2534-compliant tools for ECM reflashing. Trying to “clean” a DPF with unapproved additives or improper tools is a recipe for permanent substrate damage. Don’t even think about it.
Professional Cleaning Professional Only
Component Replacement Professional Only
Full System Reinstall & Reflash
A Note on Additives
Do not use fuel additives claiming to clean the DPF. Most of them are snake oil; they do little to nothing for ash buildup and can even foul your injectors. OEM-approved cleaning additives can help with early-stage soot buildup, but this is a band-aid, not a fix. Use them sparingly, if at all, and only if you’re sure it’s a soot issue, not ash or damage.
Post-Repair Validation: Don’t Skip This Step
You’re not done just because the DPF is cleaned or replaced. This is where you separate the pros from the hacks. Validation ensures the repair actually worked and prevents costly comebacks. You wouldn’t change brakes and not test them before driving, right? Same principle here.
For a cleaned or new DPF, I always initiate a forced regeneration using my scan tool. I monitor the inlet and outlet temperatures closely—they should rise steadily and peak above 600°C. After the regen completes, I check the differential pressure at 2,500 RPM. A healthy, properly functioning DPF should read below 5 kPa. Then, I road test the vehicle under mixed driving conditions. The system shouldn’t set P2002, P2463, or similar codes within the first 50–100 miles. If it does, something’s still wrong.
If you’ve reinstalled a full system after a delete, validation is even more critical. It includes both mechanical and software checks. All emissions monitors (catalyst, evaporative, EGR, etc.) must go to “Ready” status after a proper drive cycle. This confirms the ECM is functioning in its legal, emissions-compliant mode. Visually inspect for any smoke under load—there should be none. For a definitive check, especially on commercial vehicles, I’ll use an exhaust opacity meter; anything above 20% opacity indicates a problem that needs immediate attention.
Always use a capable scan tool to monitor soot load, regeneration frequency, and pressure delta. These metrics are your early-warning system for future problems. Skipping validation is just asking for trouble, and it’s unprofessional.
Cost, Risk, and Making the Hard Decisions
DPF repairs are never cheap, and the cost can swing wildly depending on the solution. Here’s a realistic breakdown based on what I see in my shop, including current parts and labor rates.
| Repair Type | DIY Cost | Shop Cost | Success Rate | Secondary Risk if Failed |
|---|---|---|---|---|
| DPF Cleaning | N/A (requires professional equipment) | $300–$600 | 60–80% | May accelerate failure if substrate is already thermally damaged or cracked. |
| OEM DPF Replacement | N/A (high labor and alignment risk) | $3,000–$8,000 | 95%+ | Exhaust leaks or sensor faults due to improper torque or gasket use. |
| Full System Reinstall (from delete) | N/A (complex calibration required) | $4,000–$10,000+ | Varies | Existing oil dilution may have already caused worn crankshaft journals or bearing damage. |
Here’s a hard truth I tell every customer: if the DPF replacement cost exceeds 40% of your vehicle’s market value—and it’s not absolutely essential for your work—it may be more economical to consider replacing the vehicle entirely. I’ve had clients spend $7,000 on a DPF for a truck worth $12,000. That’s a tough pill to swallow, but it’s better than sinking good money into a ticking time bomb that’s going to cost you more down the road.
Prevention & Monitoring: Your Best Defense
The best DPF repair is always the one you never have to do. Preventive maintenance is absolutely key, especially with how complex these emissions systems have become. Treat your DPF right, and it’ll treat you right.
Maintenance Best Practices
-
Use only low-ash engine oil (API CK-4 or FA-4). These oils are specifically formulated to minimize ash accumulation in your DPF. Stick to the manufacturer’s oil change interval strictly—don’t stretch it.
-
Monitor DPF health proactively. During routine service, always scan for soot load percentage and regeneration frequency. Catching underlying issues early can save you thousands.
-
Visually inspect the DPF housing and connections. Soot stains or carbon tracking around flanges suggest leaks or cracks that need immediate attention. Don’t ignore them.
