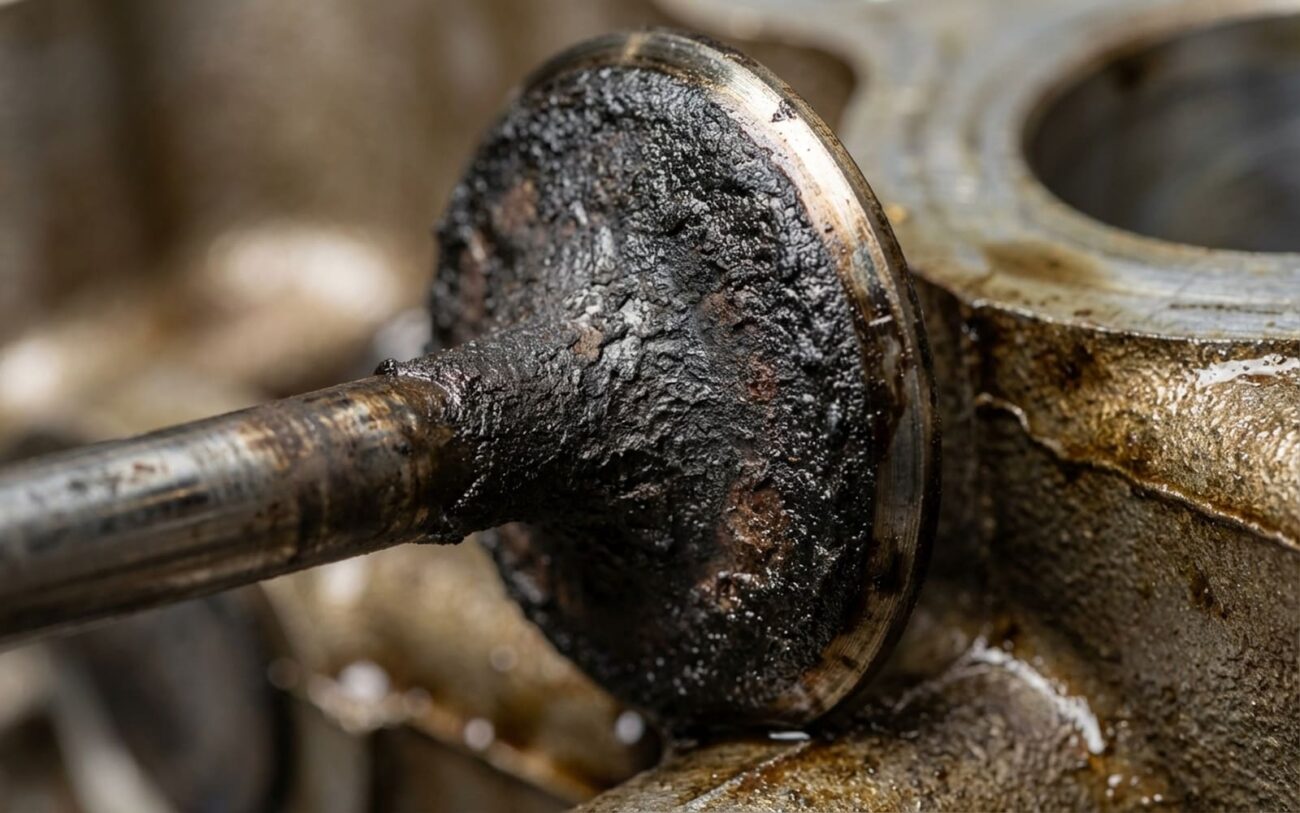
“My GDI engine is running rough, especially when it’s cold. It’s stumbling, feels down on power, and I’ve got a check engine light with misfire codes like P0300.” I hear that call weekly in my shop, and frankly, it’s almost always the same story: thick carbon deposits caked onto the backside of the intake valves. On the Ford EcoBoosts or the VW/Audi 2.0L TSIs, it’s practically a guarantee.
These deposits aren’t just ugly; they’re choking your engine. They restrict the airflow, mess up the precise air-fuel mixture, and make the engine run like crap, especially on a cold start. Think about it: if the engine can’t breathe right, it can’t burn fuel efficiently. That unburned fuel can then slip past the piston rings, contaminating your oil, or worse, overload the catalytic converter. And if that carbon gets hot enough, it can ignite the fuel before the spark plug even fires – that’s pre-ignition or knock, and it’s a fast track to bent pistons or even a valve getting stuck open if a chunk breaks off. GDI engines are great for fuel economy and power, no doubt, but this carbon buildup? It’s the trade-off, plain and simple. No fuel washing over those valves means nothing to clean them.
Why GDI Engines Get Gunked Up (And How I Check It)
It’s not your fault, and it’s usually not a defective part. This carbon problem is baked right into the GDI design. See, with older engines, the fuel injectors sprayed gasoline into the intake port, and that fuel (with its detergents) would wash over the back of the intake valves, keeping them relatively clean. But with GDI, the fuel gets sprayed directly into the combustion chamber. Those intake valves? They never see a drop of fuel, so there’s nothing to clean ’em.
Meanwhile, your engine’s PCV (Positive Crankcase Ventilation) system is constantly recirculating oil vapor and combustion byproducts back into the intake manifold. When that oily mist hits those hot intake valves—and they can get screaming hot, 300-500°F—it bakes on. Over time, it just builds up, layer after layer, like plaque. Turbocharged engines are even worse off because of higher crankcase pressures and how they’re often driven. Manufacturers know this; I’ve seen plenty of service bulletins for specific Ford EcoBoost, Audi/VW TSI, and BMW N54/N55 engines detailing cold-start misfires directly linked to this issue.
Now, here’s the kicker: carboned-up valves can make your engine act just like it has a bad ignition coil, a clogged injector, or even worn camshafts. So, before you start throwing parts at it, you’ve got to confirm it’s actually carbon. A lot of shops will just jump to a cleaning, but that can be a waste of time and money if it’s something else entirely.
My Go-To Diagnostic Steps: Ruling Out the Mimics
When a car rolls in with these symptoms, I follow a pretty standard diagnostic routine. The key is to isolate the problem. Here’s what I look for and how I confirm it:
-
Misfires & Rough Idle: If it’s worst on a cold start and at low RPMs, often smoothing out a bit as the engine warms up, that screams carbon. The deposits disrupt the air swirl and even absorb fuel, making combustion inefficient.
- Mimics: Bad ignition coil, worn spark plug, leaky or clogged fuel injector, or even worn camshaft lobes.
- My Test: I always start with a relative compression test using the scan tool. If that looks good, the definitive step is a visual inspection. I pull the intake manifold and get a borescope in there. No guessing when you can see it.
-
Loss of Power: This is usually a gradual thing. The engine just feels sluggish because the carbon is progressively choking off airflow. Sometimes it feels a little better after a long highway drive, but it’s never really “right.”
- Mimics: Clogged catalytic converter, weak fuel pump, restricted air intake (like a dirty filter), or low turbo boost pressure.
- My Test: After a relative compression test, I’ll do a cylinder balance test. Then, I’m looking for airflow restrictions. If the borescope shows heavy carbon, and the engine isn’t pulling enough air, that’s my answer.
-
Knock or Ping (LSPI): This is serious. Low-Speed Pre-Ignition happens when hot carbon deposits act like glow plugs, igniting the fuel-air mixture before the spark plug fires. It’s often heard under light load.
- Mimics: Low-octane fuel, incorrect ignition timing, overheating, or carbon buildup in the combustion chambers (different issue, but related).
- My Test: I monitor the knock sensor data with a good scan tool. If the engine computer is constantly pulling timing even when the fuel is good and the engine isn’t overheating, carbon on the valves is a prime suspect.
Tech Tip: Don’t just rely on codes. A P0300 (random misfire) is a symptom, not a cause. You need to dig deeper. A borescope is your best friend here; it eliminates all the guesswork.
How I Fix It (And What NOT To Do)
Walnut Shell Blasting Professional Only
For most vehicles with moderate to heavy carbon buildup, walnut shell blasting is the gold standard. This isn’t a job for your average DIYer, though I’ve seen some very skilled enthusiasts tackle it successfully. You’re going to need specialized equipment: a media blaster, 20-40 grit crushed walnut shells, a high-volume shop vac, and sealing adapters for the intake ports.
The process involves removing the intake manifold, rotating the crankshaft to close the valves on the cylinders you’re working on, then carefully blasting each intake port. The walnut shells are abrasive enough to chip away the carbon but soft enough not to damage the aluminum or steel. After blasting, you must vacuum out every last bit of media. Leaving walnut shells in the cylinders is a recipe for serious engine damage.
When you reassemble, factory torque specs are non-negotiable. For example, on many VW/Audi 2.0L TSI engines, those intake manifold bolts aren’t just torqued; they require a specific torque-angle sequence—something like 7 Nm plus two 90-degree turns. If you don’t have a quality torque-angle gauge, you’re guessing, and that can lead to vacuum leaks or a warped manifold. Take your time here; it’s critical.
Cylinder Head Removal Professional Only
Chemical “Top Engine Cleaners” Temporary / Palliative Only
Worse, spraying a large amount of solvent into a running engine carries a real risk of hydro-lock – that’s when liquid fills a cylinder and can bend a connecting rod. I’ve seen it happen. These chemicals can also degrade MAF sensors or even damage turbo seals. My advice? Save your money. This isn’t a fix; it’s a gamble, and the odds aren’t in your favor.
Making Sure the Job’s Done Right: Post-Repair Checks
You don’t just put it back together and cross your fingers. After any carbon cleaning, especially walnut blasting, thorough verification is absolutely critical. I always follow these steps:
-
Visual Re-inspection: Before the intake manifold goes back on, I get the borescope back in there. You should see clean, smooth valve surfaces—I aim for 90% or more carbon removal. And this is key: absolutely no walnut media left in the ports or on the pistons. Any residual media can score cylinders or damage bearings.
-
Road Test & Scan Tool Data: Once everything’s buttoned up, I take it for a good drive. The idle needs to be smooth, especially on cold starts. Throttle response should feel crisp and linear, like the engine can finally breathe. On the scan tool, I’m watching misfire counters; they should be at zero and stay there across multiple drive cycles. Long-term fuel trims (LTFTs) are another big one. They should normalize, ideally within ±5%. If they’re still way off, say +10% or higher, you might have residual carbon, a vacuum leak, or another underlying issue.
-
Cylinder Head Specific Checks: If we had to pull the cylinder head, the stakes are higher. I’ll perform a cooling system pressure test to confirm that new head gasket is sealing perfectly. A combustion leak (or “block”) test is also a must to check for exhaust gases in the coolant, which would indicate a head gasket failure or even a cracked head. Finally, a compression test across all cylinders should show balanced results—no more than 10% variation between cylinders. If you’re still chasing misfires after a head job, you need to revisit everything, including potential coolant issues.
The Bottom Line: Cost and When to Call It Quits
Let’s talk money. These repairs aren’t cheap, and the cost can vary a lot depending on your vehicle and how bad the buildup is. Here’s a general idea of what you’re looking at, based on what I see in the shop:
-
Walnut Blast Cleaning: If you’re doing it yourself and have the tools, you might get away with $300 for materials. In a reputable shop, expect to pay anywhere from $500 to $900. This method has a high success rate, usually 95% or more, assuming it’s done correctly. The main risk is incomplete cleaning or, worse, walnut media getting left behind in the cylinders.
-
Cylinder Head Removal: This is the big one. DIY cost for parts alone could be around $800, but honestly, this is rarely a DIY job. In a shop, you’re looking at $2,000 to $3,500, easily. Success rate is typically 98%+, but the risks are higher: timing errors on reassembly, incorrect torque leading to leaks, or even head warpage if not handled properly.
-
Chemical “Cleaners”: You might spend $50 for a can or $150 for a shop to spray it. My success rate for these is less than 30%. The risks? Hydro-lock, damaging your MAF sensor, or degrading turbo seals. Not worth it, in my opinion.
Slowing Down the Carbon: My Prevention Tips
Look, you’re never going to completely eliminate carbon buildup in a GDI engine; it’s just how they’re designed. But you can definitely slow it down and extend the time between cleanings. Here’s what I recommend to my customers:
My Carbon Prevention Checklist
-
Use Top Tier Fuel: Always fill up with Top Tier detergent gasoline. While it won’t clean your intake valves (remember, the fuel bypasses them), it keeps your fuel injectors clean. Clean injectors mean better spray patterns and more complete combustion, which in turn reduces the amount of blow-by gases and oil mist recirculated through the PCV system. Less gunk going in means less gunk baking on.
-
Install an Oil Catch Can: This is probably the single most effective preventative measure you can take. A good quality oil catch can, installed in the PCV line, traps a significant amount of that oil vapor before it ever gets to your intake manifold and valves. I’ve seen these make a huge difference, especially on turbocharged GDI engines.
-
Monitor Fuel Trims: If you have an OBD2 scanner, keep an eye on your long-term fuel trims (LTFTs) at idle. A steady climb, say from +5% to +10% or +12%, can be an early warning sign of airflow restriction from carbon buildup. Catching it early can save you a lot of headache.
-
Preventative Borescope Inspections: For engines known to have carbon issues, I recommend a borescope inspection every 30,000 to 50,000 miles. It’s relatively inexpensive, and it lets you see the buildup before it becomes a major problem.
-
Choose the Right Oil: Use only API SP or ACEA C-rated (low-ash) oils. These oils are specifically formulated to reduce low-speed pre-ignition (LSPI) and minimize deposit formation. It’s a small change that makes a big difference over the life of the engine.
