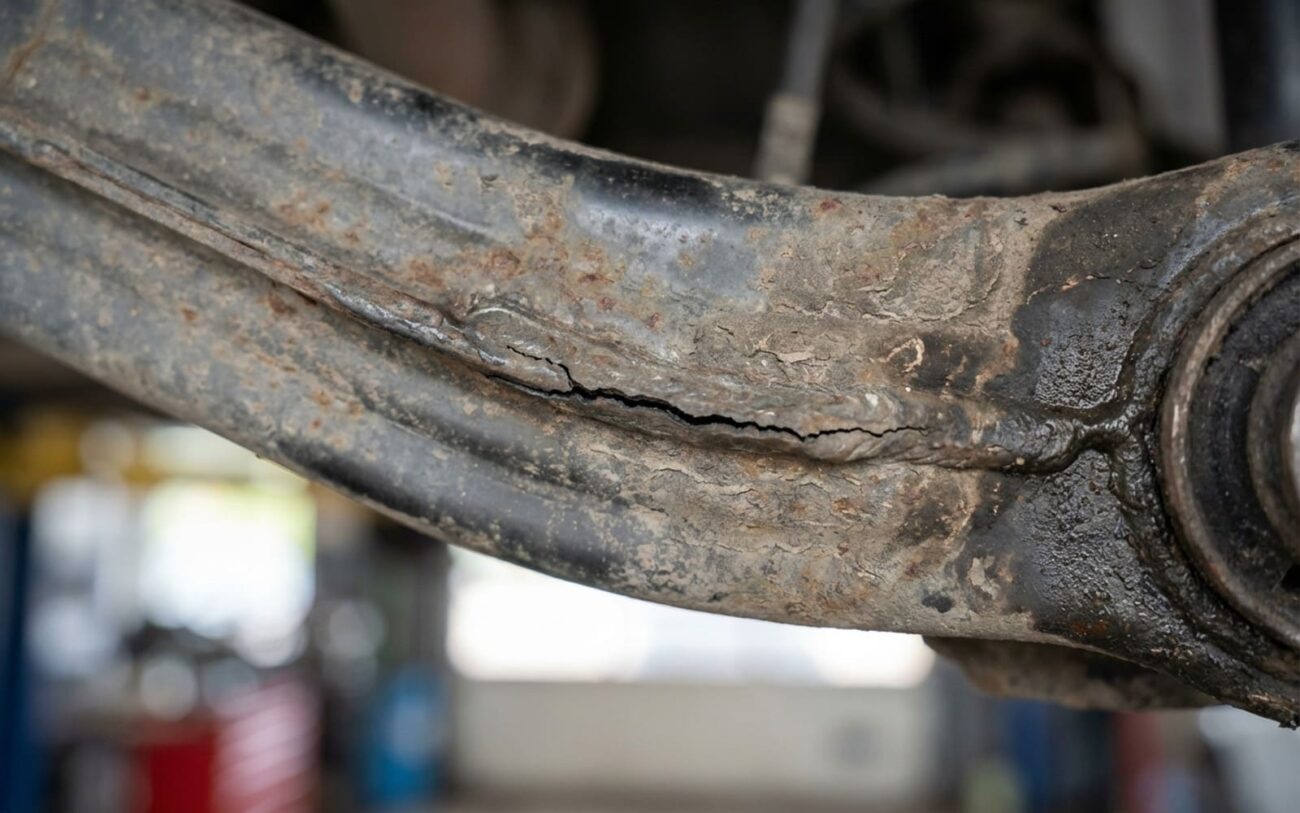
Recognizing the Problem: When Your Trailing Arm Shouts
Look, if you’re driving a Ford Focus, especially a Mk2 or Mk3, and you’re hearing weird noises from the back, pay attention. I’ve seen this issue on dozens of these C1-platform Fords over the years, and when a rear trailing arm starts to go, it doesn’t just whisper – it shouts. Once you know what to look and listen for, the signs are pretty unmistakable.
This isn’t just some minor bushing wear we’re talking about here. The trailing arm is a big deal. It’s the main anchor for your rear hub, tying it all the way up to the front subframe mount. It keeps your rear wheels pointed straight and handles all the abuse from bumps and turns. When that thing cracks, you’re not just looking at a worn-out part; you’ve got a serious structural compromise on your hands.
INTEGRITY MONITOR
Status: CRITICAL
The Concept
“It doesn’t whisper—it shouts. A crack in the stamped steel is a sharp, resonant signal that the car’s foundation is failing.”
The absolute dead giveaway, the thing that makes my stomach drop every time I see it, is a visible fracture. We’re not talking about a little surface rust or some minor pitting here. I mean a clean, sharp crack in the stamped steel itself. You’ll usually find these cracks in the high-stress areas: where that vertical leg of the arm meets the horizontal mounting flange, right near the front bushing, or sometimes around the welded spring perch.
Even if you haven’t seen the crack yet, the car will definitely be trying to tell you something. A loud, metallic “clunk” or “pop” from the back end, especially over little bumps or when you’re just creeping along at low speeds, is a classic warning sign. This isn’t the dull thud you get from a worn-out bushing; this is a sharp, resonant impact – that’s metal hitting metal as the cracked sections shift under load. Another huge red flag is if you suddenly notice the rear wheel alignment is way off. You might see excessive negative camber, where the top of the tire leans inward. That’ll show up as rapid, uneven inner-edge tire wear, and it’s a sure sign something structural is wrong.
Differential Diagnosis: Is It Really the Trailing Arm?
Now, before you go condemning that trailing arm, it’s crucial to rule out other common failures. A clunk or an alignment shift can come from a few different places in the rear suspension, and believe me, a misdiagnosis is just a fast track to wasting your time and money.
For instance, those big rubber bushings where the entire twist-beam axle mounts to the body? If they’re shot or completely separated, the whole axle can shift around. That’ll give you clunks and alignment issues. Same goes for failed shock absorbers, especially their upper mounts – they can rattle like crazy over bumps. And don’t forget loose or broken anti-roll bar links; they’re another frequent noise maker I see.
The trick here is targeted inspection. You start by figuring out the symptom pattern, then you use proven diagnostic methods to narrow it down. If you’re hearing noise mostly during turns, for example, that might point you towards a CV joint — we’ve got a whole guide on crunching sounds when turning if that fits your situation. Or if it’s a knocking noise that happens when you’re just coasting, you’ll want to check out our coasting knock diagnosis to rule out driveshaft or axle issues.
| Symptom | Indicative of Crack | Common Mimics | Definitive Test |
|---|---|---|---|
| Excessive negative camber on one rear wheel | Crack at front pivot or spring seat altering arm geometry | Worn twist-beam bushing, impact damage, or bent arm |
Inspect arm with bright light/mirror for cracks near weld seams. |
| Sharp clunk from rear over bumps | Crack opening/closing under load, metal impacting metal | Failed shock absorber, worn top mount, loose anti-roll bar link |
Perform bounce test; visually inspect shocks and links. |
| Handling instability or drifting | Loss of wheel alignment control due to structural failure | Worn rear bushings, unbalanced tires, failing dampers |
Measure camber/toe; >0.5° delta suggests structural damage. |
Why It Happens: Root Causes of Trailing Arm Failure
So, why do these stamped steel trailing arms crack in the first place? After all these years, especially seeing it so often on the Mk2 and Mk3 Focus models – and particularly the ST and RS variants with their stiffer suspension setups – I can tell you it almost always comes down to two main culprits: metal fatigue and corrosion. And usually, they’re working together to really speed up the failure.
Fatigue cracks typically start at stress concentration points. Think sharp bends in the metal, weld seams, or even the holes drilled for the bushings. Once a tiny hairline crack forms there, every single load cycle – every bump, every turn – just makes it grow bigger. Corrosion is the other big player. Road salt and moisture love to collect in those tight recesses, especially around the front bushing and the spring seat. Those rust pits act like tiny little knives, creating stress risers that make the metal much, much more prone to cracking.
Critical Distinction:
Now, it’s really important to understand the difference here. A worn trailing arm bushing? That’s common, expected wear and tear on a rubber part. But a cracked arm is structural failure. It’s not a maintenance item; it’s a serious safety concern, the kind of thing that could lead to a recall.
The Fix: Full Replacement is the Only Way
No Safe Welding Alternative
I’ve seen people try to weld these cracked arms, and I’m telling you right now, I don’t recommend it. The heat from welding seriously weakens the surrounding metal, and even a tiny bit of misalignment from the repair will throw your suspension geometry completely out of whack. Ford doesn’t support welding repairs on these for a reason.
Step 1: Full Trailing Arm Replacement
So, what’s the fix? There’s really only one reliable way to go: full replacement. First, you’ll need to free the hub from the old arm. Sometimes a ball joint separator works, other times you might need a small press. Once that’s out, you install the new arm. Make sure you use a quality part – OEM is always best, but a trusted aftermarket brand like Moog can work too.
Step 2: New Torque-to-Yield (TTY) Fasteners
Now, this is critical: you absolutely must use a new front pivot bolt and nut. These are torque-to-yield (TTY) fasteners, meaning they stretch when torqued and are designed for one-time use. Reusing them is asking for trouble. Torque them down to about 85 lb-ft, then give them a final 90-degree turn. Always double-check your specific model’s service manual for the exact specs, though.
Step 3: Mandatory 4-Wheel Alignment
And finally, after all that, a mandatory 4-wheel alignment. Replacing a trailing arm directly impacts your rear camber and toe. Skip the alignment, and you’re just guaranteeing rapid tire wear and sketchy handling. I always aim for no more than a 0.5° difference between sides after an alignment.
Post-Repair Validation: Don’t Skip the Test Drive
Just bolting in the new arm is only half the battle. You’ve got to validate the repair to make sure you actually fixed the original problem and didn’t accidentally create a new one. Start with a good visual check: the new arm should sit perfectly flush, no binding anywhere. Then, take it for a controlled test drive. Hit some of those small bumps, pull into a few driveways – the clunk should be completely gone. If you hear any new noise, or the old one is still there, something’s wrong. Get it back on the lift and double-check your work.
Cost, Risk & The Smart Decision
When it comes to the cost and risk, here’s a quick rundown of what you’re typically looking at:
| Repair Option | DIY Parts Cost | Shop Estimate | Success Rate | Risk of Failure |
|---|---|---|---|---|
| Full Replacement | $150–$400 | $500–$900 | ~100% | Low |
| Weld Repair | $50–$100 | $200–$400 | <30% | High |
Prevention: Keep an Eye (and Ear) Out
To Keep This From Happening Again
So, how do you keep this from happening again? It’s mostly about vigilance, especially if you live somewhere with road salt.
-
Regular undercarriage washes. If it’s winter and they’re salting the roads, get under there with a high-pressure rinse every few weeks to blast that salt buildup away.
-
Proactive inspection. Whenever you’ve got the wheels off for a tire rotation or brake job, shine a bright light right on that pivot area and around the spring seat. Look for any signs of rust or, worse, a hairline crack.
-
Listen for clunks. A new clunk or pop isn’t just an annoyance; it’s your car trying to give you an early warning of structural fatigue. Don’t ignore it.
Pro Tip
Here’s a pro tip: If your Focus is otherwise in good shape, this repair is absolutely essential. You just can’t legally or safely drive around with a compromised suspension component like this. And often, an independent shop can get this done for you for about 30% less than what a dealership will charge.
