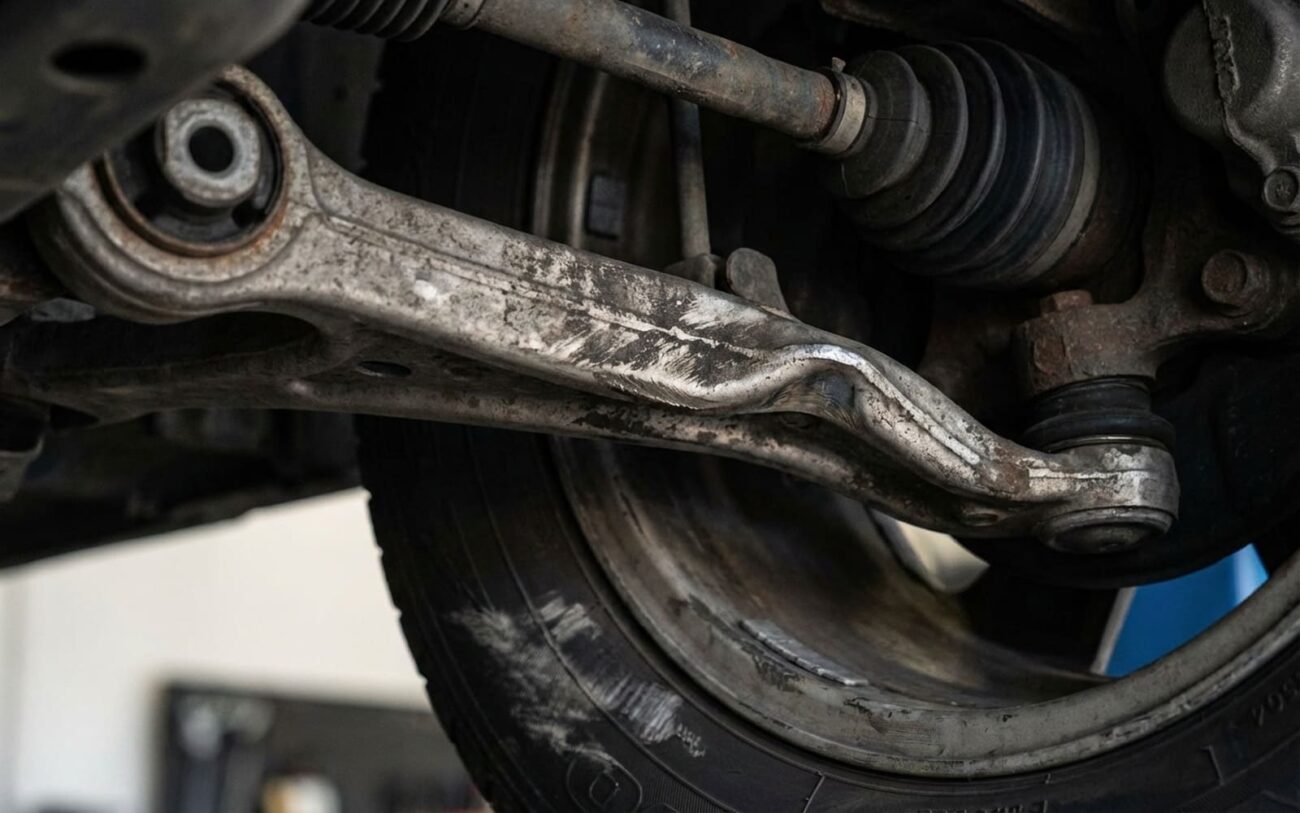
Hit a Curb, Now It Pulls? Let’s Talk Bent Control Arms.
Alright, so you clipped a curb. Maybe it was a parking lot, maybe a driveway, but now your car doesn’t drive straight. The steering wheel feels like it’s fighting you, pulling hard to one side. You know it needs an alignment, but that’s just the symptom. The real question, the one I get asked constantly in my shop, is: “What actually got bent?”
More often than not, after a good curb strike, the culprit is the front lower control arm. This isn’t your typical wear and tear; this is impact damage. It fundamentally changes the geometry of your front suspension. Control arms are designed to handle vertical loads – bumps, potholes, that kind of thing. They are absolutely not built to take a direct hit from a curb at 10 or 15 mph. When that happens, the arm bends, and your alignment goes right out the window. It’s a structural compromise, plain and simple.
Diagnosing the Damage: What I Look For
When a car comes in after a curb strike, I’ve got a systematic approach. We’re looking for physical damage, not just an alignment issue. A truly bent control arm leaves some pretty consistent clues.
The Driver’s Complaint: A Hard Pull
The biggest red flag is a constant, unrelenting pull to one side. This isn’t the subtle drift you get from road crown; this is a firm, mechanical tug on the steering wheel. It’s there at 30 mph, and it’s worse at 60. I’ve seen folks ignore this for weeks, only to come back with a tire worn bald on one edge. That’s no surprise – misaligned suspension eats tires alive, fast.
Now, a constant pull can sometimes be other things. A stuck brake caliper, for instance, can mimic it, or even a defective tire with a shifted belt (what we call radial pull). But after a curb hit, my focus immediately shifts to structural damage.
Visual Inspection: Does the Wheel Look Right?
Get down and take a good look at the front wheels from behind the car. If one wheel appears noticeably farther back or forward in the fender opening than the other, that’s a textbook sign of a bent control arm, especially if it’s a multi-link arm with a forward or rearward leg. It’s like the whole wheel assembly has been shoved out of place.
While you’re down there, look for fresh scrapes, dents, or obvious bends on the control arm itself. Sometimes it’s subtle, sometimes it’s glaring. On stamped steel arms, the bend often occurs at a sharp corner or near a welded seam. Aluminum arms might not bend visibly; they might crack or twist instead, which can be harder to spot without measurement.
The Alignment Machine Doesn’t Lie
Your best friend here is a good alignment shop with a modern four-wheel alignment system. This machine measures caster, camber, and toe with incredible precision, and critically, it shows side-to-side differences. If the alignment tech tells you they “can’t get the numbers right” – especially for caster or camber – that’s confirmation that something is physically bent.
Here’s what I look for on the alignment report:
-
A caster imbalance over 1.0 degree between the left and right side often points directly to a bent lower control arm or even a bent strut.
-
If camber is significantly out of spec and won’t adjust, that’s another strong clue. The mounting point for the wheel (via the ball joint) is no longer where it’s supposed to be.
-
If the adjustment bolts are maxed out and the angles still won’t come into spec, you’ve got a bent part. Period.
Beyond the alignment numbers, we’ll often do physical measurements. I’ll measure the wheelbase side-to-side – a difference over 5mm is a clear indicator of a shifted suspension. Then, I’ll measure from a fixed point on the subframe to the center of the ball joint on each side. A mismatch confirms a bent arm.
Don’t Overlook Related Components
A hard curb strike can be a full-on assault on your suspension. So, while the control arm is a prime suspect, it’s not the only one. Always check the tie rods, ball joints, and even the CV axle. If you’re hearing a crunching or clicking noise when turning, inspect those CV joints. A torn boot can destroy a joint quickly – yes, I’ve seen them fail within 300 miles. And a clunk from a CV joint can sometimes be mistaken for a worn ball joint or tie rod end. Take your time. Diagnose, don’t guess.
Driving with a bent control arm isn’t just about tire wear, by the way. It compromises stability, steering response, and overall handling. In an emergency maneuver, you won’t get the full range of motion or feedback from the suspension. It’s just not worth the risk.
The Repair: There’s Only One Safe Way
Professional Territory Only: DO NOT TRY TO STRAIGHTEN IT
Let me be absolutely clear: You cannot safely straighten a bent control arm. I’ve seen shops try it – heating it with a torch, using a hydraulic press, trying to bend it back into shape. Don’t do it. Heating metal changes its grain structure, weakening it significantly. You end up with a part that looks okay but is structurally compromised and could fail under load. Same goes for shimming or forcing alignment adjustments to compensate. That doesn’t fix the geometry; it just masks the problem. If the ball joint or mounting point is under abnormal stress, it could separate. That’s not a repair. That’s a time bomb waiting to go off.
The only safe, permanent fix for a bent control arm is replacement. Period. There’s no shortcut here.
Doing the Job Right: DIY or Pro?
If you’re a DIYer with decent mechanical skills, this is often a manageable job. You’ll need a new control arm (OEM or a high-quality aftermarket part), a ball joint separator (I prefer the press-style tool over a pickle fork, it’s cleaner), a good socket set, a torque wrench, and of course, a jack and jack stands. The process typically involves lifting and securing the car, removing the wheel, separating the ball joint from the steering knuckle, unbolting the arm from the subframe, and then installing the new one.
Reassembly is the reverse, but pay close attention to torque specifications. This isn’t a “snug it up” kind of job. Follow factory specs exactly. On many vehicles, the rear bushing bolt, for example, requires a specific torque plus an additional angle turn (e.g., 76 lb-ft + 90 degrees). The ball joint nut must be torqued to spec and secured with a new cotter pin. And please, for safety’s sake, never reuse old fasteners on suspension components.
If the damage isn’t immediately obvious, or if you’re just unsure, take it to a professional. A good shop will remove the arm and compare it to the opposite side or measure against known dimensions to confirm the bend. This isn’t a job to guess on.
Post-Repair: The Non-Negotiable Alignment
Installing the new control arm is only step one. The real test, and a critical part of the repair, is a professional four-wheel alignment. This isn’t optional. You need verified numbers, not just a centered steering wheel by guesswork. The success criteria are straightforward:
Success Criteria for a Proper Repair
-
All alignment angles—caster, camber, and toe—must be within the manufacturer’s specifications.
-
Side-to-side differences should be minimized: ideally, caster within 0.5°, camber within 0.3°.
-
There should be no binding or interference in suspension travel after reassembly.
If the alignment tech still can’t get the numbers right, even after a new control arm, then something else is bent. We’re talking possibly the strut, the steering knuckle, or even the subframe itself. Don’t leave the shop until that alignment report shows full compliance. That piece of paper is your proof of a proper repair, and your peace of mind.
What’s This Going to Cost You?
Costs always vary by vehicle, but here’s a realistic breakdown based on what I see in my shop.
If you’re tackling this as a DIY project, you’re primarily paying for parts. For most common models, a quality front lower control arm (often a complete assembly with bushings and ball joint) will run you anywhere from $150 to $400. You’ll also need that alignment afterward, which typically costs $100 to $150 at most shops.
Going the professional shop route includes labor, and that’s where the bill climbs. Labor time is usually 1.5 to 3 hours, and with shop rates often between $100–$150 per hour, labor alone can be $200–$450. Add in the part and the alignment, and your total bill will likely land somewhere between $450 and $900.
DIY Cost (Parts & Alignment): $250 – $550
Shop Cost (Parts, Labor & Alignment): $450 – $900
Before you commit to the repair, especially on an older vehicle, take a moment to consider its overall value. If the repair total is pushing 40% of the vehicle’s private-party value (check a trusted source like Kelley Blue Book), and the car has over 120,000 miles or other significant pending repairs, ask yourself: is this a smart investment? Sometimes, the best advice isn’t about fixing it, but about knowing when to move on.
Preventing a Repeat Performance
Look, most curb strikes are avoidable. It sounds simple, but slowing down in parking lots, watching your line when pulling into driveways, and giving curbs a wide berth really does make a difference. Remember, impact force increases with the square of speed – hitting a curb at 10 mph delivers four times the energy of a 5 mph bump. That’s why even what feels like “light” contact can bend parts.
For early detection, get into the habit of visually inspecting your suspension. When you’re at the shop for an oil change or tire rotation, take 30 seconds to look at your control arms. Check for bends, dents, or fresh scrapes. If you hit something and notice a new pull, odd tire wear, or any vibration, get it checked immediately. Don’t wait.
