That Crunching Noise When You Turn? Yeah, We Need to Talk.
If you’re hearing that distinct crunching or clicking sound when you turn — especially at low speeds, like pulling into a parking spot, and it gets louder when you give it some gas — you’re dealing with a classic symptom I’ve seen thousands of times in my 25+ years on the shop floor.
In pretty much any front-wheel-drive (FWD) or all-wheel-drive (AWD) vehicle, that noise almost always points to a failing constant velocity (CV) joint. These aren’t just fancy names; these joints are critical. They connect your transmission to your wheels, making sure power gets delivered smoothly even as your suspension bounces and your wheels turn sharply.
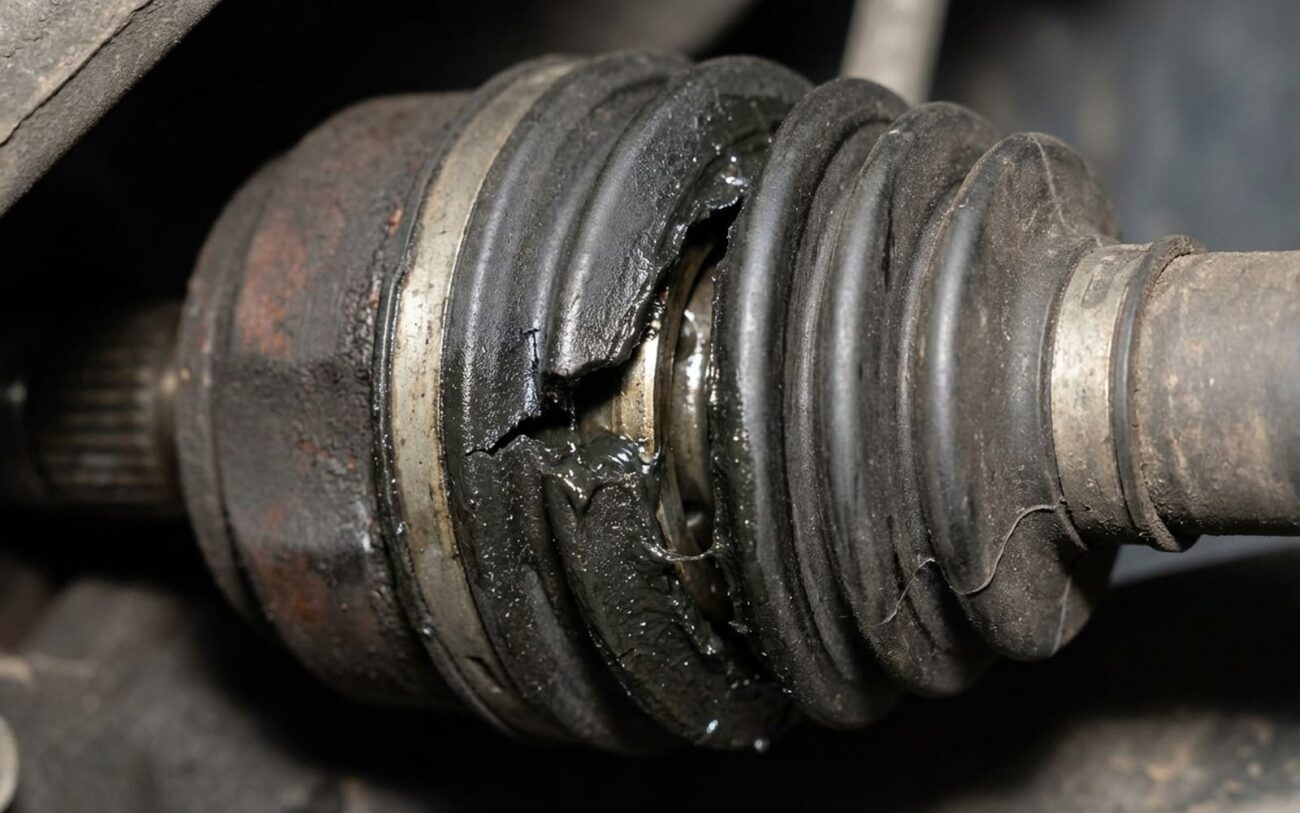
The problem starts small, usually with a tiny crack in a rubber boot. But once that boot fails, the special grease packed inside escapes, and road grit and water get in. From that moment, it’s a death sentence for the joint. Those precision internal components start grinding metal-on-metal, and that’s the crunching you hear.
Status: CRITICAL
Is It Really the CV Joint? My Diagnostic Approach.
Now, before you go tearing into things, let’s make sure we’re chasing the right ghost. It’s tempting to blame every clicking noise on a CV joint, but my experience tells me not to jump to conclusions. Other components can mimic these symptoms, and you don’t want to replace parts you don’t need.
The Classic CV Joint Clicks:
The most common symptom, and the one that screams “CV joint” to me, is a rhythmic clicking or crunching during tight turns, especially at low speeds. This usually points to a worn outer CV joint. Why? Because that outer joint has to articulate (bend) the most when you’re turning sharply. The more angle, the more load on those worn internal parts.
To confirm this, I’ll get the vehicle safely lifted. Then, I’ll rotate the driveshaft by hand near the outer joint and feel for any excessive play. I’ll also spin the wheel and listen closely for grinding or clicking directly from the joint itself. Sometimes, you can even see grease flung around the wheel well, which is a dead giveaway.
The Less Common, but Still Important, Clunk:
Another symptom, though less frequent, is a clunk or thud when you accelerate or decelerate suddenly. This often indicates a worn inner CV joint. These joints are designed to allow for in-and-out movement as the suspension compresses and extends. If they’re worn, you’ll feel that “clunk” as the slack is taken up or released.
My go-to test for this is to shift the vehicle between Drive and Reverse while holding the brake firmly. With the car on a lift, I’ll watch the inner joint for any excessive lateral “jump” or movement. If it’s sloppy, that’s your clunk.
A Note from the Trenches:
I see wheel bearing noise confused with CV joint issues all the time. Here’s how I tell them apart: wheel bearings typically produce a steady drone or hum that increases with vehicle speed, regardless of turning. CV joint clicks are rhythmic, directly tied to wheel rotation, and almost always get worse in sharp turns. If it stops clicking when you straighten the wheel, it’s almost certainly a CV joint.
What Else Could It Be? (The Mimics):
Don’t forget these possibilities, especially if the noise doesn’t perfectly match the CV joint symptoms:
- Failing wheel bearing: As I said, a constant low-frequency growl, not a click.
- Tire rubbing: Check your tire for signs of rubbing on the fender liner or suspension components during turns.
- Worn strut mount: Can cause clunking or popping, especially over bumps or during turns.
- Loose axle nut: This is rare but can cause a clunk or clicking. Always check torque specs.
- Worn engine or transmission mounts: These can cause a thud when shifting or during hard acceleration/deceleration as the drivetrain shifts.
- Degraded control arm bushings: Another source of clunks and pops, especially over rough roads.
The Root Cause: Why These Joints Give Up
CV joints are actually incredibly robust pieces of engineering. They’re designed to handle immense stress and last the life of the vehicle. But they all share one critical, fragile vulnerability: that rubber boot. It’s the only thing protecting the precision internals from the outside world.
Once that boot cracks or tears — whether from age, constant heat cycling, or a simple impact from road debris — it’s game over. The specialized grease that lubricates the ball bearings and raceways escapes, and immediately, dirt, water, and road grit get sucked in. From that point on, it’s a rapid decline:
-
Abrasive Wear: That road grit acts like sandpaper, grinding away at the hardened steel surfaces of the ball bearings and their tracks (raceways).
-
Surface Fatigue: The constant stress of power delivery, combined with compromised lubrication, causes the steel surfaces to develop micro-pitting and eventually larger cracks.
-
Corrosion: Water intrusion leads to rust on those precision surfaces. Rust dramatically increases friction and accelerates wear.
And sometimes, it’s not even the boot. I’ve seen physical damage from hitting curbs or deep potholes deform the internal cage or housing. This disrupts the joint’s delicate geometry, leading to premature failure. While rare, I’ve also encountered cases where improper torque during a previous service (like an overtightened axle nut) caused excessive pre-load on the wheel bearing, which can indirectly affect the CV joint’s alignment and lifespan.
Your Options: From a Simple Fix to a Full Swap
Safety First, Always.
Working on driveline components means getting under the car. Never, ever work under a vehicle supported only by a floor jack. Use sturdy jack stands and wheel chocks. Your life is worth more than a quick repair.
The Final Check: Making Sure the Fix Actually Worked
You’ve done the work, but you’re not done yet. A proper validation road test is critical. Don’t just assume the noise is gone and call it a day.
If you replaced just the boot, drive it for 50–100 miles, then get back under there. Check both ends of the boot and the clamps. There shouldn’t be a single speck of grease leaking out. If you see any, you’ve got a problem with your clamp or boot seating.
For a full axle swap, the real test is on the road. Find an open parking lot and make full-lock turns in both directions, slowly at first, then with a little more speed. The clicking should be completely gone. Also, pay close attention during light acceleration and deceleration to rule out any inner joint clunking. And critically, feel for any new vibration, especially during takeoff. A new vibration could mean the axle wasn’t seated fully in the transmission or differential, or that you’ve got a balance issue with the new axle (which can happen with cheaper aftermarket parts).
The ABS Tone Ring Headache:
One thing I’ve seen trip up even experienced guys is the ABS tone ring. On many modern axles, there’s a small reluctor ring pressed onto the shaft. If you nick it, bend it, or install it incorrectly during the axle swap, you’ll trigger an ABS warning light. Always double-check the ring’s position and make sure it has proper clearance to the ABS sensor. It’s a small detail, but it’ll drive you nuts if you miss it.
What’s This Going to Cost, and Is It Worth It?
Alright, let’s talk about the damage to your wallet. Here’s what I typically see for parts and labor, and my rule of thumb for deciding if the repair makes sense:
| Repair Type | DIY Cost (Parts) | Shop Cost (Total) | Success Rate | Risks of Failure |
|---|---|---|---|---|
| CV Boot Replacement | $30–$80 | $250–$400 | 95% | Undetected wear leads to rapid joint failure. |
| Axle Assembly Replacement | $150–$300 | $500–$800 | 98% | Improper torque can damage wheel bearings. |
Here’s a rule I’ve used with customers for decades: if the repair cost for any major component exceeds 40% of your car’s current market value, and there are other big repairs looming (like a timing belt, water pump, or major suspension work), it’s worth taking a hard look at whether that investment truly makes sense for your situation. Sometimes, it’s just time to move on.
How to Keep This From Happening Again
Nobody wants to do this job twice, right? Prevention is key with CV joints. Here’s my checklist for keeping those axles healthy:
My Prevention Checklist:
-
Inspect those boots regularly: Every oil change, take a flashlight and look for cracks, splits, or any signs of grease flung around the wheel well. This is your first and best warning.
-
Listen for the earliest clicks: That first faint click during a slow, tight maneuver is your only warning before serious damage sets in. Address it immediately.
-
Use the correct grease and clamps: If you’re DIYing a boot replacement, only use the grease specified in the kit. Wrong grease can cause boot swelling or premature failure. And make sure those clamps are properly tightened.
-
Drive mindfully: Avoid riding curbs, hitting potholes hard, or making full-lock turns at speed. These actions put undue stress on the joints and can lead to physical damage or premature wear.
Pro Tip:
A torn boot caught early means a $40 kit and an afternoon of work, maybe a couple hundred bucks at the shop. Wait too long, and you’re looking at a much more labor-intensive axle replacement. Think of grease flung on the inside of your wheel as the “Check Engine” light for your driveline. Don’t ignore it.
