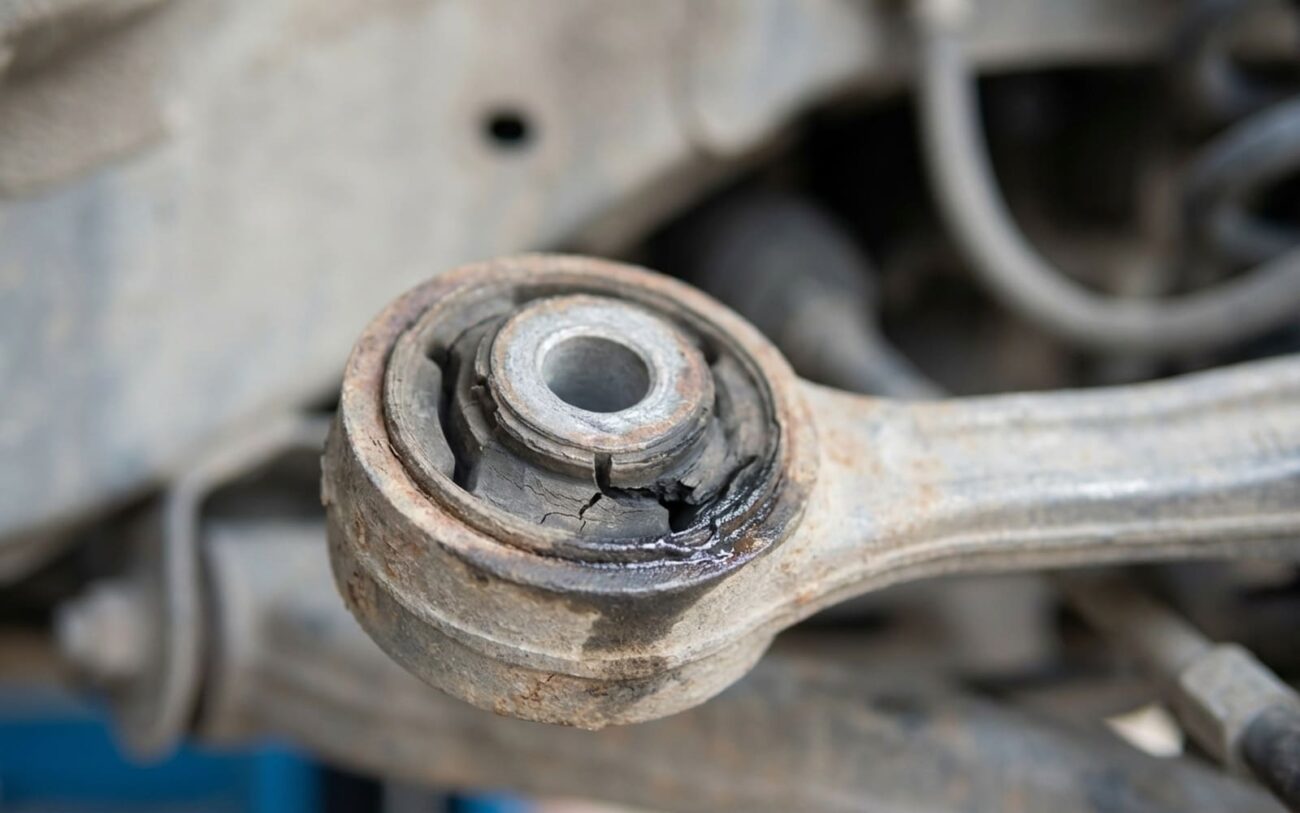
After more than 25 years turning wrenches, I can tell you that a bad control arm is one of the most common front-end problems I see. It’s not just a nuisance; it’s a safety issue that can quickly get expensive if ignored. So, let’s talk about what to listen for, what to feel, and how I go about diagnosing and fixing these things.
The Signs: What You’ll Hear and Feel
The first thing most folks notice is a distinct clunk or knock coming from the front of the car. It’s usually loudest when you hit a bump, brake hard, or accelerate from a dead stop. I’ve heard it thousands of times — it’s a sharp, metal-on-metal sound, almost like someone’s tapping a hammer under your wheel well. That noise tells me the control arm’s ball joint or bushings have worn out, allowing too much movement where things should be tight and controlled. We’re talking about more than 1/8″ of play, which is a lot in suspension terms.
Beyond the noise, you’ll start to feel it in the steering. The car might feel loose or vague, like it doesn’t want to track straight. You’ll find yourself constantly making small corrections, especially on crowned roads or in crosswinds. This happens because those worn bushings let the control arm shift back and forth under load, messing with your alignment on the fly. And speaking of alignment, that constant shifting will lead to uneven tire wear — usually on the inner or outer edges, sometimes even a scalloped or cupped pattern across the tread.
The Concept
Think of a control arm like your shoulder joint. If the socket is loose, your whole arm swings wildly instead of moving with precision. That’s what’s happening with your wheel.
Now, you might try to get an alignment to fix the steering, but if the control arm is the real problem, that alignment will drift out again in no time. It’s just a temporary band-aid. In really bad cases, I’ve seen cars come in where the front wheel is visibly sitting at an odd angle when parked on flat ground. That’s a clear sign of a serious structural failure in the suspension, and it needs immediate attention.
Diagnosing the Clunk: Is It Really the Control Arm?
This is where experience really comes in. Front-end clunks are tricky because a lot of components can make similar noises. I’ve seen worn sway bar links, failing strut mounts, loose strut tower nuts, or even a damaged steering rack all produce sounds that can fool you. That’s why you need a systematic approach, not just guessing.
Step 1: The Road Test
I always start with a road test. Drive over some familiar bumps, accelerate, brake, and turn. Listen closely to when and where the noise occurs. If it’s a sharp clunk over bumps, especially when the suspension compresses or extends, the control arm is high on my list.
Step 2: On the Lift & The Pry Bar Test
Get the car safely on a lift or jack stands. Grab a good, sturdy pry bar. This is how I confirm control arm play:
- For Ball Joints (vertical play): With the wheel off the ground, grab the tire at 12 o’clock and 6 o’clock. Try to rock it vertically. While doing this, watch the ball joint. If you see any visible movement between the ball joint stud and the control arm, or if you feel a clunk, that ball joint is shot. You can also put the pry bar under the tire and lift up, watching the ball joint. Even a little bit of play here is too much.
- For Bushings (horizontal/fore-aft play): This one’s a bit different. You’re looking for movement where the control arm mounts to the frame. With the wheel still off the ground, use your pry bar to apply fore-and-aft pressure on the control arm itself. You’re trying to simulate the forces of acceleration and braking. Any noticeable shift or clunk from the bushing area means they’re worn out. Another trick is the “dry park test”: with the car on the ground, engine running, have someone slowly turn the steering wheel back and forth. Get under the car and watch all the suspension linkages. If you see the control arm bushings flexing excessively or hear a knock, you’ve found your culprit.
Step 3: Tire Wear Inspection
Examine the tires closely. If you see irregular wear, especially on the inner or outer edges, or a “cupped” pattern, that’s a strong indicator of suspension geometry issues. While it could be a worn strut or improper alignment, it’s often linked to worn control arm bushings allowing the camber to change dynamically.
Common Mimics & How to Differentiate:
- Sway Bar End Links: These often make a clunk over bumps, similar to control arms. The difference is usually in the feel – a bad end link often feels less like a direct impact and more like a loose rattle. To test, disconnect one end link and drive slowly (on a very smooth road, just to test). If the noise goes away, you found it.
- Strut Mounts/Bearings: A failing strut mount can clunk, especially over small bumps or when turning the wheel at low speeds. You might also feel it in the steering wheel. Visually inspect the top of the strut tower for cracks or excessive movement.
- Tie Rod Ends: These cause steering wander and uneven tire wear (often feathering). You’d typically find play by rocking the wheel horizontally (3 and 9 o’clock) during the pry bar test, and you’d see movement in the tie rod itself. A CV joint clunk can feel like a suspension knock, but that’s almost always during sharp turns under acceleration, not just over bumps.
- Steering Rack Mounts: If these are loose, you’ll feel vagueness and hear clunking, especially when turning the wheel side-to-side.
Ultimately, a professional alignment check is the final word on tire wear issues. If the camber is out of spec and can’t be corrected, or if it keeps drifting, you’re almost certainly looking at a bent control arm or collapsed bushings.
Why These Things Give Up the Ghost
Control arms fail for a few main reasons, usually a combination of mechanical stress, environmental abuse, and sometimes just plain old design limitations. The two weak links are always the ball joint and the bushings. They’re designed to allow controlled movement, but they’re also wear items.
The Root Causes I See:
The ball joint takes a beating from vertical and lateral forces. Its Achilles’ heel is that rubber boot. Once that boot tears, water, dirt, and road salt get in, grinding away at the internal bearings. It’s a death sentence for the joint. The bushings, usually made of rubber, harden and crack over time from engine heat, ozone exposure, and just constant flexing. And in places with harsh winters, I’ve seen steel control arms literally rot through from rust, leading to a complete structural failure. That’s a scary sight.
Your Options: Repairing a Bad Control Arm
Safety First, Always.
Look, suspension work isn’t something to mess around with. You absolutely need proper support. Never, ever work under a car that’s only held up by a jack. Always use rated jack stands, and make sure they’re on solid, level ground. And when you put things back together, follow the factory torque specifications to the letter. Don’t guess.
Confirming the Fix
Replacing the part isn’t the end of the job; it’s just the beginning of making sure you actually fixed the problem. First, take it for a test drive on a familiar road, especially one with some bumps. That clunk better be completely gone. Then, I’ll get it back on the lift and recheck everything. Use that pry bar on the new ball joint and bushing mounts. You should detect absolutely zero movement.
Don’t Skip This:
A professional wheel alignment is absolutely mandatory after replacing a control arm. Even if you think you put it back exactly right, you’ve changed the camber and caster settings. Driving without an alignment will lead to rapid, uneven tire wear and compromised handling. You’ll just be back in the shop sooner than you think.
What to Expect for Costs
Here’s a general idea of what you’re looking at for a control arm replacement. Keep in mind, prices vary wildly by vehicle, region, and part quality.
| Repair Type | DIY Cost (Parts) | Shop Cost (Parts & Labor) | My Success Rate (DIY/Pro) |
|---|---|---|---|
| Replace one front lower control arm assembly | $150 – $400 | $400 – $800 | 95% (DIY) / 99% (Pro) |
That “My Success Rate” isn’t a knock on DIYers, it’s just that pros have the right tools and experience to avoid common pitfalls, especially with those frozen bolts and proper torqueing.
How to Catch This Early
Here’s a pro tip: every time you get an oil change, or even when you’re just rotating your tires, shine a flashlight on those control arms. Look for cracks in the rubber bushings, deep rust on the arm itself, or any grease leaking from the ball joint boot. A torn boot is a guaranteed death sentence for the joint; if you catch it early, you might be able to replace just the boot and save the joint, but usually, it’s too late. The key is to address it before the joint actually wears out and starts clunking.
