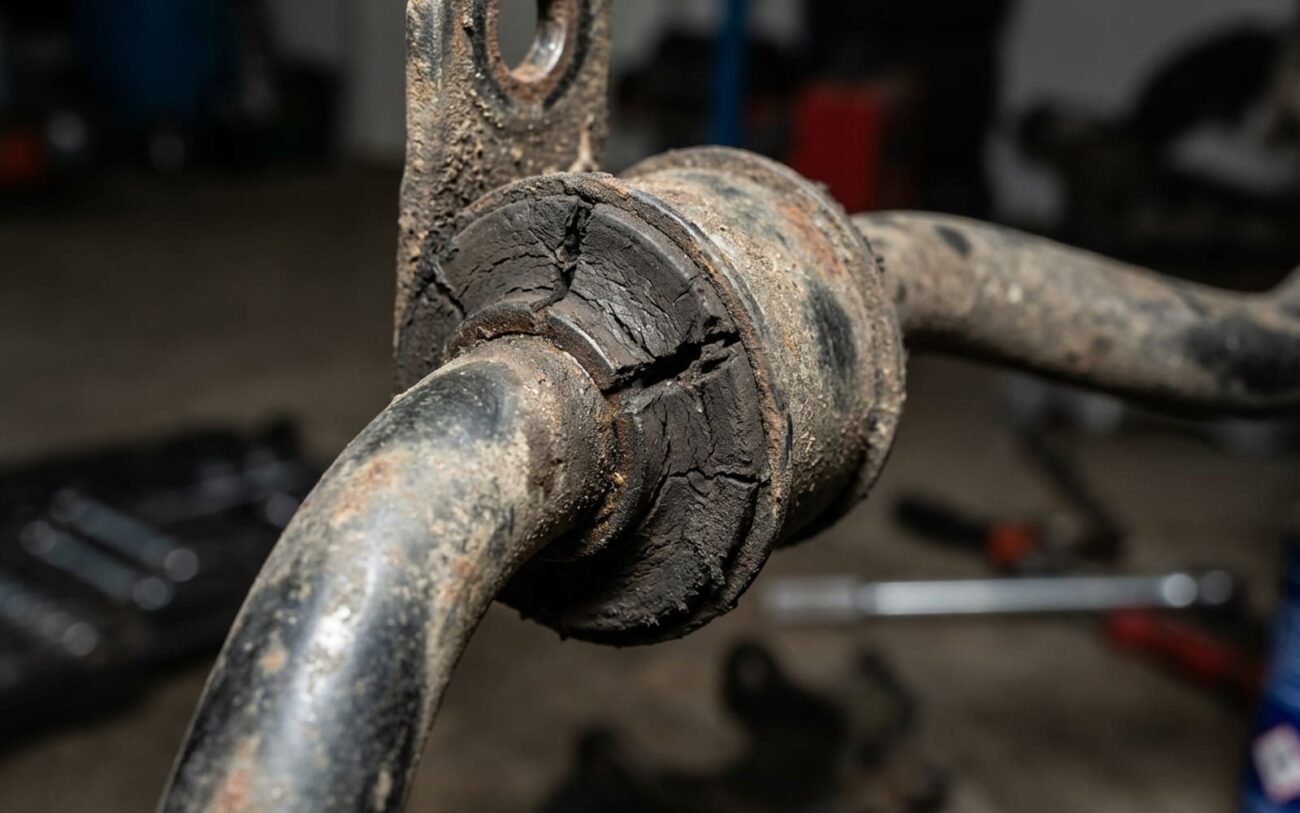
If you’re driving a VW Golf Mk6 or Mk7 and you start hearing a solid, dull thud from the back end—especially when you roll over a driveway curb, a speed bump, or just a patch of uneven road—you’re not imagining things. It’s not a light rattle or a squeak; it’s a distinct, low-frequency clunk that comes with every minor impact. In my shop, on these Golfs, that sound almost always points to one thing: worn rear sway bar bushings.
That “Clunk” and What It Means
The sway bar—some folks call it an anti-roll bar or stabilizer bar—is that U-shaped steel rod connecting your left and right rear suspension arms. Its main job is to resist body roll when you’re cornering hard. It’s mounted to the rear subframe with two rubber bushings, one on each side, held tight by metal brackets. Over time, those rubber bushings degrade, and when they do, you’ll definitely hear it.
The noise happens because the rubber has hardened, cracked, or just plain broken down. Once that rubber loses its grip, the sway bar gains lateral play inside its bracket. So, when your suspension cycles over a bump, the bar shifts side to side before it can properly engage. That movement creates a metal-on-metal or metal-on-dry-rubber impact, and that’s the clunk you’re hearing.
It’s not just noise, either. You might notice a subtle but real change in how the car handles. There’s often a slight delay in the rear-end response when you first turn the wheel into a corner. That’s because the bar isn’t reacting instantly; there’s slack in those worn bushings that has to be taken up before the bar starts doing its job of resisting roll. It’s usually not dangerous in the short term, but it’s a clear sign of wear that needs attention.
What I Look For: Visual Clues
Often, you can see the problem with a quick visual inspection. I’m looking for obvious signs of failure: cracked or split rubber, material bulging out of the bracket, or even shiny wear marks on the sway bar itself where it’s been rubbing. I’ve seen cases where the bar is scored so deeply that a new bushing won’t seat properly. If it’s that bad, you might be looking at replacing the bar too. And if you leave it too long, that constant hammering can accelerate wear in the sway bar links and their attachment points.
SUSPENSION MONITOR
Lateral Play: 4.2mm
Don’t Guess, Test: How I Diagnose That Clunk
Let’s be honest, a clunk from the rear end can have a few possible sources. A worn sway bar link ball joint, a failing shock absorber top mount, or even a loose subframe bolt can all mimic this noise. That’s why a proper diagnosis is crucial. Jumping straight to parts replacement without verifying the source is just a waste of time and money. Here’s how I typically approach it:
My Go-To Diagnostic Methods:
When a customer comes in with this specific “low-frequency clunk over small bumps,” the first thing I do is get the car on the lift. I’m looking for visual signs of course, but sometimes they’re not obvious. That’s when I start testing.
-
The Lubricant Trick for Clunks and Squeaks: This is my favorite quick check. If you’re hearing a clunk or a squeak, I’ll spray a silicone-based lubricant directly onto the sway bar bushings where the bar meets the rubber. Then I’ll bounce the suspension or take it for a very short, slow test drive over the same bumps. If the noise temporarily goes away or significantly reduces, then bingo—you’ve found your culprit. The lubricant allows the hardened rubber to slide rather than bind or clunk. It’s not a fix, but it’s a great diagnostic tool.
-
Checking for Lateral Play: With the car on a lift and the suspension hanging, I’ll grab the sway bar and try to push and pull it side-to-side. If there’s noticeable play—more than a millimeter or two—that’s a strong indicator the bushings are shot. You might even hear a subtle clunk as you do it. This confirms the lateral movement we discussed.
-
The Twist Test for Vague Handling: If the customer also complains about increased body roll or vague turn-in, I’ll disconnect one of the sway bar links from the sway bar. Then, I’ll try to manually twist the sway bar. If it rotates easily within the bushings, almost without resistance, then those bushings have lost their torsional rigidity. They’re no longer effectively resisting the bar’s movement, which means your car’s handling is compromised.
-
Pry Bar Inspection: While I’m under there, I’ll use a pry bar to check the sway bar links themselves. I’m looking for play in the ball joints at either end. If those are worn, they can also cause a clunk. I’ll also check for any looseness in the shock mounts or subframe bolts, just to rule them out.
Why These Little Pieces of Rubber Give Up the Ghost
The root cause is almost always material fatigue in the bushing itself. OEM rubber bushings are designed to strike a balance between compliance (how much they flex) and longevity, but they’re not immune to environmental stress. Over time, exposure to ozone, road salt, extreme temperature swings, and UV radiation causes that rubber to harden and crack. This is especially common in northern climates where winter road treatments are aggressive.
Once the rubber loses its elasticity, it just can’t absorb the constant twisting forces from normal driving anymore. And here’s the thing: the sway bar isn’t just twisting during hard cornering. It twists every single time one rear wheel hits a bump independently of the other. That means even daily commuting loads these bushings thousands of times per mile. Add in rough roads or spirited driving, and their lifespan drops significantly. I’ve seen bushings practically disintegrate on cars that see a lot of gravel roads.
Another often-overlooked factor is lubrication. The OEM bushings are designed to allow a slight rotational movement between the bar and the rubber sleeve. When that interface dries out, friction increases, generating heat and accelerating wear. Think of it like a door hinge that’s lost its lubrication—the door still opens, but it groans and shifts every time you move it. Same idea here, just with more clunking.
Fixing It: Your Options Explained
Once you’ve confirmed those sway bar bushings are the problem, you’ve got a few ways to tackle it. Here’s what I recommend, and what I’ve seen work (or not work) over the years.
Replace Both Rear Sway Bar Bushings DIY-FEASIBLE
Bracket or Subframe Repair Professional Only
Lubrication as a Stopgap (Not a Real Fix)
How to Validate the Repair and Avoid Future Issues
Don’t just assume the job’s done because the new parts are bolted on. Validation is key. First, drive the same roads that triggered the noise before. The clunk should be completely gone. Next, test the handling: take a moderate-speed ramp or an on-ramp turn. The rear should feel stable and responsive—no slop or delay when you first steer into the corner. That’s how you know the sway bar is doing its job again.
To Prevent Recurrence
-
Inspect those bushings during every oil change. Look for cracks, splits, or bulging rubber early—catching it early saves headaches.
-
Wash the undercarriage regularly in winter, especially if you live where they use road salt. That stuff is brutal on rubber and metal.
-
Always use the correct lubricant: silicone for rubber bushings, and specialized grease for polyurethane. Mixing them can cause issues.
-
Torque all bolts to factory specs. Overtightening crushes rubber and can lead to premature failure, while undertorquing obviously causes play and noise.
What’s This Going to Cost You? (My Experience)
Here’s a breakdown of what you can expect to pay for this repair, based on whether you DIY or take it to a shop. Keep in mind, these are general ranges, and prices can vary by region and specific parts.
| Repair Type | DIY Cost (Parts) | Shop Cost (Total) | Success Rate | Potential Risks I’ve Seen |
|---|---|---|---|---|
| OEM Rubber Bushings | $30–$80 | $150–$300 | 95% | Undertorqued link bolts leading to new noise; misaligned bushings causing binding. |
| Polyurethane Bushings | $50–$120 | $200–$350 | 98% | Using the wrong lubricant (leading to squeaking); increased transfer of road noise/vibration. |
| Bracket/Subframe Repair | $100–$250+ | $400–$800+ | 90% | Inadequate welding leading to structural weakness; improper alignment causing tire wear. |
Expert Advice from My Bench
If you’re ever unsure whether a clunk is suspension-related or something else entirely, it really helps to know how to isolate the source. For tips on distinguishing suspension noises from CV joint or steering issues, check out: How to Tell the Difference Between a CV Joint Clunk and a Suspension or Tie Rod Knock.
