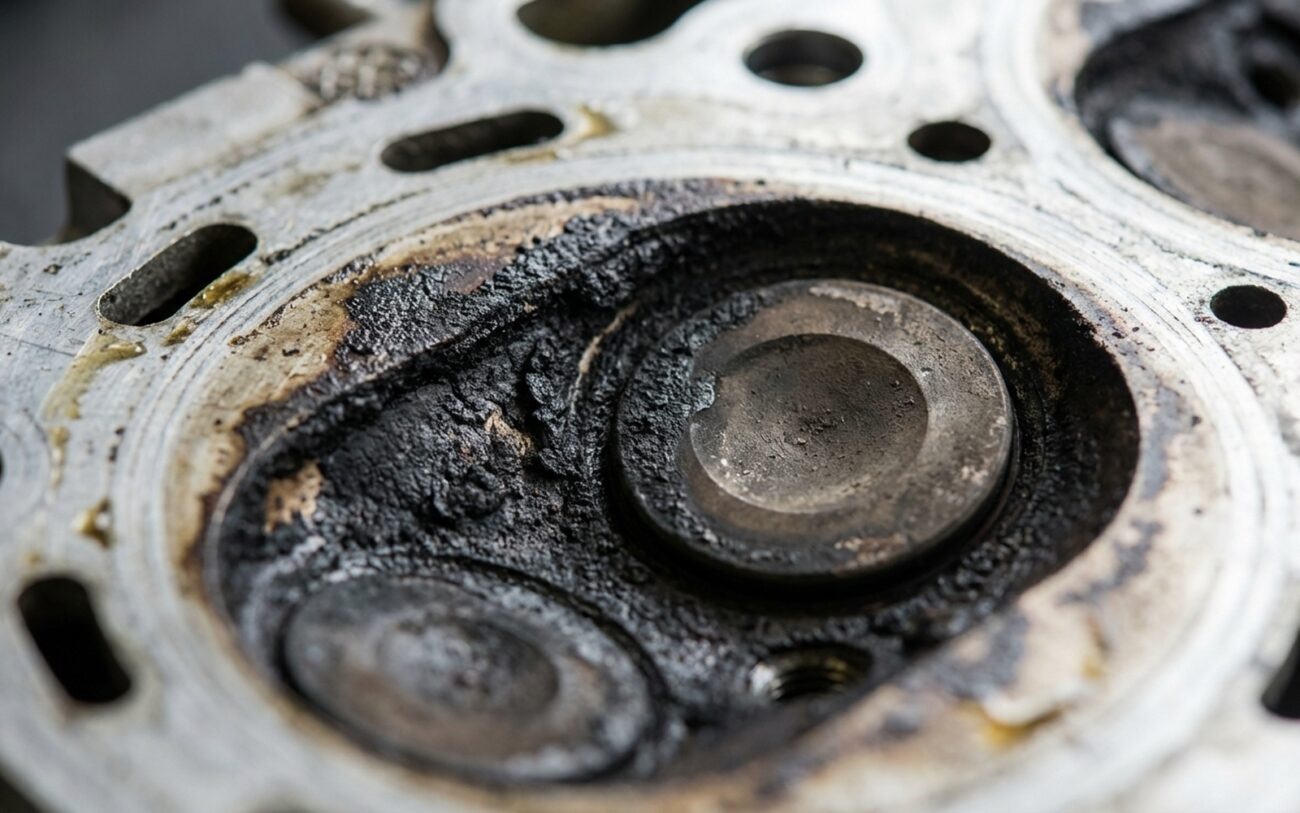
Alright, let’s talk about carbon buildup on your valve seats. This isn’t just some minor gunk; it’s a real mechanical problem that I’ve seen sideline countless engines, especially the newer direct-injection (GDI) ones. After 25 years under the hood, I can tell you this issue is becoming more and more common, and if you don’t address it, it’s going to cost you.
What Carbon Buildup Really Does to Your Engine
Think of your intake and exhaust valves like precision doors. When they close, they’re supposed to seal the combustion chamber completely. That seal is critical for building compression, which is what gives your engine power. When carbon starts to build up on the valve seat—that’s the surface the valve rests against—it acts like a tiny wedge. It prevents the valve from fully closing, even if it’s just by a few thousandths of an inch. And believe me, a few thousandths is all it takes.
When that valve doesn’t seal, you lose combustion pressure. It’s like trying to inflate a leaky balloon. That loss of compression means less power, worse fuel economy, and generally rougher running. Over time, those hot combustion gases leaking past the valve can actually erode the valve edge and the seat itself. Once that happens, you’re looking at permanent damage, and what could have been a cleaning job turns into a full-blown cylinder head repair. This is a particularly nasty problem for GDI engines because, unlike older port-injected engines, there’s no fuel washing over the back of the intake valves to keep them clean.
Spotting the Symptoms: What I Look For
The first thing I usually hear from a customer with significant carbon buildup is a complaint about a cold-start misfire. They’ll say the engine shakes or stumbles for 10 to 60 seconds right after startup, especially on a cold morning, then smooths out as it warms up. Why does it do that? Well, when the engine is cold, that carbon deposit physically holds the valve open. As the engine heats up, the metal valve and seat expand, and that thermal expansion can temporarily crush the softer carbon enough to improve the seal. It’s a temporary fix, though; the problem is still there.
Beyond the cold misfire, you’ll often notice a rough idle, especially when the engine is warm. There might be hesitation during light throttle acceleration, and a definite reduction in low-end torque. Your fuel economy will likely drop too, because the engine computer (ECM) is constantly trying to compensate for the lean condition caused by those leaky valves.
One quick note: if you’re seeing white exhaust smoke, that’s usually coolant intrusion, not carbon buildup. Different problem entirely, and you can look up white smoke from exhaust smells like coolant for that diagnosis.
How I Confirm It’s Carbon, Not Something Else
A lot of these symptoms can overlap with other issues—a weak ignition coil, a vacuum leak, a clogged catalytic converter, even a failing MAF sensor. That’s why you can’t just guess. You need targeted diagnostics that assess the cylinder’s actual integrity. I rely heavily on mechanical tests; they give you real data about what’s happening inside the engine, not just sensor readings.
Here’s my approach to pinpointing carbon buildup:
For Cold-Start Misfires: The Running Compression Test
If a customer reports a cold-start misfire, after checking the basics like spark and fuel pressure, my go-to is a running compression test. I’ll test it cold, then let the engine warm up and test it again. If a cylinder with carbon buildup jumps from, say, 90 psi cold to 150 psi hot, that’s a huge red flag for carbon. The thermal expansion is temporarily crushing that deposit and improving the seal.
For Loss of Power/Hesitation: The Cylinder Leakage Test
When I’m chasing a loss of power or hesitation, especially at low RPM, I’m thinking about restricted airflow and reduced compression. A cylinder leakage test is invaluable here. I’ll bring each cylinder to Top Dead Center (TDC) on its compression stroke and introduce shop air. If I hear a distinct hiss coming from the intake manifold, that tells me I have an intake valve that isn’t sealing properly. That’s almost always carbon.
For Valvetrain Ticking: Listen and Look
If I hear that rhythmic ticking, my first step is to grab a stethoscope to isolate the sound. Is it coming from the valve cover? If so, I’ll pull the valve cover off. Then, I’ll slowly crank the engine by hand (or with a remote starter) and visually observe the valve action. If a valve is staying slightly open, or if the hydraulic lash adjuster (HLA) isn’t maintaining zero clearance because a deposit is physically blocking the valve from closing, that’s a pretty clear indicator. This is different from a collapsed HLA or a worn cam lobe, which usually have a different sound or visual characteristic.
These mechanical tests cut through the noise. They tell you definitively if the problem is internal sealing, which is what carbon buildup affects.
Why This Mess Happens: The GDI Reality
This isn’t really “wear and tear” in the traditional sense; it’s a consequence of how modern engines are designed, specifically Gasoline Direct Injection (GDI). In older engines with port fuel injection (PFI), the fuel was sprayed into the intake manifold, and as it flowed past the intake valves, it actually helped wash away any oil vapor or combustion byproducts that might try to stick there. It was a built-in cleaning system, almost.
The GDI Dilemma:
With GDI, the fuel is injected directly into the combustion chamber, bypassing the intake valves entirely. So, what’s left to clean them? Nothing. The carbon builds up primarily from oil vapor coming from the PCV (Positive Crankcase Ventilation) system, along with some combustion byproducts that get pushed back into the intake. These blow-by gases carry oil mist, which then bakes onto the hot valve stems and heads, eventually migrating to the critical sealing surface. It’s a known design characteristic, and manufacturers like GM and VW/Audi have even issued service bulletins about cold misfires and rough idle specifically due to intake valve carbon in their GDI engines.
It’s important to understand this is a fouling issue, not a structural failure. We’re not talking about a cracked head or a spun bearing here, although a cracked or burnt cylinder head can certainly mimic some of these symptoms and is a far more serious problem. Worn valve guides or leaking valve stem seals can definitely make the carbon buildup worse by allowing more oil into the combustion chamber, but those are separate mechanical concerns that would need to be addressed alongside the carbon.
Your Repair Options: From a Scrub to a Full Overhaul
Once you’ve confirmed it’s carbon, you’ve got a few paths forward. The severity of the buildup and whether there’s actual damage will dictate the best approach.
Walnut Blasting Professional-Only DIY-Possible
Cylinder Head Removal & Valve Service Professional-Only
Chemical Mitigation Temporary/Preventative
Verifying the Fix: Don’t Just Assume It’s Done
You never just assume the job is done because the misfire code went away. A good shop, and certainly what I do, is verify the repair. After a walnut blasting, the engine should start cleanly, even on the coldest mornings. I’ll hook up the scan tool and check the long-term fuel trims at idle—they should stabilize within ±5%. If they’re still way off, something isn’t right. A follow-up cylinder leakage test on those previously problematic cylinders should show less than 10% loss, with absolutely no air escaping into the intake tract. And if you did a compression test before the repair, repeat it: readings should now be strong and consistent across all cylinders, both cold and hot.
If the cylinder head was removed and serviced, verification starts on the bench. A proper machine shop will perform a leak test by filling the combustion chamber side with solvent (like mineral spirits or even gasoline) and checking for any seepage past the valves. Any drip, even a tiny one, is a red flag. Once the head is reinstalled on the engine, a final in-car cylinder leakage test confirms the repair. This level of verification is what separates a real fix from just throwing parts at a problem.
The Cost and the Tough Decision
Let’s be honest: fixing carbon buildup properly isn’t cheap. You really have to weigh the investment against the vehicle’s current value and how much life you expect to get out of it.
For walnut blasting, if you’re a capable DIYer with the right tools, you might spend $300-$500 on the kit, media, and gaskets. In a shop, expect to pay anywhere from $500 to $1,200, depending on the engine and how difficult the intake manifold is to remove. I’d say the success rate for blasting is around 95% if done correctly, but there’s always a small risk of incomplete cleaning or media fragments getting into the cylinder if you’re not careful.
If you’re looking at cylinder head removal, that’s a whole different ballgame. DIY costs could be $800-$1,500 for parts, machine shop work, and specialized tools. For a professional shop, you’re easily looking at $2,000 to $3,500 or more. The success rate is over 99% because you’re physically restoring the sealing surfaces, but the risks are higher too: improper reassembly, timing alignment errors, or even catastrophic damage if not done by an experienced hand.
My “40% Rule”
Here’s how I often advise my customers: if the repair cost exceeds about 40% of the car’s current fair market value (check Kelley Blue Book or Edmunds for a realistic number), and the vehicle is already over 120,000 miles, you really need to think about the long-term picture. GDI engines are prone to this issue recurring—you might need another cleaning in 60,000 miles. At that point, putting that money into a newer vehicle or even a low-mileage used engine swap might be the smarter financial move. Sometimes, the best repair is a new car.
Stopping It From Coming Back: Prevention is Key
Once you’ve cleaned things up, prevention is absolutely critical, especially with GDI engines. You don’t want to go through all that again. The single most effective step you can take is installing a quality oil catch can on the PCV system. This device captures oil vapor before it ever enters the intake manifold, significantly reducing the primary source of carbon. Just a heads-up: modifying the PCV system might not be emissions-legal in all states, so always verify your local regulations.
My Maintenance Checklist to Fight Carbon
-
Always use Top Tier gasoline. The added detergents, while they don’t clean the intake valves in GDI, do help reduce deposit formation elsewhere in the combustion chamber.
-
Stick to the manufacturer-specified engine oil. Many turbocharged GDI engines specifically require low-SAPS (Sulfated Ash, Phosphorus, Sulfur) oils, which produce fewer deposits.
-
If your engine uses dual injection (like Toyota’s D-4S system, which has both port and direct injectors), make sure those port injectors are actually functioning. They’re there specifically to clean the valves.
-
Keep an eye on your long-term fuel trims via OBD-II. If they start climbing into the +10% range at idle, that can be an early signal of a lean condition due to valve leakage, long before a P0300 misfire code pops up.
And finally, I recommend doing a compression test every two years or so during a major service. It gives you a solid baseline to compare against, so you can catch any degradation early before it turns into a big headache.
