That Phantom ABS Kick: When Your Car Thinks You’re Skidding
You’re just cruising along, dry pavement, maybe a light tap on the brakes, and then BAM! The pedal goes soft, starts pulsing like crazy, and you hear that familiar grinding noise. Your Anti-lock Braking System (ABS) just kicked in, but there’s no ice, no gravel, no emergency. Nothing. Just a false alarm.
I see this all the time in my shop. That false ABS activation on dry pavement isn’t just annoying; it’s a real safety hazard. Every time it happens, your stopping distance increases, and often, your Electronic Stability Control (ESC) throws in the towel, leaving you with less control if you actually do need it.
Variance: 12 km/h
More often than not, this issue traces back to a failing wheel speed sensor (WSS). These sensors are the eyes and ears of your ABS, telling the module exactly how fast each wheel is spinning. When one of them sends bad data—a weak, erratic, or missing signal—the system thinks that wheel is locking up. So, it kicks in the ABS pump unnecessarily. The symptoms usually come and go, which makes them a pain to diagnose, but the pattern is pretty consistent: that pulsing brake pedal under light deceleration, warning lights popping up on the dash, and sometimes even a speedometer that acts like it’s had too much coffee.
My Diagnostic Playbook: Don’t Guess, Test.
Before you even think about replacing parts, you need to confirm what’s actually broken. A corroded or failing wheel speed sensor is the most common culprit, no doubt. But I’ve seen plenty of other issues that can fool you into thinking it’s the sensor. Misdiagnosis is rampant, especially when shops just throw parts at it without proper testing. Here’s how I approach it to pinpoint the real problem:
Step 1: Scan Tool & Live Data
This is always my first move. Hook up a good scan tool and check for ABS/ESC fault codes. You might see something like a C0060 (Left Front Wheel Speed Sensor Malfunction) or similar. But don’t stop there. Go into live data and watch the wheel speed PIDs (Parameter IDs) as you drive. On a straight, smooth road, all four wheels should read within 2-3 km/h of each other. If one sensor is lagging, spiking erratically, or dropping out, you’ve found your suspect wheel. This is the most definitive test for an erratic speedometer or cruise control issues too – if one sensor is feeding bad data to the CAN bus, those systems will react.
Step 2: Visual Inspection
Once you’ve identified a suspect wheel, get the car on a lift. Pull the wheel off and visually inspect the sensor and its wiring. Look for:
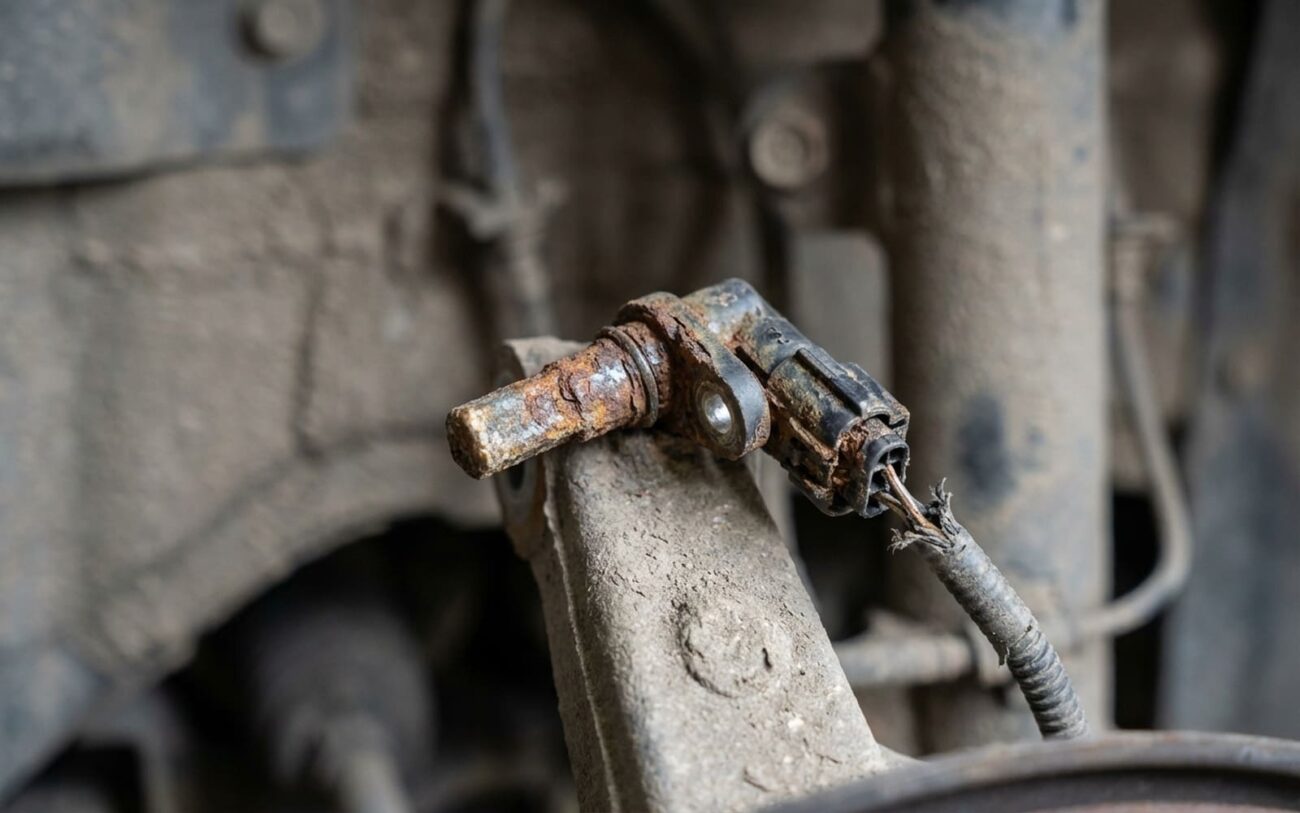
- Sensor Tip: Is it covered in rust, brake dust, or metallic debris? That’s a classic sign of external corrosion, which weakens the signal.
- Tone Ring (Reluctor Ring): This is the toothed ring the sensor reads. Is it damaged, chipped, cracked, or caked with gunk? A damaged tone ring will cause false readings even with a perfect sensor.
- Wiring Harness & Connector: Check for frayed wires, cracked insulation, or green corrosion inside the connector pins. A damaged harness or poor connection can mimic a bad sensor.
- Wheel Bearing Play: Grab the wheel at 12 and 6 o’clock and try to wiggle it. Excessive play in the wheel bearing can change the air gap between the sensor and tone ring, causing an erratic signal.
Step 3: Electrical Tests (If Needed)
If the visual inspection isn’t conclusive, or if you suspect an intermittent electrical issue, it’s time for the multimeter and oscilloscope.
- Resistance Test (for passive sensors): Disconnect the sensor and measure its resistance. Most passive sensors should read between 800–1,400 ohms. An open circuit (infinity) or a very low reading indicates internal coil degradation. Note: Modern active (Hall effect) sensors often won’t show a resistance reading; they require power to operate.
- Wiggle Test & Continuity: With the scan tool still hooked up and monitoring live data, gently wiggle the sensor harness and connector. If the signal drops out or becomes erratic, you’ve likely got a wiring or connector issue. You can also perform a voltage drop test on the wiring to check for excessive resistance.
- Oscilloscope (the gold standard): This is how you really see the signal. Connect an oscilloscope to the sensor wires (or the ABS module inputs). As you spin the wheel, you should see a clean, consistent AC waveform (for passive sensors) or a square wave (for active sensors). A weak, distorted, or intermittent waveform confirms a sensor problem.
Why Your Wheel Speed Sensor Goes Bad (It’s Usually Corrosion)
Wheel speed sensors are pretty simple devices. They’ve usually got a magnet surrounded by a copper coil, all tucked into a casing. They work by detecting changes in a magnetic field as a toothed tone ring (or reluctor ring) on your hub spins past them. It’s a basic principle, but it’s easily messed with, especially in harsh environments.
The Concept
Think of it like trying to read a book through a muddy window. The information (the tone ring’s teeth) is there, but the sensor can’t “see” it clearly enough to make sense of it.
The most common killer is external corrosion on the sensor tip. Road salt, moisture, and iron particles from brake dust love to build up on that little pole piece. This creates a barrier, weakening the magnetic field between the sensor and the tone ring. The ABS module then gets a low or erratic signal, interprets it as an irregular wheel speed – possibly a lock-up – and triggers the system. It’s not a true failure of the sensor’s internal electronics, but it effectively makes it blind.
Internal vs. External Failure:
Once water gets inside those fine copper windings of the sensor, it’s usually game over. I’ve seen this repeatedly in coastal areas and places with heavy road salt usage. Some vehicle platforms are definitely more prone to this than others, often due to how the sensor is placed or the quality of its seals. At that point, cleaning won’t do a thing.
It’s crucial to distinguish between a sensor that’s actually failed and one that’s just getting bad information. A damaged tone ring, a worn-out wheel bearing, or a chafed wiring harness aren’t sensor failures themselves, but they’ll absolutely disrupt the signal. If the tone ring teeth are chipped or clogged with metallic debris, cleaning or replacing the sensor won’t fix the root problem. You’ve got to address the real source of the signal interruption.
Fixing It Right: My Approach to WSS Replacement
Cleaning External Corrosion DIY Feasible
Replacing a Failed Sensor DIY Feasible
- Always use a torque wrench. Those mounting bolts are small, typically only needing 8–12 Nm (around 6-9 lb-ft). Overtightening can strip the threads or crack the sensor housing.
- Before you insert the new sensor, clean out the bore in the hub. Any debris in there can prevent the sensor from seating properly, messing up the air gap.
- A small amount of dielectric grease on the O-ring of the new sensor helps with moisture sealing and makes future removal a lot easier.
Path C: Dealing with a Seized Sensor
Professional Territory: This is where things get ugly. In areas with heavy road salt, the sensor can literally weld itself into the hub bore. If you’ve got the mounting bolt out and the sensor won’t budge, STOP. Forcing it will almost certainly break the plastic body, leaving the metal tip stuck in the hub. Then you’re looking at drilling it out (which is risky) or, more commonly, a full hub replacement. I’ve seen countless DIY attempts turn a simple $150 sensor replacement into a $900+ hub job. If it’s seized, take it to a pro who has the right tools and experience to extract it without destroying the hub.
Did You Actually Fix It? The Post-Repair Checkup.
Just replacing the sensor isn’t the end of the job. You need to validate the repair. First, clear all stored ABS fault codes with a capable scan tool. If the codes immediately pop back up with the ignition on, you’ve still got an open circuit, a short, or a connection issue somewhere. Don’t skip this step.
Next, take the vehicle for a road test. Again, monitor live wheel speed data on your scan tool. Drive on a straight, smooth road, and make sure all four wheels are reporting speeds within 2–3 km/h of each other. If one wheel is still lagging or spiking, you’ve either got a bad new sensor (it happens!), a damaged tone ring you missed, or a problem in the wiring path.
Finally, and this is important, simulate an ABS event. Find a safe, loose surface – like a dirt or gravel parking lot – and perform a firm, controlled brake application from about 30–40 km/h. You should feel that familiar pedal pulse and hear the ABS pump activate. If it doesn’t trigger, the system might still be in a failsafe mode, or there’s a deeper issue that needs more diagnosis.
The Bottom Line: What to Expect on Your Bill
| Repair Type | DIY Cost (Parts) | Shop Cost (Est.) | Success Rate | Secondary Risk |
|---|---|---|---|---|
| Clean Sensor Tip | ~$10 (cleaner) | $100–$200 | <30% | Almost always a temporary fix; corrosion returns quickly. |
| Replace One WSS | $50–$200 | $250–$400 | >95% | Damaging the harness or breaking the old sensor during removal. |
| Replace WSS & Hub | $300–$600 | $600–$1,000 | 100% | The cost jumps if the sensor is seized and ruins the hub. |
One more thing I always tell my customers: if your vehicle is showing signs of widespread corrosion – multiple failing sensors, damaged connectors, or other electrical gremlins popping up – that’s a huge red flag. Corrosion doesn’t just stop at one sensor. Components like your EPS control module, the ABS pump itself, or even the instrument cluster could be next. It’s a sign of deeper issues, especially in older vehicles or those in harsh climates.
Keeping Those Sensors Happy: My Prevention Tips
Prevention Checklist
-
Annual Inspection: When you’re rotating tires or doing a brake job, take a minute to look at the sensors. Check for green corrosion on the connectors, cracked bodies, or excessive grime on the tips. Catching it early can save you a headache.
-
Anti-Seize & Dielectric Grease: If you’re replacing a sensor, put a dab of anti-seize on the mounting bolt threads (but NOT on the sensor tip itself). And a little dielectric grease inside the electrical connector will help keep moisture out.
-
Undercarriage Washes: Especially if you live where they use road salt, a thorough undercarriage wash in the spring can make a huge difference. It flushes away a lot of that corrosive crud that eats away at wiring and sensors.
-
Early Detection: Don’t ignore a flickering ABS or traction control light. Even a basic OBD2 scanner can often read pending ABS codes before they become full-blown false activations. It’s cheaper to fix a weak signal than to deal with a seized sensor.
