The Drowned Steering: What Happens When Water Hits Your EPS
Alright, let’s talk about electric power steering (EPS) and water. I’ve been wrenching on cars for over 25 years, and one thing I’ve seen time and again is how quickly water can absolutely trash an EPS system. You drive through a flooded street, maybe a deep puddle you didn’t see, and suddenly your steering feels like you’re trying to turn the Titanic with a spoon. Heavy, unresponsive, maybe totally dead. If that EPS assist disappears right after you hit some standing water, and it doesn’t come back after things dry out, you’re almost certainly looking at water damage inside the EPS control module.
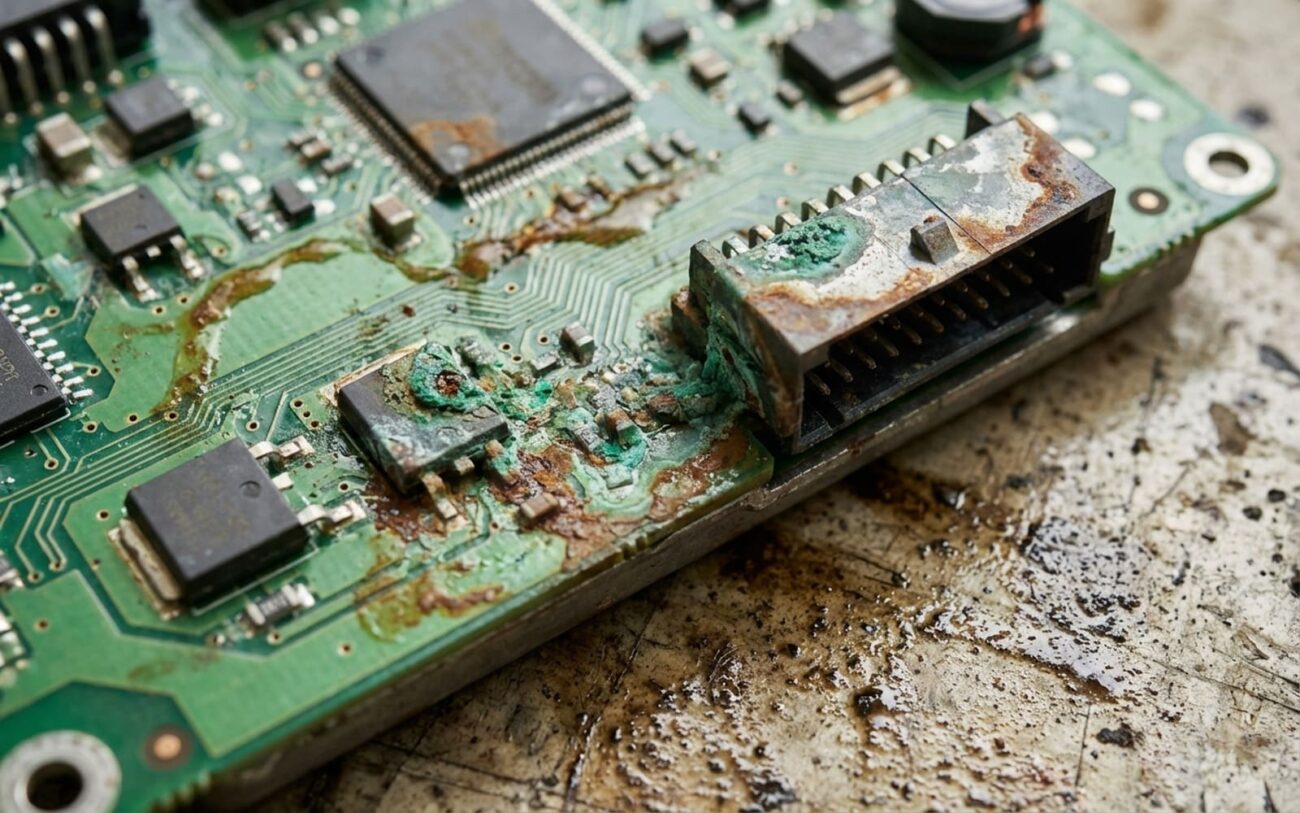
See, unlike the old hydraulic systems where you might just get some air in the lines or a leaky hose, an EPS failure after water exposure is usually electrical, and it’s often permanent. It doesn’t take much, especially if that water is salty or muddy. The moment that contaminated water touches the printed circuit board (PCB) inside the module, it starts creating unintended electrical paths. Think of it like a tiny, uncontrolled lightning storm happening on your delicate electronics.
Output: 0.0 Nm
This kind of internal short circuit can burn out components, fry the processor, or just shut the whole thing down. The most obvious sign you’ll get is a total loss of power assist. I mean, you’ll feel like you’re wrestling a bear, not turning a steering wheel. That wheel will be incredibly stiff, and you’ll almost always see a red or yellow steering warning light pop up on your dash and stay there. It’s a clear signal something’s seriously wrong.
“When the EPS goes out, the mechanical link is still there, so you can still steer. But the ‘muscle’ is gone. It’s like trying to steer a heavy truck without power steering at all.”
Now, sometimes the failure isn’t immediate. You might get intermittent assist – the steering goes heavy for a second, then it’s back, or you feel a “notchy,” jerky sensation through the wheel. To me, that usually points to early-stage corrosion creeping across those tiny PCB traces or around surface-mounted components like resistors and capacitors. Even a tiny bit of moisture can create high-resistance connections that just confuse the module’s internal logic. It’s like trying to talk to someone with a bad cell signal – sometimes you hear them, sometimes you don’t.
The Process of Destruction:
First, electrolytic corrosion begins. This is where voltage bridges traces, creating galvanic cells that literally dissolve the copper. Then, dendritic growth forms microscopic conductive “trees” that create unintended shorts. Finally, this corrosion attacks solder joints, messing up signal integrity. It’s a chain reaction, and it’s nasty.
Manufacturers are well aware of this. I’ve seen service bulletins for specific models – like certain 2015-2017 F-150s, for example – regarding EPS failures after water exposure, especially where the module sits low on the chassis. These documents often point to internal control unit corrosion as the root cause, even if the housing seal looks perfectly fine from the outside. That’s a critical distinction: it’s not just a bad gasket letting water in; it’s the chemical destruction of the PCB itself. A compromised seal is just the entry point; the real problem is what happens inside.
My Diagnostic Approach: Don’t Guess, Test
Before you even think about tearing into the EPS module itself, or worse, just ordering a new one, you’ve got to rule out the simpler, more accessible stuff. I’ve seen too many guys jump straight to module replacement only to find out it was a blown fuse, a damaged wiring harness, or just a poor connection. That’s a waste of time and money, plain and simple. We need to isolate the true source of the problem.
Most water-related EPS failures do end up being internal to the module, especially if the vehicle was submerged near or above where the module lives (often at the base of the steering rack). But don’t assume. Remember, symptoms like a whining noise when turning are strictly for hydraulic systems; you won’t hear that with EPS. The principle I always follow is: isolate the faulty component before you assume the worst.
| What You See/Feel | Likely Culprit (EPS Module PCB) | Common External Mimics | How I Confirm It |
|---|---|---|---|
| No EPS assist, scan tool can’t talk to the module. | Internal short circuit on the PCB from water and corrosion. | Blown main EPS fuse, severed power or ground wire, failed Body Control Module (BCM), or damaged CAN bus line. |
I’ll verify power and ground at the EPS module connector using a good digital multimeter (DMM). If both are solid, but the module still won’t communicate or respond, I’m pretty confident it’s an internal failure. |
| Intermittent EPS assist, maybe a “Processor Fault” DTC. | Progressive corrosion on PCB traces or component leads, causing erratic signals. | Loose connector pins, chafed wiring, or moisture in the connector housing (not necessarily the module itself). |
I monitor CAN bus signals with an oscilloscope. If I see stable power supply to the module but corrupted or intermittent communication signals, that tells me the module’s internal logic is getting confused, likely due to corrosion. |
| EPS warning light with motor circuit DTCs (e.g., “Motor Phase Open”). | Corrosion on the motor driver FETs (Field-Effect Transistors) or their associated traces on the PCB. | Water-damaged motor windings, shorted phase wiring outside the module, or a failed EPS motor itself. |
I measure phase-to-phase resistance at the motor harness before the module. If the motor windings check out (usually a few ohms, check specs for your vehicle), but the module is reporting motor faults, then the problem is almost certainly in the module’s internal motor driver circuitry – those FETs. If I see less than 1 ohm, or an open circuit, that points to the motor or external wiring. |
Fixing It Right: Repair or Replace?
Safety First, Always.
Once you’ve confirmed that EPS module is damaged internally, your options depend on how bad the corrosion is and where it’s located. There is no safe shortcut when it comes to steering components. Period.
Professional PCB Micro-repair Professional Only
Module Replacement Most Common Solution
No Safe Temporary Fix – Don’t Even Try It
The Critical Step: Post-Repair Validation
Whether you’ve managed a micro-repair or you’ve replaced the module entirely, validation is non-negotiable. A failed EPS system is just too dangerous to leave to chance. This is where I really put the system through its paces.
For a repaired module, the first thing I check is communication with my scan tool. It needs to talk, and it needs to complete its initialization sequence without any errors. If it passes that, then it’s time for a road test. I’m looking for the steering assist to feel smooth, linear, and consistent – no lag, no surging, no dead spots. Then, I perform a high-load test: I’ll turn the steering wheel lock-to-lock while stationary on dry pavement. If it groans, struggles, or cuts out, it’s not fixed.
For a replaced module, calibration is the absolute key step. Most systems need a steering angle sensor and torque sensor zero-point calibration after a module replacement. If you skip this, you’ll get erratic assist, over-correction, or those pesky warning lights will come right back on. I always use an OEM-compatible scan tool to perform the exact procedure specified by the manufacturer. The final pass/fail test for me? No active or pending DTCs after at least three complete drive cycles. If it throws a code after that, something’s still not right.
Making the Call: Costs and Risks
| Repair Type | DIY Cost (Parts Only) | Shop Cost (Parts & Labor) | My Estimated Success Rate | Secondary Risk |
|---|---|---|---|---|
| Professional PCB micro-repair | N/A | $200–$500 | <50% (if widespread corrosion) | CAN bus disruption, recurring faults, safety hazard |
| Module replacement (new OEM) | $800–$2,000 | $1,200–$3,000 | >98% | Very low if correctly calibrated |
| Module replacement (remanned) | $400–$1,200 | $800–$2,000 | >95% | Slightly higher risk of premature failure compared to new |
Here’s a rule I’ve used in the shop for years: if the total repair cost starts to creep past 40% of your vehicle’s current market value, it’s really time to reconsider. At that point, sometimes sourcing a used steering rack with a known-good EPS module from a reputable dismantler might make more financial sense. But be warned: even used modules still require programming, and you’re always gambling a bit on someone else’s maintenance history. I’ve had good luck with some, and others have been a headache right out of the box.
Prevention: An Ounce of Cure
My Best Practices
-
Know your vehicle’s limits. Every car has a maximum water fording depth, usually somewhere between 6 to 10 inches. Exceeding that is just asking for trouble, and the EPS module is often one of the first things to get hit.
-
Inspect housing seals. Whenever I’m working near the steering rack, especially if I’m checking for rust damage in frame rails, I take a good look at the EPS module’s housing seals. Make sure they’re not cracked or compromised.
-
Use dielectric grease and proper torque. A little dielectric grease on exposed connectors can go a long way to prevent moisture ingress. And always make sure any housing bolts are torqued to spec – usually around 3–5 N·m (2.2-3.7 lb-ft). Overtightening can crack the housing, letting water right in.
A Final Note on “Drying Out”
You’ll hear some shops or DIYers talk about trying to “dry out an EPS module.” Let me tell you, if that PCB was truly submerged and corroded, drying alone isn’t going to fix it. The chemical reaction has already started, and the damage is done. All you’re really doing is delaying the inevitable. It might work for a day, a week, maybe even a month, but it’s not a reliable repair for a critical safety component.
