Steering Rack Bushings: What I See, Hear, and How I Fix ‘Em
After 25+ years wrenching on cars, I can tell you, few things are as unsettling as a loose steering rack. It’s not just annoying; it’s a genuine safety issue. When those steering rack bushings start to give up the ghost, your car tries to tell you in a few distinct ways. Let’s break down what I look for, how I diagnose it, and what your options are for getting it fixed right.
The Symptoms: What You’ll Feel and Hear
First off, you’ll feel it. That steering wheel won’t feel connected to the road like it should. You’ll get what I call a “dead spot” – maybe an inch or more of play before the front wheels even think about responding to your input. It’s like trying to steer a boat with a loose rudder; you turn, you wait, then the car finally decides to follow. This isn’t just poor alignment; it’s mechanical slop in the system.
And then there’s the noise. It’s usually a distinct “clunk” or “thud” – not a squeak or a rattle, but a solid, single knock. You’ll feel it right through the steering wheel, especially when you’re turning into a driveway, hitting a pothole, or going over a speed bump at low speeds. That’s the steering rack shifting around in its worn mounts.
As things get worse, that ‘dead spot’ turns into general vagueness. Your car will wander on the highway, forcing you to constantly make small corrections. It just won’t feel precise anymore, and honestly, it gets tiring to drive.
Is It the Steering Rack Bushings? Or Something Else?
Okay, so you’re feeling a clunk or some play. Is it definitely the rack bushings? Not always. In my shop, before I condemn the rack bushings, I always rule out a few other common culprits. I’ve seen plenty of worn inner tie rod ends mimic this, or a worn U-joint in the steering column’s intermediate shaft. Ball joints are another big one, and don’t forget loose subframe bolts – those can cause all sorts of headaches.
Sometimes, even a failed strut mount can fool you, especially with that clunk on tight turns or when hitting a bump. If you’re hearing a squeak when turning at a standstill, that’s almost always a strut mount issue, not the rack. I’ve got a whole article on that if you want to dig deeper: can a corroded strut mount cause steering squeak when turning at a standstill?
How I Check Steering Rack Bushings (No Disassembly Needed)
Alright, so you suspect the bushings. Here’s how I check them, and no, you don’t need to pull the whole rack out for this initial diagnosis. You’ll need a good floor jack, some sturdy jack stands (safety first, always!), a bright flashlight, and a helper. A torque wrench will be essential later, too.
Get the Vehicle Up and Safe
The Lateral Movement Test
The Twist and Fore/Aft Movement Test
The Torque Check (Don’t Skip This!)
Why Do Steering Rack Bushings Fail?
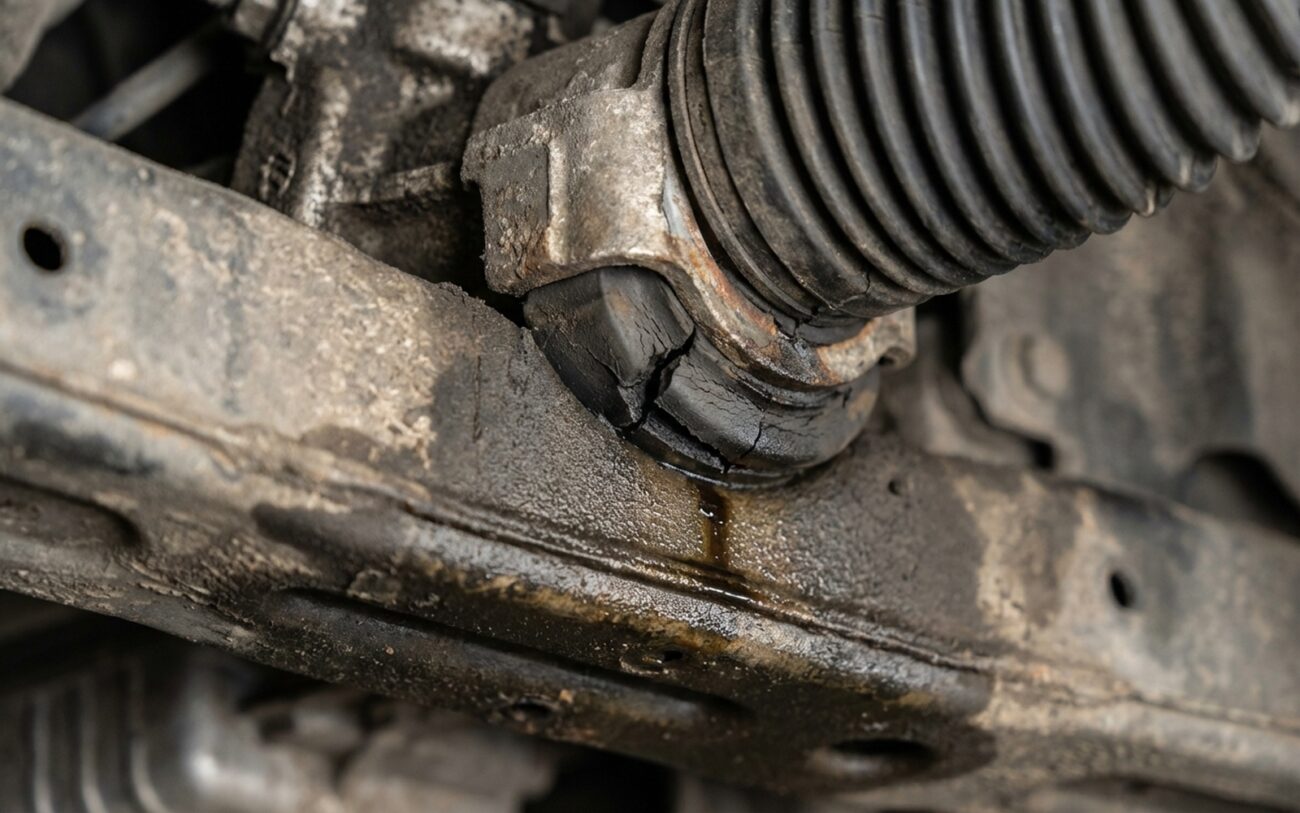
Why do these things fail? Mostly, it’s just plain old rubber degradation. These bushings are usually made from nitrile or EPDM rubber, and they live a tough life. They’re constantly exposed to engine heat, exhaust radiation, road grime, salt, you name it. Over time, that rubber hardens up, cracks, and just loses its ability to absorb shock and hold the rack tight.
Fluid contamination accelerates failure:
And here’s a big one I see all the time: fluid contamination. If you’ve got a power steering fluid leak, or even just engine oil dripping down onto those bushings, it’s like a death sentence for them. That fluid acts as a solvent, breaking down the rubber matrix. I’ve seen rack mounts completely disintegrate in less than two years because they were constantly soaked in fluid. Fix those leaks, folks!
Beyond that, it’s just repeated stress. Every bump, every pothole, every turn puts micro-movements and shear fatigue on those bushings. They develop internal cracks, and eventually, they just give up. I remember a few years back, GM even had a service bulletin out for models like the Malibu and Impala, specifically addressing clunk-on-turn symptoms that were directly tied to worn steering gear mounts. It’s a common issue, and it happens to the best of them.
Repair Options: From DIY to Major Shop Work
Safety First: No Shims!
A quick word of warning: I’ve seen some folks on forums suggest shimming worn bushings with washers or other spacers. Please, don’t do it. That’s a temporary, unsafe hack. I’ve personally seen those kinds of ‘fixes’ fail catastrophically during a hard corner or emergency maneuver. You’re dealing with your steering here; do it right, or don’t do it at all.
[DIY-Friendly] Bolt-On Rack Mount Bushings
[Shop Job] Pressed-In or Integrated Bushings Professional Only
[Major Repair] Damaged Subframe
How to Verify the Repair Worked
Okay, so you’ve done the work. Don’t just assume it’s fixed. This is where you double-check everything. Get back under there and repeat both the lateral and twist tests; you should feel absolutely zero detectable movement now. Then, take it for a road test. The steering should feel tight, precise, with no dead spot or clunking over bumps.
And here’s a pro tip: after the first few miles of driving, get it back up on those jack stands and recheck the mounting bolt torque. Some setups will relax slightly after they’ve been put under load for a bit, and you want to make sure everything stays snug.
Cost Breakdown: DIY vs. Professional Repair
Here’s a general idea of what you can expect to pay for parts and labor, depending on the severity of the issue and your approach.
| Repair Type | DIY Parts | Shop Estimate | Success Rate | Risks |
|---|---|---|---|---|
| Bushing (Bolt-On) | $20 – $100 | N/A (often DIY) | High | Loose bolts, improper preload |
| Bushing (Pressed-In) | N/A (special tools) | $250 – $600 | Very High | Low (with alignment) |
| Subframe Replacement | $300 – $800+ | $1,000 – $2,000+ | High | Misalignment, high cost |
Preventing Future Steering Rack Bushing Problems
-
Fix power steering fluid leaks promptly. This is huge. Any red or brown fluid near the rack is a death sentence for rubber bushings. Get those leaks fixed ASAP.
-
Make the lateral rack test part of your routine during tire rotations or oil changes. It takes two minutes and can save you a lot of grief down the road.
-
Keep the engine bay clean to reduce heat aging and grime buildup on nearby rubber components. A clean engine bay isn’t just for show.
Pro Upgrade Tip
If you’re doing the work anyway, especially on a vehicle you plan to keep, consider upgrading to polyurethane bushings. Brands like Energy Suspension or Moog make great kits. They’re much more resistant to fluid and heat than stock rubber, and they’ll last a lot longer. Just be aware, you might feel a slight increase in road noise or vibration, but for many, the improved steering feel is worth it.