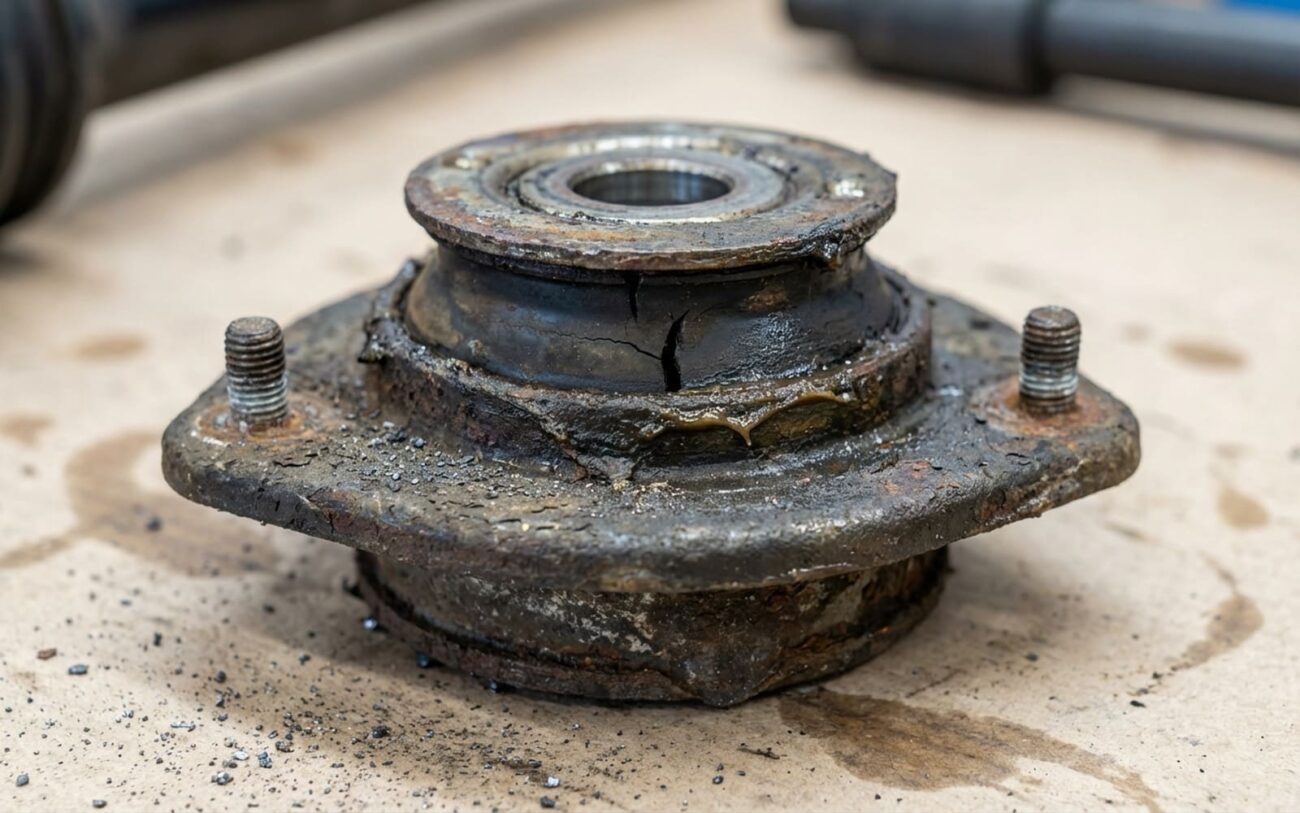
Strut Mount Bearing Failure: How I Diagnose and Fix It
After 25+ years turning wrenches, I can tell you this much: when a strut mount bearing starts to go, it makes itself known. It’s not a subtle failure. You’ll hear it, you’ll feel it, and if you ignore it, you’ll be buying more than just a strut mount.
The first thing most drivers notice is a distinct clunking, popping, or groaning noise from the front end. This usually happens at low speeds, especially when you’re turning the wheel — pulling into a parking spot, backing out of a driveway, or making a sharp corner. That sound? It’s the upper spring seat fighting to rotate against a bearing that’s seized or pitted. The internal raceways are binding up, then suddenly letting go. Each “pop” or “groan” is metal grinding against metal where it should be smooth as silk.
Then there’s the steering feel. Instead of that smooth, progressive movement from center, the wheel feels stiff, notchy, or even sticky when you start a turn. That’s rotational resistance building up in the bearing. You’re literally muscling the steering against friction where there should be almost no drag. And here’s a big one that often gets missed: poor steering return. A good MacPherson strut uses caster angle to help the wheel snap back to center after a turn. But if that strut mount bearing is locked up, that self-centering force is blocked. You let go of the wheel, and it just… stops. No smooth return. Jerky, hesitant, or incomplete return is a textbook sign of a binding strut bearing.
Status: HIGH DRAG
Pinpointing the Problem: My Diagnostic Steps
Now, here’s where experience really comes into play. These symptoms aren’t always a bad strut bearing. I’ve seen plenty of techs replace strut mounts only to find the real culprit was a worn ball joint, a binding steering shaft U-joint, or even a loose sway bar link. Wasting time and money on the wrong part is frustrating for everyone. So, before you grab any tools for removal, you need to confirm the source. Here’s how I do it:
The “Hand-on-Spring” Test (My Go-To)
This is my absolute first step for any suspected strut bearing issue. With the vehicle on the ground, have an assistant slowly turn the steering wheel from lock to lock. Get your hand on the top of the spring perch, right where it meets the strut tower in the engine bay. A healthy bearing will allow the spring to rotate smoothly with the strut shaft. If you feel a distinct “pop,” “grind,” or “clunk” directly at the perch, you’ve found your culprit. That’s the bearing binding and releasing.
If the hand-on-spring test isn’t definitive, or if the steering is just generally stiff, I move on to isolating the steering system:
Isolating Stiff Steering
For that stiff, binding steering feel, you need to figure out if it’s the strut bearing, the steering rack, or something else in the steering column. Here’s the sequence:
- Lift the front end: Get both front wheels off the ground.
- Check steering column: Turn the wheel by hand. Is it smooth? If not, you might have a binding U-joint in the steering column or a problem with the intermediate shaft.
- Disconnect steering shaft: Locate the intermediate steering shaft where it connects to the steering rack. Disconnect it. Now, try turning the steering wheel again. If it’s still stiff, the problem is further up the column. If it’s suddenly smooth, the issue is either the rack or the suspension.
- Turn wheels by hand: With the steering shaft disconnected, try turning the front wheels by hand (gripping the tire). If they turn freely and smoothly, the rack is likely okay, and the problem points back to the strut bearing or possibly a seized lower ball joint. If they’re stiff, you’ve got a rack issue or possibly those seized ball joints.
- Check ball joints: While the front end is up, grab the wheel at 12 and 6 o’clock, then 3 and 9 o’clock. Push and pull. Any play? Also, use a pry bar to check for play in the lower ball joint. A seized ball joint can mimic a binding strut bearing, so don’t skip this.
When Steering Doesn’t Return to Center
This is almost always a binding issue. Beyond the strut bearing, I look at:
-
Alignment: Incorrect toe or caster is a common culprit. If the car pulls, or the tires are wearing funny, get an alignment check first.
-
Tire Pressure: Seriously, check it. Low pressure on one side can cause this.
-
Control Arm Bushings: Worn or seized bushings can resist the natural return.
But again, the “hand-on-spring” test during a slow turn is key. If that spring perch isn’t rotating smoothly with the strut shaft, the bearing’s the prime suspect.
Why They Fail: Root Causes I See
Strut mount bearings are designed to take a beating, handling constant rotational movement under load. But real-world conditions are brutal. The bearing sits right at the top of the strut assembly, sandwiched between the body and the spring, exposed to everything the road throws at it.
Real-World Example:
I remember Chrysler putting out a service bulletin for certain 2011–2016 Dodge Charger and Challenger models. Customers were complaining about a groaning noise when turning at low speeds. The root cause? Corrosion of the front strut upper bearing. The fix was a revised part with better sealing. So, even the manufacturers know this is a common problem.
In my shop, contamination is the leading cause of failure, hands down. Many OEM and aftermarket strut mounts just don’t have adequate sealing. Road salt, water, dirt – it all gets in there, washes away the grease, and starts the corrosion process. Rust doesn’t just weaken the metal; it expands. That “rust jacking” effect distorts the internal clearances, leading to binding and eventual seizure. Think of it like trying to turn a rusty bolt – it just won’t go.
Material quality also plays a huge role. I’ve seen low-grade steel or poorly heat-treated bearing races fail prematurely. They’re prone to brinelling – tiny dents from impact loads, like hitting a pothole. Over time, these dents become stress points, leading to spalling (flaking metal) and complete breakdown of the bearing surface. It’s why I always recommend good quality aftermarket parts, or OEM if the budget allows.
The Fix: Repair Options and What I Recommend
SAFETY WARNING: HIGH-TENSION SPRINGS
MacPherson strut coil springs store lethal energy. Releasing that tension without the correct professional-grade spring compressor and proper training risks catastrophic injury or death. This is NOT a DIY job for the inexperienced. These repairs are designated for professional environments.
Replace Strut Mount Bearing (and Mount) on Existing Strut Professional Only
Replace with Complete Quick-Strut Assembly Professional Only
Temporary Lubrication Last Resort Only
Post-Repair Validation: Don’t Skip This!
Replacing the part isn’t the end of the job – it’s just the beginning of verifying your work. You must validate the repair properly to ensure the safety and longevity of the entire suspension system. I’ve seen too many comebacks because a tech rushed this part.
My Validation Checklist
-
Steering Sweep: With the vehicle on the ground, perform a full left-to-right steering sweep. Listen closely. It should be smooth and absolutely silent.
-
Road Test: Take it for a good road test. Hit some uneven pavement, go over speed bumps, and make some turns. Listen for any lingering clunking, groaning, or binding.
-
MANDATORY Wheel Alignment: I cannot stress this enough. Every time you touch a strut mount, you change the suspension geometry. Caster, camber, and toe must be reset. If you skip this, you’re going to have premature tire wear and poor handling. It’s part of the job.
Cost, Risk, and Making the Call
When I’m talking to a customer about this repair, we always weigh the costs against the vehicle’s overall value. Here’s a general breakdown of what to expect:
| Repair Type | DIY Cost (Parts) | Shop Cost (Total) | Success Rate | Secondary Risk |
|---|---|---|---|---|
| Replace bearing/mount only | $50 – $150 | $300 – $500 | 95% | High risk of injury during spring disassembly for DIYers. |
| Complete quick-strut assembly | $200 – $400 | $500 – $800 | ~98% | Lower risk; but absolutely requires alignment afterward. |
As a rule of thumb, if the repair cost starts to creep over 40% of the car’s current private-party value, and there are other pending repairs, it might not make financial sense to fix it. A $700 repair on a $2,000 car is a tough pill to swallow, and I’ll be honest with my customers about that. Sometimes, it’s time to let go.
Prevention & Monitoring: Keep an Eye On It
The best repair is the one you don’t have to do, right? Corrosion is the biggest enemy of these bearings, especially if you live in a northern climate where they use road salt. An annual application of a good corrosion inhibitor like Fluid Film or LPS3 to the strut tower area can help seal out moisture and keep things moving freely. Just avoid blasting high-pressure sprayers directly into the wheel well and up around the strut mount – you’re just forcing water in there.
Also, make it a habit to take a quick visual look yourself. Pop the hood and check around the strut tower. Look for cracks in the rubber insulator or any rust blooms around the bearing. Early detection saves a lot of headaches and money down the line. And remember, while knocking noises while coasting or transmission output shaft seal leaks are completely different beasts, regular undercar inspections help catch all sorts of problems early. Stay proactive. Your steering, your tires, and most importantly, your safety, will thank you.
