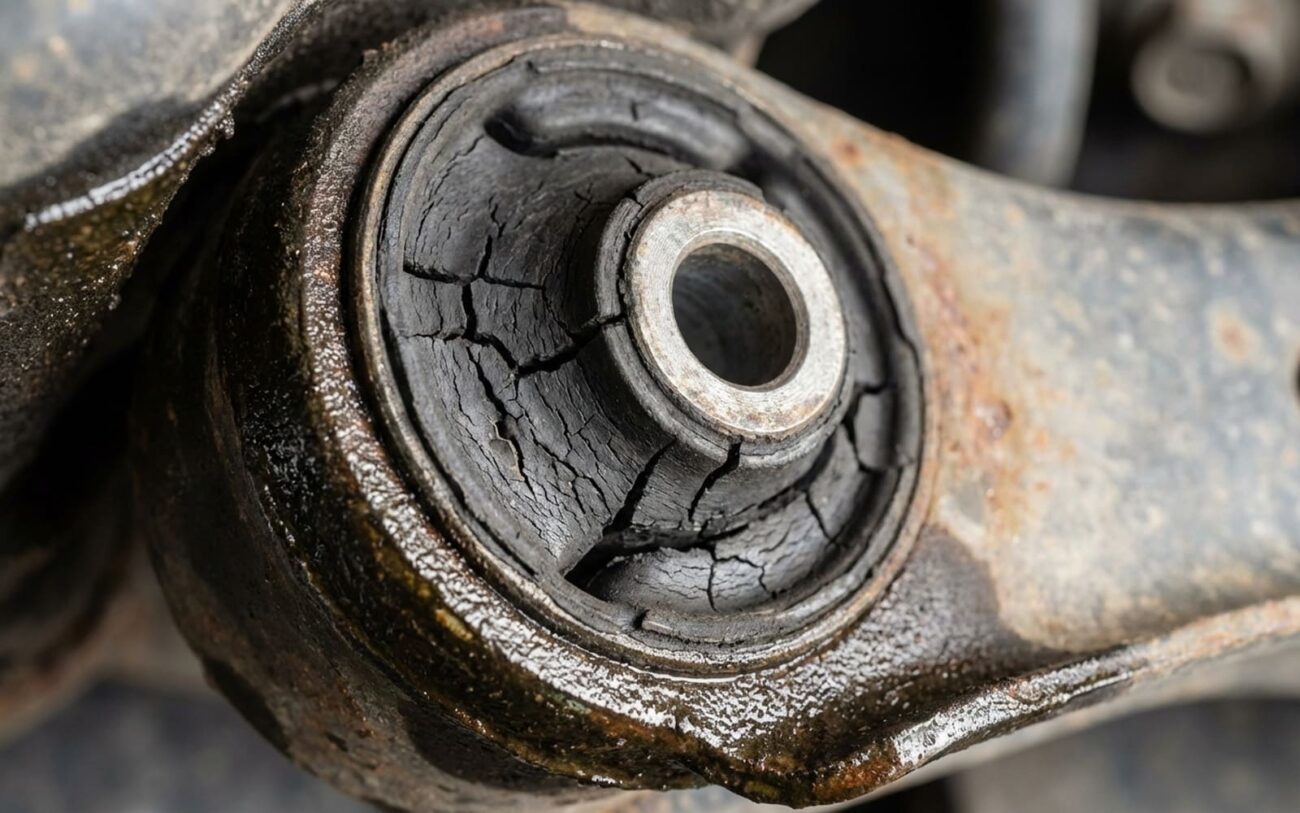
You hear it, don’t you? That knock or clunk coming from the front end, especially around a wheel. Your gut usually tells you it’s suspension, and you’re probably right. But “suspension” isn’t a single part you can just point to. It’s a whole network of components, and over 25 years of turning wrenches, I can tell you two things are almost always the main culprits for these noises: worn suspension bushings and failing shock absorbers or struts.
The trick to figuring out exactly what’s going on, and saving yourself a lot of headache (and money), is to really pay attention to when that noise happens and what kind of sound it actually is. That’s where the real diagnosis starts.
Symptom Spotting: What Your Car is Telling You
Let’s break down these knocks and clunks. Each one usually points to a specific area or component. Think of it like a doctor listening to different coughs – they all mean something.
Sharp Knocks Over Bumps
If you hit a pothole, a driveway lip, or a speed bump and hear a sharp knock or a distinct “thud” that feels like it’s coming from deep in the corner of the car, that’s textbook for a worn bushing. We’re talking control arm bushings, especially the rear one, or a sway bar link bushing. The rubber in these things just degrades over time. It hardens, cracks, and eventually, the metal sleeves inside start banging against the surrounding parts when there’s a sudden load. It’s metal-on-metal contact where there should be rubber isolation.
Noise During Low-Speed Turns
Now, if that knock shows up when you’re making tight turns, like in a parking lot or pulling into a spot, the front control arm bushing is often the one to blame. This is especially true on vehicles with MacPherson strut suspensions. These bushings are designed to handle the fore-aft forces as you steer. When they wear out, that control arm can shift abruptly, and you get a distinct metallic knock. Just a heads up: a bad CV joint usually makes a clicking noise on turns, not a true knock. If it’s a knock, it’s almost always a bushing or another joint, not the CV.
Rear End Clunking on Power Changes
Hearing a knock from the rear when you accelerate hard or let off the gas? That typically points to a worn trailing arm, toe link, or even a subframe bushing. When the drivetrain applies torque, if those bushings aren’t solid, the suspension components can shift and collide. A loose shock mount back there can mimic this, but in my experience, worn bushings are the more common offender.
Knocks During Body Roll
If the noise happens when you’re cornering or changing lanes, especially if it seems to match the body roll of the vehicle, you’re likely looking at a failing sway bar system. Worn sway bar link ball joints or hardened sway bar frame bushings allow too much lateral movement, and you get that metallic knock. Don’t rule out a loose strut mount bearing here either; it can make a similar noise under these conditions.
Bouncy Ride with Noise
And finally, if you’ve got a generally bouncy ride quality along with a knocking sound, that’s a pretty strong indicator of a failed shock absorber or strut. The internal hydraulic damping is gone, and the shock piston is essentially just rattling around inside the body. This is a classic symptom of a worn-out shock.
My Go-To Diagnostic Tests: Getting to the Truth
Okay, so you’ve heard the noise and have a hunch. Now, how do you confirm it? Here’s how I go about isolating the true source in the shop.
The Pry-Bar Test for Bushings
This is my first move for most bushing suspicions. Get the vehicle safely on a lift or jack stands. With the suspension loaded (or at least partially loaded), take a good, sturdy pry bar. Insert it between the control arm and the subframe, or wherever the suspected bushing is. Gently, but firmly, try to lever the component. If you see more than about 1/8″ of movement where there should be none, or if you can replicate the clunk, you’ve found your worn bushing. It’s a simple test, but it’s incredibly effective.
The “Assistant” Test for Turning Noises
For those low-speed turning noises, I’ll put the car on the ground (or on a drive-on rack if available) and have an assistant slowly turn the steering wheel lock-to-lock. While they’re doing that, I’m under the vehicle, or sometimes even just kneeling beside the tire, watching the control arm bushings. You’re looking for any visible “twist” or sudden shift in the bushing. If you have a chassis ear (an electronic listening device), this is a perfect time to use it to pinpoint the exact source of the knock. It’s amazing how much a little vibration can travel.
The Sway Bar Disconnect Test
If I suspect the sway bar system (links or frame bushings) for noises related to body roll, this is my definitive test. I’ll disconnect one end of the sway bar link on the suspected side. Just one end, so the sway bar is effectively “out of commission” for that corner. Then, I’ll carefully take the car for a short test drive over the same conditions that caused the noise. If the noise stops, bingo, you’ve found your culprit in the sway bar link or its bushings. Just remember to reconnect it properly afterward!
The Bounce Test for Shocks
This is an old-school test, but it still works for confirming failed damping. With the vehicle on level ground, go to each corner and push down firmly on the fender or bumper, then release. A healthy shock will allow the car to bounce down once and then immediately return to its resting position, maybe one small oscillation. If it bounces more than two times, or if it feels mushy and uncontrolled, that shock is toast. You’ll often see fluid leaking from a completely failed shock too, but not always.
Visual Inspection: Your Best Friend
Always, always do a thorough visual inspection. Look for:
- Cracks or tears in rubber bushings.
- Fluid leaks around shocks or struts.
- Corrosion or rust on components.
- Loose nuts or bolts on mounts.
- Any signs of metal-to-metal contact or shiny spots where parts have been rubbing.
Why These Parts Fail: Understanding the Root Causes
Knowing why something breaks helps you understand the problem better and sometimes even prevent it from happening again. It’s not always just about mileage; environment and driving habits play a huge role.
Suspension Bushings: The Rubber’s Demise
Bushings are mostly rubber, and rubber doesn’t last forever. The biggest culprits for bushing failure are material degradation from ozone exposure, constant heat cycling (especially under the hood), and chemical attack from fluid leaks. I’ve seen countless control arm bushings soaked in engine oil or power steering fluid, and they just turn to mush. Over time, that rubber hardens, cracks, and loses its elasticity. In severe cases, the bond between the rubber and the inner or outer metal sleeves fails completely—we call that “bond separation.” Once that happens, it’s just a matter of time before you get metal-on-metal knocking.
Shock Absorbers and Struts: Hydraulic Breakdown
Shocks and struts are hydraulic devices, and their failure usually comes down to internal hydraulic breakdown. The piston seal inside wears out, allowing fluid to bypass the piston or, worse, leak externally. When air gets into the system, the fluid aerates, reducing damping efficiency and letting those internal parts rattle around. If the nitrogen gas charge (which helps prevent aeration) leaks out, the fluid cavitates—basically, it forms bubbles—leading to that knocking sound and a real loss of control. Once the damping is gone, the shock can’t do its job, and you feel every bump.
A common misdiagnosis I see:
That knocking sound from a loose or seized strut mount bearing often gets mistaken for a bad shock. And a clunk from a worn ball joint or CV joint? That’s frequently misdiagnosed as a bushing issue. Getting it right saves time and money, and it’s why these diagnostic steps are so important.
Getting It Fixed: Repair Pathways
Safety First, Always.
There are no safe shortcuts when it comes to suspension. Driving with worn bushings or shocks compromises your safety and can lead to more expensive damage down the road. Always use proper jack stands, never rely solely on a jack, and torque all fasteners to factory specifications. This isn’t the place to guess.
Suspension Bushing Repair Mixed DIY/PRO
Shock & Strut Replacement DIY-FEASIBLE
After the Fix: Post-Repair Validation & Alignment
You’ve done the work, now how do you know it’s fixed? And what’s the critical step you absolutely cannot skip?
For Bushing Repairs
The test is straightforward: drive the car over the exact same roads and conditions that triggered the noise before. You shouldn’t hear any knocking during impacts, turns, or cornering. If the noise is gone, great. But here’s the non-negotiable step: a professional wheel alignment. Even a minor change in control arm position from replacing a bushing can throw off your camber or toe, leading to rapid and uneven tire wear. I’ve seen customers ruin a brand new set of tires in a few thousand miles because they skipped the alignment. Don’t be that guy.
For Shock or Strut Replacements
Again, take it for a spin. Listen for silence over bumps and feel for that controlled rebound—no more bounciness. The bounce test you did earlier should now show no more than 1-2 oscillations. Visually inspect all mounting points, especially the upper strut mount, to make sure everything is torqued down properly and there are no gaps. After a short drive, I always do a quick check for any fluid leaks, just to be sure.
Making the Call: Cost, Risk & Economic Decisions
Repair costs vary wildly depending on your vehicle and where you live. Here’s a general idea of what you’re looking at, and some risks to consider.
| Repair Type | DIY Parts Cost | Shop Repair Cost | Success Rate | Secondary Risk |
|---|---|---|---|---|
| Control Arm Bushings (Press-in) | $50–$150 | $300–$600 | 95% | Premature tire wear if alignment is skipped. |
| Front Quick-Strut Assemblies | $200–$600 | $800–$1,500 | 98% | Remaining noise if misdiagnosed. |
| Sway Bar Links & Bushings | $80–$200 | $300–$500 | 99% | Minimal; low-risk repair. |
My “40% Rule” for Older Cars
If the total repair cost for a major suspension job starts creeping past 40% of your vehicle’s current market value, and the car has over 150,000 miles on it, it’s time to seriously consider the long-term picture. Sometimes, it’s just smarter resource allocation to put that money towards a newer, more reliable vehicle. I’ve seen too many people sink good money after bad.
Keeping It Quiet: Prevention & Monitoring
The best repair is the one you don’t have to do. Here’s how to keep those suspension knocks at bay:
-
Fix fluid leaks immediately. This is huge. Oil, power steering fluid, transmission fluid—any of these dripping onto rubber bushings will accelerate their breakdown significantly. It’s like pouring acid on them.
-
If you’re upgrading to polyurethane bushings, use only silicone-based grease. Petroleum-based lubes will swell the material and ruin them. I’ve seen it happen.
-
Make visual inspections part of your routine maintenance. Whenever you’re under the car for an oil change or tire rotation, take a few extra minutes to look for cracks, tears, or any “squeezing” rubber that indicates a bushing is failing.
-
Wash the undercarriage regularly, especially in winter if you live where they salt the roads. SAE studies confirm those chlorides accelerate rubber and metal fatigue. Get that crud off your suspension.
