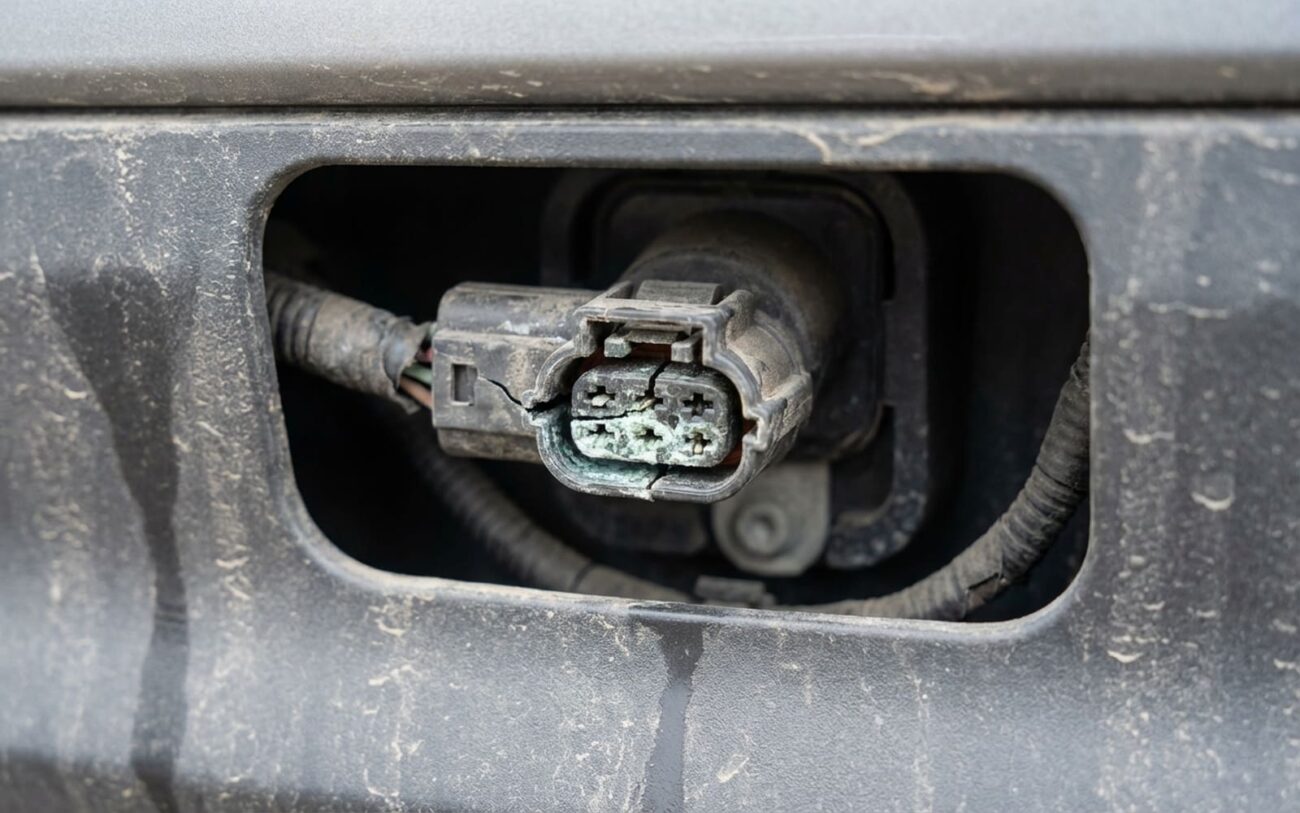
If your blind spot system throws a fit right after a car wash, especially a high-pressure one, you’re not alone. I’ve been turning wrenches for over 25 years, and I see this problem come through the bay all the time. On vehicles like the 2018-2022 Subaru Outbacks or certain Ford F-150s, it’s practically a weekly occurrence. It’s almost always water where it shouldn’t be, not a dead sensor right out of the gate. Catch it early, and it’s usually a cheap fix. Wait, and you’re looking at big money. Let’s walk through how I diagnose, fix, and prevent this headache properly.
What You’ll See (Symptoms & What They Tell Me)
You’ll typically get a warning message on your instrument cluster – something like “Blind Spot Detection Unavailable,” “Side Assist Fault,” or a related icon will light up. In most cars, the system just disables itself completely, and you can’t reactivate it through the infotainment screen or driver settings. This usually pops up right after a wash, but sometimes it takes a drive cycle or two for the fault to register, especially if water is slowly seeping into a connector and messing with conductivity.
Often, you’ll see other related systems like Rear Cross Traffic Alert (RCTA) or Lane Change Assist (LCA) go down too. That’s a big clue right there, because these features often share the same radar sensor or wiring harness. Here’s the deal: in my experience, 9 times out of 10, after a wash, it’s moisture ingress at the sensor’s connector or a compromised seal – not a dead sensor. But if you ignore it, that moisture turns into corrosion, and corrosion eats wiring and pins for breakfast. What starts as a $20 fix can turn into a $1,500 nightmare. Don’t procrastinate on this.
How I Diagnose It (Pinpointing the Real Problem)
Before I pull a single bolt, I connect my professional-grade scan tool. Forget your basic OBD2 reader here; you need a tool that can communicate with the ADAS (Advanced Driver-Assistance Systems) modules. That’s how you pull specific diagnostic trouble codes (DTCs), check live data from the blind spot monitoring (BSM) system, and run bidirectional tests. A good multimeter is essential for checking circuits, and a borescope can be a lifesaver for inspecting tight spaces without tearing everything apart.
My first step is always to scan for codes. I’m looking for communication faults, signal plausibility codes, or anything that points to a specific radar sensor (most cars have one on each side of the rear bumper). Once I have a direction, then it’s time for a visual inspection.
Getting Access & What to Look For
You’ll need to remove the bumper fascia or an inner access panel to get to the rear radar sensor. Consult your vehicle’s service manual for the exact steps and fastener locations – every car is different here. Use trim removal tools to avoid damaging plastic clips. Once the sensor is accessible (it’s usually a small rectangular module mounted behind the bumper cover), I get a good look at it.
- The Connector (Prime Suspect): This is where I start. I disconnect it and look for any sign of moisture – water droplets, soap residue, or that tell-tale white or green corrosion on the pins. Even a “lightly seated” connector that wasn’t fully clicked into place can let water creep in over time.
- The Seal/Gasket: Next, I check the rubber or foam gasket between the sensor and its mounting bracket. These seals harden over time, crack, or can get pinched during reassembly after previous work (like a collision repair or hitch installation). If that seal isn’t airtight, water will wick right in during a wash.
- The Housing/Radome: Less common, but I always check the sensor’s main housing and the smooth plastic lens (what we call the radome) for any cracks or physical damage from road debris or a minor bump. A crack creates a direct entry point for moisture.
Specific Tests I Perform:
- Multiple Faults (BSD, RCTA, LCA): If I see several related faults, I’m thinking shared wiring or a more widespread water issue. I’ll do a voltage drop test on the power and ground circuits to the sensor – it should be under 0.1V under load. Any higher, and I’ve got resistance, usually from corrosion.
- Intermittent Issues: For those flickering icons or intermittent alerts, I’ll monitor sensor signal strength in live data on my scan tool while gently wiggling the connector. If the signal drops out, I’ve found my loose connection or corroded pin.
- Borescope Inspection: For those really tight spots where you can’t get a direct line of sight, a borescope is a lifesaver. It lets me peek into connectors or behind brackets to spot hidden corrosion or damage.
Fixing the Problem: My Go-To Solutions
The repair path depends entirely on what you find during your inspection. Here are the three most likely scenarios and how I handle them.
Path A: External Moisture or Light Corrosion at Connector DIY-FEASIBLE with proper tools
Path B: Damaged Seal, Cracked Housing, or Failed Sensor Professional Repair Required
Path C: Internal Corrosion or Water Inside the Sensor Non-Repairable → Replace
Post-Repair Validation: Don’t Skip This
Just clearing the code isn’t enough. You need to make sure the fix actually worked. For a connector clean-and-seal repair (Path A), I’ll monitor the system over three full ignition cycles. The BSD icon should activate normally once you’re driving above 10 mph. Use your scan tool to confirm no active or pending codes return. Then, a good test drive on a multi-lane road is essential. Verify that alerts trigger when vehicles enter your blind spot and that Rear Cross Traffic Alert works when reversing out of a parking spot. For a sensor replacement (Path B), validation is part of the calibration process. The scan tool must display “Calibration Complete” or “Alignment Within Tolerance.” Any dynamic calibration phase must also complete successfully. If it doesn’t, the job isn’t done. Skipping this step risks unreliable system performance and potential safety issues.
Keeping It From Happening Again
-
Anytime your rear bumper is removed for any reason—like a collision repair or hitch installation—insist the technician inspect the BSD sensor seal and connector. A quick application of dielectric grease during reassembly is cheap insurance.
-
When washing your car, especially with a pressure washer, keep that high-pressure spray away from the rear bumper corners or emblem areas. Those are prime sensor locations.
-
Here’s a simple habit: after washing, start the car and wait 30 seconds before driving. Watch the instrument cluster for any ADAS-related warnings during the system’s self-check. Any warnings are a red flag.
-
If the BSD fault appears intermittently after rain or car washes, treat it as an early warning. That’s moisture getting in, and it’s only a matter of time before corrosion sets in and turns a small problem into a big one.
Costs, Risks, and Making the Call
Alright, let’s talk brass tacks. Here’s a realistic breakdown of repair costs and outcomes to help you decide the best path forward.
If it’s just a dirty or damp connector (Path A), you’re looking at about $15–$25 for electrical contact cleaner and dielectric grease if you DIY. A shop might charge $150–$300 for diagnosis and labor. My success rate on these, if caught early and done right, is about 85%. But if you let it go, that corrosion will spread, leading to a much more expensive repair—think $500–$1,500 for a new sensor or even part of the wiring harness.
A new sensor (Path B) is $400–$800 for the part alone, sometimes more depending on the vehicle. With labor and that critical calibration, a shop will typically charge $900–$1,800. If done right, with proper calibration, the success rate is near 98%. The big risk here is incorrect calibration, which can cause false alerts or missed detections and will require more shop time to fix.
Consider your vehicle’s value and how you use it. If the repair cost starts to exceed 30% of the car’s worth, especially if it’s out of warranty, you need to weigh how critical the BSD system is to your driving. While it’s a valuable safety aid, the car will operate safely without it. That said, if you frequently drive on highways or in heavy traffic, restoring the system may be well worth the investment for peace of mind.
