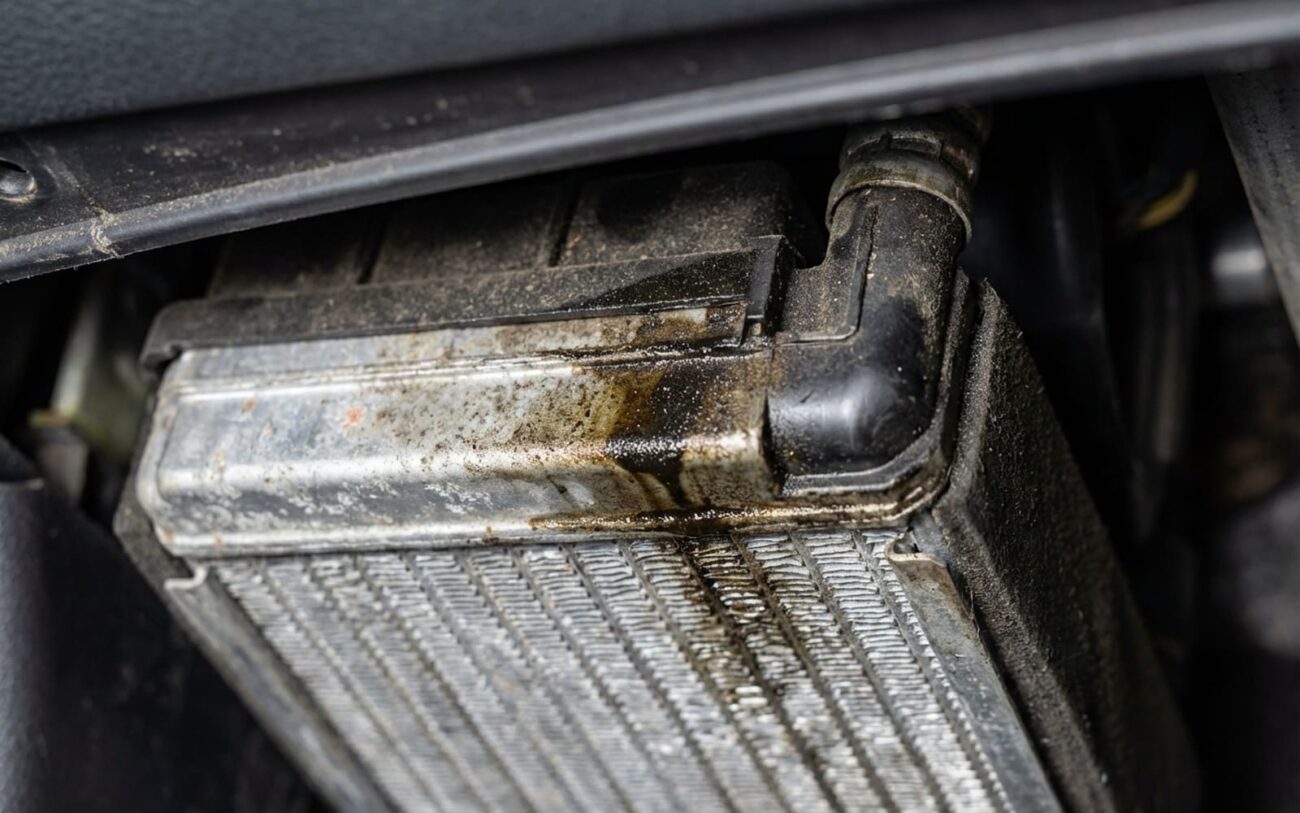
Alright, let’s talk about evaporator core leaks. In my 25+ years turning wrenches, I’ve seen more than my share of these, and they’re a real pain. But here’s the thing: if you know what to look for, you can catch it early and save yourself a ton of grief—and money—down the road.
The Dead Giveaways: Oily Residue, Weak AC, and That Nasty Smell
The absolute biggest red flag for an evaporator leak is when you find an oily, greasy film where it shouldn’t be. Pull out your cabin air filter, and if the paper element or the plastic housing is slick, or you see a shiny drip coming from the AC drain tube under the car? That’s not water, and it’s definitely not road grime. What you’re looking at is refrigerant oil—most likely PAG oil—that’s escaped your HVAC system. This oil travels with the refrigerant (R-134a or 1234yf) to keep the compressor lubricated. When there’s a leak, that oil gets carried right out with the refrigerant. If you spot this oily film inside the HVAC case or under the dashboard, it’s a near certainty the leak is coming from the evaporator core itself. That’s the small aluminum heat exchanger buried deep behind your dash that actually cools the air.
Of course, you’ll also notice the AC just isn’t blowing cold like it used to. That’s because you’re losing refrigerant. If I hook up my AC gauges, both the high- and low-side pressures will be way down because the system’s charge is depleted. Now, low pressure alone could mean a leak anywhere—a cracked condenser, a bad compressor seal, a leaking hose. But when you combine poor cooling with that internal oily residue, my suspicion immediately shifts to the evaporator.
And then there’s the smell. A lot of folks complain about a musty, damp odor coming from the vents, especially when they first fire up the AC. That’s not just an “old car” smell. That’s mold and bacteria having a party on your evaporator fins. The escaping oil traps moisture and dust, creating a perfect breeding ground that’s almost impossible to clean effectively without pulling the core. A clogged drain can cause mildew on its own, sure, but when oil’s in the mix, the problem gets worse and just won’t go away.
Here’s the real danger, and I’ve seen it happen too many times: running the system with a leak means you’re not just losing refrigerant, you’re losing that critical lubricating oil. Without enough oil, the compressor runs dry. I’ve had compressors seize up from this, sending metal shrapnel through the entire system. What might start as a $1,500 evaporator replacement can quickly balloon into a $3,000+ nightmare, requiring a new compressor, accumulator, and flushing all the lines. Catch it early, and you might just save the whole system.
My Diagnostic Approach: Confirming the Evaporator Leak
Seeing oil inside the HVAC case is a huge clue, but it doesn’t automatically mean the evaporator core itself is leaking. Before I even think about tearing into a dashboard, I need to rule out other, more accessible culprits. The goal is to isolate the leak to the core, not just a serviceable O-ring or seal nearby.
Checking for Oil Residue & Refrigerant Vapor
If I see that oily film on the cabin filter or inside the HVAC plenum, my first step is usually a UV dye and black light inspection. I’ll add dye to the system, run the AC for a bit, then get a good black light and look inside the HVAC plenum. Sometimes, you can see the glowing dye right on the evaporator fins or the housing. If it’s hard to see, I’ll use an electronic refrigerant leak detector with a sniffer probe. I’ll insert that probe through the cabin air filter opening, or sometimes through the blower motor opening or the condensation drain tube. Then, I’ll run the blower motor on high. This helps draw any leaking refrigerant vapor through the system and into the detection path of the sniffer. A strong, consistent reading from the core area, especially after I’ve checked and ruled out accessible seals like the evaporator temperature sensor O-ring or the expansion valve connections, pretty much confirms the core is the source.
Don’t forget to check the obvious, easy stuff first. I’ve seen a leaking Schrader valve on a service port get mistaken for an internal leak, or even oil carryover from a really worn compressor. Always eliminate the simple things before you go digging deep.
Pinpointing Low Pressure Leaks with Nitrogen
When the system is low on refrigerant, and the gauges confirm low pressure on both sides, I go for a nitrogen pressure test. This is far more reliable than just relying on ambient temperature pressure readings. Here’s how I do it:
- First, I evacuate the system completely.
- Then, I use isolation valves (if available, or by carefully disconnecting and sealing sections) to separate the low-side circuit (which includes the evaporator) from the high side.
- I’ll charge the suspected circuit to about 150–200 psi with dry nitrogen.
- With a precise gauge, I monitor that pressure. If the low-side circuit loses pressure while the high side holds steady, that tells me the leak is in the evaporator or its associated low-side lines. This test is non-negotiable for accurate diagnosis.
This method helps me rule out other common leak points like the condenser, a compressor seal, or a high-pressure line. When that oil is inside the cabin-side HVAC housing, though, my search area narrows pretty quickly to the components within that evaporator case.
Why Evaporators Give Up: Corrosion, Vibration, and Bad Luck
When an evaporator core fails, it means the aluminum tubing or the brazed joints in the core itself have developed a leak. It’s not just a failed O-ring on an attached component. I typically see three main reasons why these things go bad:
Vibration Fatigue
The evaporator sits inside a plastic HVAC housing, and that housing vibrates. From the blower motor, from road inputs, from the engine itself. Over time—and we’re usually talking 10+ years here—these constant micro-movements cause stress cracks. I see them most often at tight bends in the tubing or where the tubes connect to the header plates. They start tiny, but with all the thermal cycling (heating up, cooling down), they just grow and grow until you’ve got a leak.
Formicary Corrosion: The Sneaky Killer
This is probably the most common cause I encounter, and it’s a real sneaky one. Formicary corrosion is a slow-acting type of corrosion that literally eats microscopic tunnels through copper and aluminum from the inside out. It’s triggered by organic acids that form when moisture, oxygen, and contaminants like formic or acetic acid mix on the cold, damp surface of the coil. Where do these acids come from? Often, they’re pulled right in through the cabin air intake. Think dirty cabin filters packed with organic debris, off-gassing plastics from the dash, or—and this is a big one—aftermarket air fresheners, especially those sprays and gels. These chemicals break down into corrosive compounds when they hit that moist, temperature-cycling environment. I’ve diagnosed countless Honda and Toyota models where the evaporator failed prematurely due to this exact issue. It’s a known problem, and sometimes manufacturers even put out service bulletins about it, though specific models and TSBs vary.
Manufacturing Defects
Less frequently, you’ll run into an evaporator that just wasn’t made right from the get-go. Things like porous castings or weak factory brazing. These might hold up for years, but eventually, they’ll fail under the constant pressure and thermal stress of the AC system. But here’s a critical distinction: a leak at the evaporator temperature sensor O-ring or the expansion valve connection? That’s not a failed core. Those are replaceable seals, and frankly, replacing those O-rings (and the expansion valve O-rings) is standard practice during any evaporator repair. Diagnosing accurately saves you from an unnecessary, incredibly labor-intensive dash removal.
The Fix: It’s a Big Job, Do It Right
This is a Professional-Level Repair
If the evaporator core itself is leaking, let me be clear: replacement is the only permanent fix. There’s no reliable way to patch or seal an aluminum evaporator core from the outside. The materials just don’t bond well to sealants, and the core is buried too deep for any meaningful external repair. For nearly all DIYers, this is a job for a professional shop.
This repair typically involves complete or at least partial dashboard removal. That means disconnecting the battery, disabling the airbag system, often removing the steering column, the instrument cluster, and a whole spaghetti of HVAC and electrical connectors. On many vehicles, you’re looking at 8 to 12 hours of labor, sometimes more. It’s not for the faint of heart or the inexperienced.
If you (or your chosen shop) are tackling this, you’ll need specific tools and parts to do it right:
- A quality evaporator core (OEM or a reputable aftermarket brand).
- A new receiver drier or accumulator. Never, ever reuse the old one—it absorbs moisture and loses its filtering ability over time.
- The correct type and amount of PAG oil, specified by your service manual (e.g., PAG 46, 90ml).
- Fresh O-rings for all refrigerant connections you open up.
- A manifold gauge set.
- A high-capacity vacuum pump.
- A refrigerant scale for precise charging.
Validating the Repair: The Vacuum Test is Non-Negotiable
Once that new evaporator is in and the dash is (mostly) back together, the job isn’t done. The next step is absolutely critical: the vacuum decay test. This isn’t optional; it’s what separates a proper, lasting repair from a “come-back” job that’ll have you pulling the dash again in a few months.
Using a quality vacuum pump, you need to pull the system down to below 500 microns. Then, close the valves and isolate the system from the pump. Monitor that vacuum level for at least 15 to 30 minutes. If the micron reading climbs above 1,000, you still have a leak. It could be a bad connection, a faulty O-ring, or something wasn’t installed quite right. This test absolutely requires an electronic micron gauge; those old-school compound gauges simply can’t detect small leaks reliably enough.
Only after the system holds a solid vacuum should you charge it. And I mean charge it with the exact weight of refrigerant, measured on a scale—not just by pressure alone. Once charged, run your final operational test: engine at 2,000 RPM, A/C on max, recirc mode active, and ambient temp around 75°F. The center vent air temp should drop to 35–45°F within 10–15 minutes. Check both high- and low-side pressures; they should stabilize within the normal range for the ambient conditions and stay steady for at least 15 minutes. If all those checks pass, then your repair is solid, and you’ve done it right.
Cost and Value: Is This Repair Worth It?
Let’s be honest, this repair is expensive. It’s not because the evaporator core itself is pricey—you might pay $150–$300 for the part. It’s the labor that drives the total cost through the roof. For a shop, you’re typically looking at anywhere from $1,200 to $2,500+, depending on the vehicle. Luxury cars or compact models with incredibly complex dash layouts will always cost more.
My Rule of Thumb
Here’s a practical rule I use when advising customers: if the repair cost exceeds 50% of your car’s private-party value (check a reliable source like Kelley Blue Book), you really need to think hard about whether it makes financial sense. On a newer, well-maintained vehicle, replacing the evaporator is often a smart investment. You’ll get years more out of the car. But on an older car with high mileage and other pending repairs, it might be the tipping point to consider replacing the vehicle instead.
That said, don’t ignore the hidden costs of inaction. Running without AC in a hot climate isn’t just uncomfortable; it can strain your engine (especially if the compressor seizes) and reduce your comfort and safety. Plus, a seized compressor could leave you stranded, which is a whole other headache.
Prevention: Keep That Evaporator Happy
You can’t stop time, but you can definitely slow down the most common causes of evaporator failure. Since formicary corrosion is such a leading culprit, your best defense is keeping that evaporator clean and dry.
- Change your cabin air filter regularly. I tell my customers every 12 to 24 months, or more often if you drive in dusty or polluted areas. A clogged filter restricts airflow, making the evaporator run colder and longer, which means more condensation and more chances for contaminants to stick and cause corrosion.
- Avoid aerosol sprays and gel-based air fresheners near the intake vents. I’ve seen dozens of cases where these products directly accelerated corrosion. They break down into those corrosive acids we talked about. Stick to activated charcoal filters or odor-neutralizing cabin treatments that don’t leave a residue.
- Inspect annually. Make it a habit to inspect your cabin filter and its housing once a year. Look for any oily sheen or dark spots. During routine AC service, a good technician can use an electronic leak detector near the HVAC drain tube under the car. This is often one of the earliest places refrigerant vapor will escape. Catching a small leak early won’t save the evaporator, but it can absolutely prevent compressor failure and save you hundreds—or thousands—down the road.
