That Burning Plastic Smell from the AC Vents? Let’s Get Real.
You turn on the AC or heat, and there it is: that sharp, acrid smell. Like melting plastic, or maybe scorched electrical insulation, coming right out of the dash vents. You’re not imagining things. That smell is your car screaming at you, telling you something in the HVAC system is overheating. And believe me, after 25 years in the shop, I’ve smelled it more times than I can count.
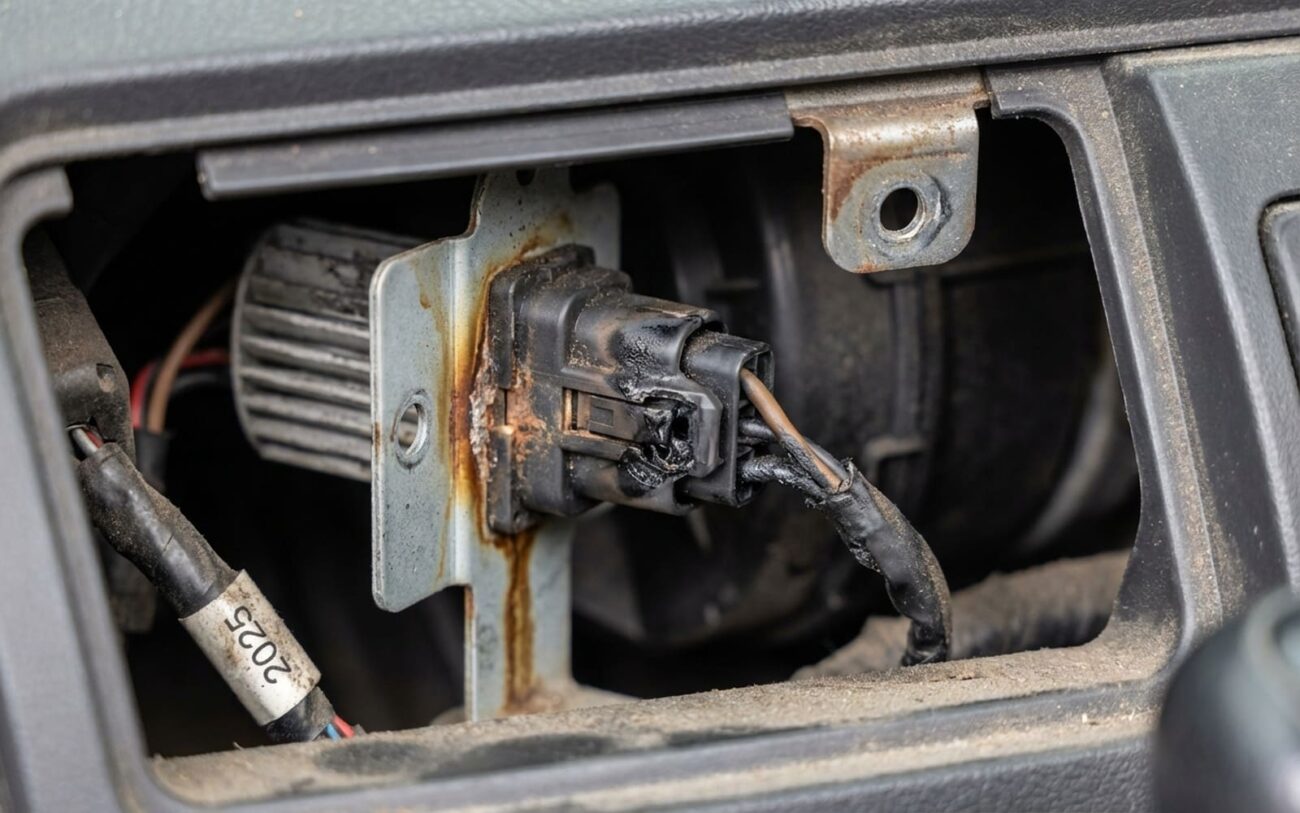
Usually, it hits hardest when you first crank up the blower, especially on high speed. Now, the good news is it’s rarely a mystery fire about to happen. But the bad news? Ignoring it can turn a relatively simple $200 fix into a $1,500 wiring nightmare. The usual suspects are tucked away inside the HVAC housing: the blower motor itself, its resistor, a blend door actuator, or sometimes, just plain damaged wiring.
How I Pin Down That Smell: Driver’s Clues & Shop Tools
First things first: diagnosis starts with observation, not just tearing into the dash. As a tech, the first thing I ask a customer is, “When does it happen?” Does the smell change with fan speed? Is it worse on defrost or Max AC? These details are gold; they help me narrow things down fast.
- If that plastic smell flares up mostly at low fan speeds, I’m usually looking at the blower motor resistor. That resistor works hardest when it’s trying to limit voltage to the motor, and that’s when it gets hot.
- A constant odor, especially if it’s paired with a new whine or grinding noise, usually points straight to the blower motor itself failing.
- If the smell only shows its face on Max A/C or defrost, then I start thinking about a blend door or recirculation door actuator binding up and overheating. Those little plastic gears can strip or seize, making the motor work overtime.
But don’t get tunnel vision. I’ve seen plenty of “burning plastic” smells that weren’t HVAC at all. Sometimes, it’s just coolant spraying onto a hot exhaust manifold from a ruptured hose, or even a plastic bag stuck to the exhaust. Always check the obvious stuff first.
My Diagnostic Process: Tools I Use
Once I’ve got the driver’s input, it’s time for the heavy lifting. A good scan tool is invaluable here. It lets me talk to the HVAC module, pull any diagnostic trouble codes (DTCs), and even command actuators to move. I watch the data PIDs for anything sluggish or resistant, which tells me if a door motor is binding. But you’ll also need some basic electrical tools:
- A digital multimeter (DMM) for checking voltage and resistance.
- A clamp-on ammeter to measure current draw. This is critical for blower motors.
- Sometimes, a borescope comes in handy. It lets me peek behind ducts and into tight spaces without having to rip the whole dash apart.
| What You Smell/Hear | My Top Suspect (HVAC) | Common External Mimics | How I Confirm It |
|---|---|---|---|
| Plastic odor with AC/heat on, at any fan speed. | Blower motor housing or impeller overheating, usually from a seized bearing or electrical overload. | Melting insulation on nearby wiring; overheated blower motor resistor pack. |
I pull the blower motor. I’m looking for localized melting, discoloration, or warping on the housing and impeller.
|
| Odor changes with blower speed (e.g., worse at low speeds). | Blower motor resistor failing, or the motor’s armature binding, increasing current draw and heat. | Failing blower resistor overheating at specific speed settings. |
I do an amperage draw test on the blower circuit. If it’s pulling more than OEM spec, the motor is working too hard.
|
| Odor only present on Max A/C or Defrost. | Unlikely to be the blower motor alone. More often, it’s an overheating blend or recirculation door actuator motor or its plastic linkage. | Nothing really mimics this externally in the same way. |
I use the scan tool to command the actuators to move. I’m monitoring position feedback for binding or sluggishness. Then I visually inspect the actuators for any signs of heat damage.
|
Why These Blower Motors Go Bad (It’s Not Overnight)
When the blower motor is the actual problem, it’s almost always one of three internal issues. And none of these failures happen suddenly; they’re usually a slow burn (pun intended).
- Bearing Failure: Most blower motors ride on sleeve or ball bearings. Over time, these dry out, or get gunked up with dust and debris – especially if you’re neglecting that cabin air filter. When that happens, friction goes through the roof. The motor has to work a lot harder, pulling more current to spin. This overheats the internal windings and literally bakes the surrounding plastic. When I pull these motors, I often see brown, bubbled, or melted spots on the housing or impeller.
- Commutator and Brush Wear: These little DC motors rely on carbon brushes making contact with a copper commutator to transfer power. As those carbon brushes wear down, or if the commutator gets dirty, you get increased arcing. That arcing creates intense, localized heat – enough to melt the plastic brush holder or the end cap. If you ever smell ozone along with the plastic, that’s a dead giveaway for electrical arcing.
- Mechanical Imbalance: Sometimes the impeller itself gets damaged. Maybe a blade breaks off, or it warps from heat, or it just gets packed solid with leaves and crud. This creates vibration and an uneven load on the motor. That vibration accelerates bearing wear and can even cause the motor shaft to rub directly against the housing. Friction, heat, melted plastic – you get the picture. I’ve seen some specific models, like certain Chrysler Pacificas, that had known issues with premature bearing failure and melting impellers. Manufacturers sometimes put out revised motors with upgraded components for these, but the basic failure pattern is pretty consistent across the board.
The Fix: What I Recommend
This Can Get Tricky. Don’t Skimp on Safety.
While swapping out a blower motor might look like a simple DIY job, if you’re dealing with damaged wiring or a deeper electrical fault, you’re in professional territory. You need specialized tools, proper safety gear, and a solid understanding of automotive electrical systems. There are no safe shortcuts here.
Blower Motor & Impeller Replacement DIY-Feasible (with caution)
But here’s my advice: always replace the entire blower motor and impeller assembly as a single unit. Don’t try to salvage the old impeller, even if it looks okay. These are balanced components, and mismatching them can cause vibrations and shorten the life of your new motor. And for goodness sake, don’t just grab the cheapest generic motor. Verify its amperage draw against OEM specifications. A motor that pulls too many amps will just overload your new blower resistor or wiring, and you’ll be right back in my shop.
No Repairing the Motor Itself Not Repairable
No Safe Temporary Fix Don’t Even Try It
Did the Repair Actually Work? Don’t Skip This Step.
Alright, you’ve got the new motor in. The fan spins. Great, right? Not so fast. Just because it spins doesn’t mean the job’s done. Validation is absolutely critical here. I always tell my guys: “Don’t just button it up and send it out.”
- First, run that blower on every single speed setting. It should operate smoothly—no grinding, no whistling, no weird vibrations. And you should feel strong, consistent airflow. Most importantly, there should be zero odor. None.
- Next, and this is where a lot of DIYers miss it, you need to check the electrical load. Grab that clamp-on ammeter and measure the current draw at each fan speed. Compare those numbers to your vehicle’s service manual specifications. A new, healthy motor should draw current within 10% of that specified range. If it’s pulling too much current, you haven’t fixed the root cause. You need to dig deeper: Is there a clogged evaporator core restricting airflow? Is the HVAC control module sending erratic signals? A high draw on a brand new motor is a red flag that it’s going to fail prematurely, and you’ll be doing this job again soon.
How to Keep This From Happening Again
Preventing a repeat performance of that burning plastic smell really boils down to two things: good airflow and paying attention. Trust me, it’s a lot cheaper and easier than a full repair.
My Top Prevention Tips
-
Change your cabin air filter. This is the #1 cause of premature blower motor failure. A clogged filter makes the motor work like it’s running a marathon with a pillow over its face. It pulls more current, generates more heat, and eventually burns out. I recommend every 12,000 to 15,000 miles, or even more often if you drive in dusty areas. It’s a cheap part that protects an expensive system.
-
Listen for early signs. Any new whine, buzzing, or even a faint plastic smell isn’t “just the way the car is.” It’s a warning. Check that filter first. If it’s clean and the smell or noise persists, your motor is probably on its way out. Catch it early, and you avoid smoke, total failure, and potential damage to the resistor or wiring.
-
Inspect regularly. When you change that cabin filter, take a quick peek into the blower motor housing. Clear out any leaves, pine needles, or other debris. This stuff can throw the impeller off balance or get sucked into the motor.
-
Don’t ignore vibrations. If you feel the fan vibrating more than usual, it’s a sign of an unbalanced impeller. That leads to accelerated bearing wear and a quick trip to failure town.
What’s This Going to Cost Me? & Long-Term Outlook
Let’s talk money. Fixing that burning plastic smell isn’t usually pocket change, but it’s often less terrifying than people imagine. The real financial hit comes if that overheating has already damaged other components. A fried HVAC control module or a melted section of the wiring harness can easily push the repair bill into the $1,000 to $2,000 range. That’s why I stress getting it looked at early.
| Repair Type | DIY Cost (Parts Only) | Shop Cost (My Estimate) | Success Rate | Secondary Risk if Not Fixed Right |
|---|---|---|---|---|
| Blower Motor Replacement | $80 – $250 | $300 – $600 |
98% (if you use the correct, OEM-spec part and check current draw)
|
Repeat failure if the true root cause (like a clogged evaporator or faulty control module) isn’t addressed. |
| Full HVAC Harness Inspection & Repair | N/A (This is diagnostic and repair labor) | $150 – $300 (for diagnostic time alone, repairs extra) |
100% (if the tech is thorough)
|
N/A |
My rule of thumb is this: if the total repair cost starts creeping past 40% of your car’s current market value, and the vehicle has other significant aging issues, then it’s time to seriously think about whether that investment makes long-term sense. But for most folks, replacing a blower motor is a smart, cost-effective fix that brings back your comfort and, more importantly, eliminates a potential fire risk.
Always, always check your vehicle’s warranty status before you authorize any repairs. You might still be covered!
My Two Cents on Shop Choice
If you’re out of warranty, a good independent shop can often save you a bundle on blower motor replacement—I’m talking 30-50% less than dealership pricing. But here’s the catch: make sure they’ve got the experience. This isn’t just a general mechanic job; you want someone who understands HVAC electrical systems. Ask around, check reviews. A qualified indie shop is worth their weight in gold.