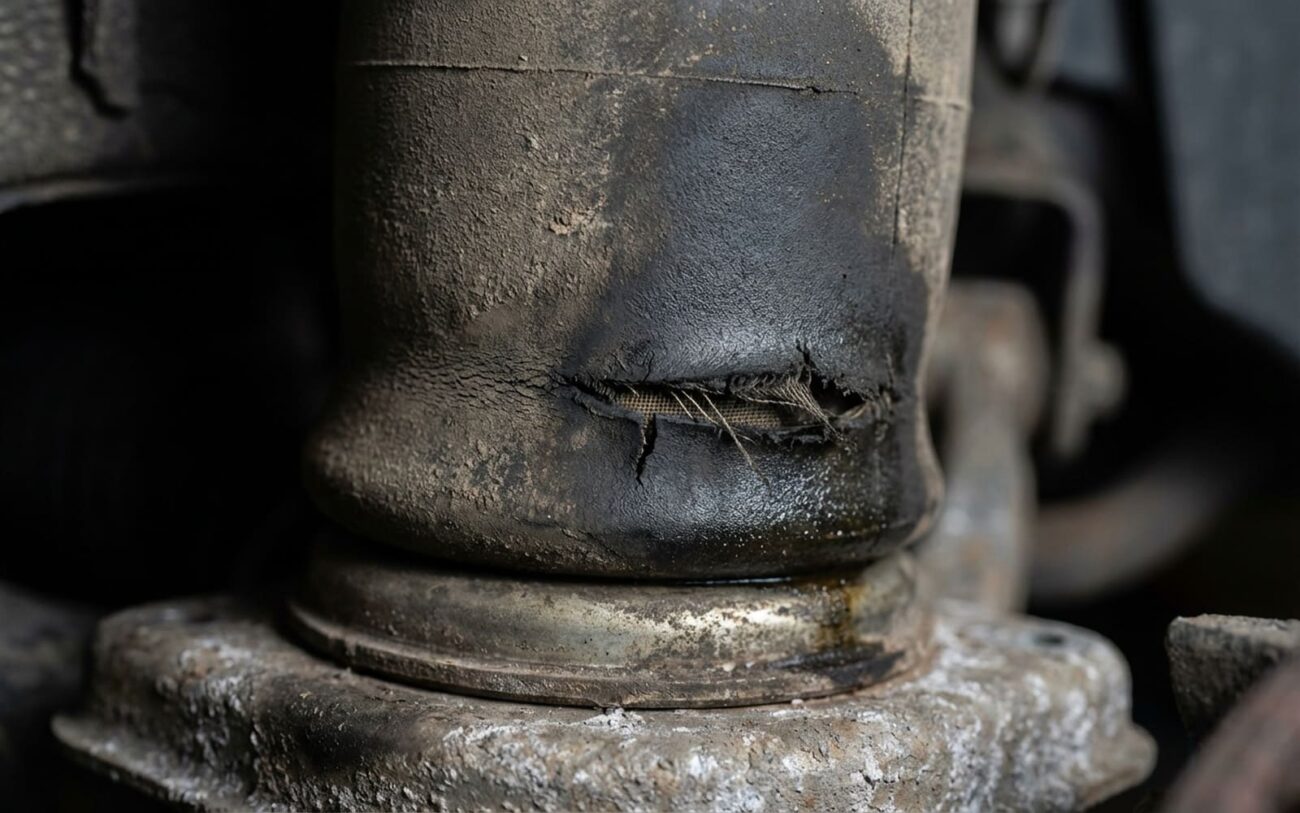
If you own a Range Rover, chances are you’ve already dealt with, or will deal with, a sagging air suspension. It’s one of the most common issues I see roll into my bay, and after 25 years turning wrenches, I’ve seen just about every way these systems decide to quit. This isn’t just about a comfy ride; a failed air spring can quickly snowball into much bigger, more expensive problems if you don’t address it right.
Spotting the Sag: Symptoms and What They Mean
The first sign is almost always visual: you walk out to your Range Rover in the morning, and it’s sitting low. Sometimes it’s just one corner, sometimes the whole vehicle looks like it’s kneeling, almost down on the bump stops. It’s a pretty unmistakable sight once you know what to look for.
When you fire it up, you’ll probably hear the air compressor, usually mounted in the rear, kick on immediately. It’ll run for a minute or two straight, maybe even longer, working overtime to try and lift the truck back to normal height. If the leak is minor, it might recover fully. But if that air spring is truly ruptured or the leak is severe, it might never reach proper height, or it’ll lift up only to sag right back down once you shut the engine off.
Another dead giveaway is the sound of escaping air. I often hear it as a steady, low hiss coming from a wheel well. It’s most noticeable right after startup when the system is under full pressure, or sometimes after you park it. If it’s a persistent lean – one side of the vehicle noticeably lower than the other – combined with that yellow “Suspension Fault” message on the dash, you’ve got a pretty strong case for a leak in the air suspension system.
Status: LOW
Beyond the Obvious: Pinpointing the Leak
So, your Range Rover is sagging or hissing. Most folks immediately think “blown air spring,” and honestly, they’re often right. But here’s the kicker: the air suspension is a closed system with multiple failure points. You’ve got the compressor, the valve block, air lines, height sensors, and the springs themselves. A leak anywhere in that system can mimic a failed air spring. I’ve seen too many people—and even some less experienced techs—replace a spring only to find the problem persists because the real leak was somewhere else. That’s a waste of time, money, and a quick way to get a repeat visit.
The most reliable way I’ve found to pinpoint the exact source of a leak is the soapy water test. But you’ve got to do it right. Grab a spray bottle, fill it with water, and add a few drops of dish soap – no need for fancy commercial solutions. With the vehicle at normal ride height (you might need a good scan tool to command it up and hold it there), methodically spray every inch of the suspect air spring. That means the rubber bellows, the top and bottom mounting plates, the plastic piston, and especially the air line connection. You’re looking for bubbles, and I mean active bubbles.
A steady stream or cluster of bubbles forming on the sidewall of the bellows or along the piston indicates a definitive failure in the spring assembly itself. That’s your blown spring. But if you only see bubbles appearing at the brass air fitting, that’s usually a worn O-ring or a loose connection – a much simpler, cheaper fix, and definitely not a full spring replacement. Don’t stop there, though. While you’re under there, check the air lines leading to the spring, and even spray around the valve block if you suspect a more central leak. This thoroughness saves headaches later.
My Take: Common Leak Locations
In my experience, a corner sag with an audible hiss almost always points to a ruptured rubber bellows, a failed bead seal, or a cracked plastic piston on the air spring itself. However, I’ve also chased leaks that turned out to be a pinhole in an air line, a faulty O-ring on a valve block solenoid, or even a leaking compressor discharge hose. That soapy water test is your best friend here.
Why Air Springs Fail (It’s Not Always Age)
Let’s talk about why these air springs give up the ghost, especially on Range Rovers where longevity often falls short of what you’d expect – sometimes failing before 60,000 miles. I’m focusing on failures that originate within the spring assembly itself, not external components.
The first and most common culprit is simply environmental degradation. That rubber bellows is constantly exposed to road salt, brake dust, UV radiation from the sun, and heat from the brakes and exhaust. Over time, ozone and chemical exposure cause the rubber to harden and lose its elasticity. You get these tiny, almost invisible micro-cracks, often on the inner sidewall where debris tends to accumulate. These flaws grow with every compression cycle until you get a sudden split, usually overnight when the vehicle is sitting.
The second major failure point is the bead seal. This is that crimped joint where the rubber bellows bonds to the plastic piston. This area flexes constantly with suspension movement, and that creates stress fatigue. I’ve seen countless springs where the rubber just starts to peel away from the piston, allowing air to escape. It’s not always visible without getting right up in there, which is another reason the soapy water test is so valuable.
Technician’s Note on L405 Models:
On the L405 generation Range Rovers, the plastic piston itself is a major issue. It’s made from glass-reinforced nylon, and I’ve seen it crack from road debris impacts or just from repeated thermal cycling. A cracked piston won’t always leak visibly until it completely fails, but it will cause recurring sag and make your compressor work overtime. It’s a sneaky one.
The Fix: What Works and What Doesn’t
CRITICAL SAFETY WARNING
Working on air suspension is serious business. You must depressurize the system before doing any work. Failure to do so can result in explosive decompression, which can cause severe injury. Always use proper jack stands, and a capable scan tool is mandatory to place the vehicle in service mode and safely release the air pressure.
O-Ring Replacement DIY FEASIBLE
Full Air Spring Replacement Professional Only
Sealants & Temporary Fixes LAST RESORT (NOT RECOMMENDED)
Confirming the Repair: Don’t Skip This Step
You’ve made the repair – great. But you’re not done until you’ve verified it. First, the vehicle should smoothly raise to all its programmed heights: Access, Normal, and Off-Road. The compressor shouldn’t run for more than 30–45 seconds after startup to reach its target pressure. Once it’s stable, shut the engine off and listen carefully for about 15 minutes. Any lingering hiss means the leak isn’t truly fixed. Do another soapy water check, just to be sure.
Next, clear all fault codes from the Suspension Control Module using your scan tool. Take the vehicle for a good test drive over varied terrain – hit some bumps, make some turns, accelerate, brake. After that, scan it again. No new suspension codes should appear. If they do, you’ve either got an unresolved leak, a sensor issue, or the calibration step was skipped or done incorrectly. Don’t send it out of the shop (or your driveway) until it passes this final check.
A Note on Other Noises
If you notice other noises post-repair – like a whine at highway speeds – don’t automatically assume it’s suspension-related. For example, a whining noise from the rear axle at speed is almost certainly a differential issue, not something you fixed on the air suspension. Keep your diagnostic mind open.
Cost, Risk, and Making the Right Call
| Repair Type | DIY Cost (Parts) | Shop Cost (Parts + Labor) | Success Rate (Properly Done) | Secondary Risk |
|---|---|---|---|---|
| Replace single air spring (OEM) | $300 – $600 | $1,200 – $1,800 | 99% | Improper calibration can lead to premature compressor wear or new fault codes. |
When it comes to these repairs, here’s a practical rule of thumb I tell my customers: if the estimated repair cost for multiple springs and related components starts to exceed 40% of the vehicle’s current market value, it’s time to seriously reassess. These are luxury SUVs with expensive upkeep, and air springs are just one part of a larger, complex system that includes control arms, bushings, and electronic modules – all aging together. Sometimes, chasing every leak isn’t the most economical path forward.
Keeping Your Air Suspension Healthy
My Maintenance Checklist
-
Keep ’em clean. After winter or off-road excursions, take a hose and rinse road salt, mud, and brake dust off the rubber bellows and pistons. It makes a difference.
-
Watch your tire size. Oversized tires can rub against the bellows at full steering lock. I’ve seen it cause rapid, avoidable wear.
-
Listen to your compressor. If it’s running for more than 60 seconds every morning when you start the car, you’ve got a leak. Don’t ignore it; address it immediately before it takes out the compressor too.
-
Do monthly visual inspections. Grab a flashlight and check for cracks, deep creasing, or shiny wear spots on the rubber. Catching these early can save you a tow.
