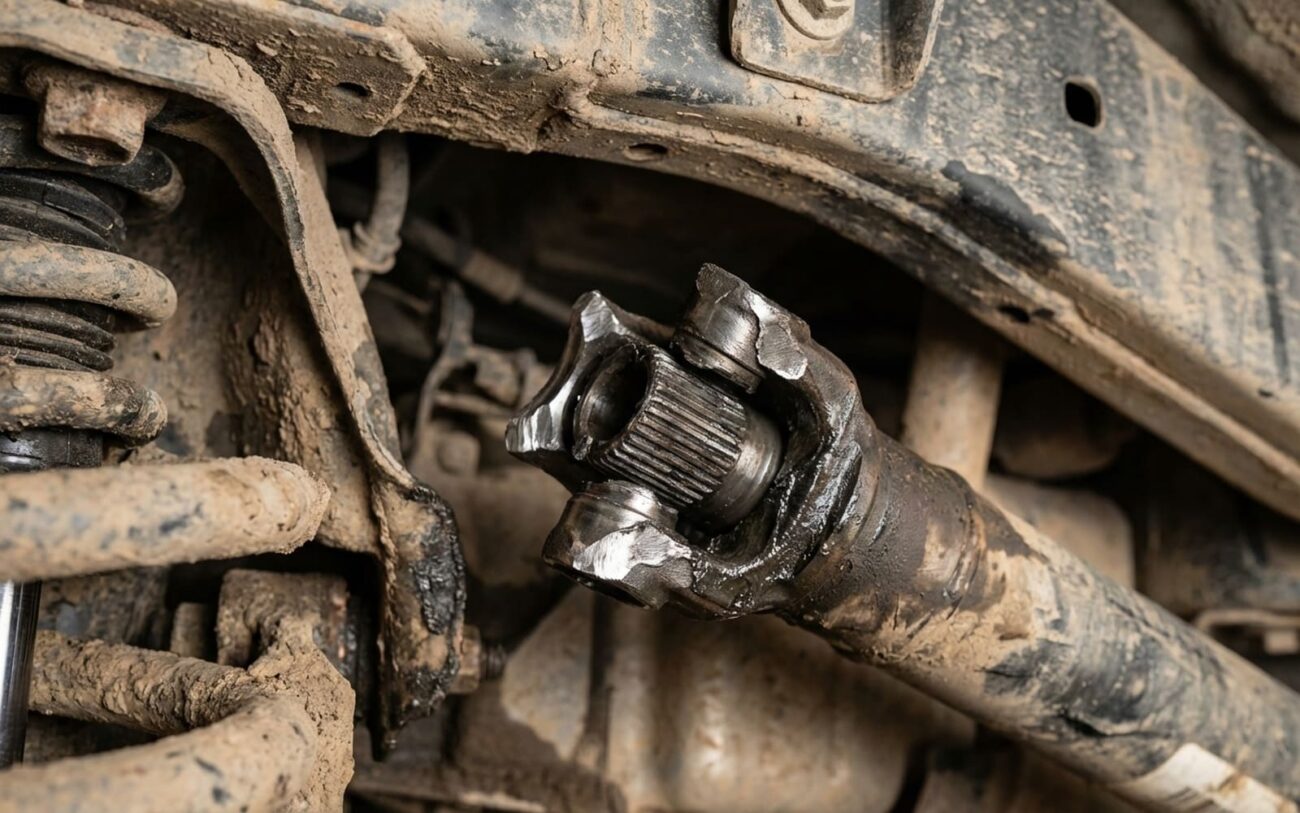
Alright, let’s talk about a broken driveshaft. If you’ve ever had one let go, you know it’s not a fun day. And if you haven’t, well, you’re about to learn what to look for and, more importantly, what to do when it happens. I’ve been wrenching on trucks for over 25 years, and I’ve seen more than my share of these failures. Trust me, it’s a mess you want to avoid.
When the Driveshaft Gives Up the Ghost
You’re pushing hard, maybe crawling up a rocky trail, tires digging in, throttle cracked open. Then it happens: a sudden, loud metallic BANG or CLUNK from right under your seat. Instant loss of drive power. Your truck just stops moving forward. If you’re still rolling, you might hear a nasty dragging or grinding sound as that now-loose driveshaft scrapes along the ground, or maybe it’s just beating the hell out of your skid plate. That’s the classic signature of a driveshaft failure, plain and simple.
Sometimes, though, you get a warning. I’ve had customers come in describing a growing vibration through the floorpan, one that gets worse the faster they go. Or maybe it’s a harmonic shudder, like the whole truck is humming a bad tune. That’s usually a U-joint screaming for help, or maybe the shaft itself is out of balance. It’s telling you it’s about to let go, and you better listen.
My First Steps: Diagnosing the Real Problem
Okay, you’ve got the symptoms: no drive, loud noises, maybe a wicked vibration. While a driveshaft is a prime suspect, it’s not the only thing that can cause these issues. You need to confirm what actually broke before you start tearing things apart or ordering expensive parts. Misdiagnosing this can cost you a lot of time and money. Here’s how I typically narrow it down:
| What You’re Feeling/Hearing | My Top Suspects (Driveshaft Related) | Other Common Culprits (Mimics) | How I Confirm It |
|---|---|---|---|
| Complete loss of propulsion, with grinding or dragging underneath. | A fractured driveshaft tube, a broken weld on the yoke, or sheared splines on the slip yoke. | A shattered ring and pinion gear in the diff, a broken axle shaft, or a failed chain or output shaft inside the transfer case. |
First, get under there and visually inspect the driveshaft. Is it in one piece? Is it bent? If it looks intact, I’ll pull the differential cover to check the ring and pinion gears. |
| Severe vibration that gets worse with speed, especially before a failure. | An unbalanced shaft, a worn-out or seized U-joint, or a bent/out-of-round driveshaft tube. | An unbalanced tire, a bent wheel, a failing wheel bearing, or even a warped brake rotor. |
Safely lift the vehicle on a hoist. With the wheels off the ground, put it in gear (carefully!) and watch the driveshaft spin. Look for any wobble or runout. Then, manually grab each U-joint and try to twist it—any rotational play means it’s shot. |
Why These Things Break: The Root Causes
When I say the driveshaft “broke,” I’m usually talking about the main tube failing, not just a U-joint or slip yoke. That tube is under constant torsional load, vibration, and bending stress, especially when you’re off-road. The most common failure points are what we call “stress risers”—places where the geometry changes abruptly, like the weld between the steel tube and the end yoke. Over time, metal fatigue sets in, starting a tiny crack that slowly grows until the shaft just splits. I see this more often than you’d think, especially on high-mileage or heavily worked trucks like the Toyota Hilux or older Ford Rangers.
Impact damage is another huge culprit. You’re out on the trail, you hit a rock, and BAM—the driveshaft slams into it. That creates a dent or a bend. That spot immediately becomes a weak point, like a crease in a paperclip. The next time you hit a bump, experience wheel hop, or just put a lot of torque through it, all that stress concentrates right there, and the tube can snap clean in half. I’ve pulled plenty of shafts out of trucks with hairline cracks running right along an impact point.
Then there’s torsional overload. This happens when you get sudden, massive torque spikes that just exceed what the shaft can handle. Think aggressive driving: a hard clutch dump, tires spinning wildly then suddenly grabbing traction, or serious wheel hop on a steep climb. That shock can twist or shear the shaft, especially at the splined section of the slip yoke. And while a failed U-joint isn’t technically a “broken driveshaft” itself, its collapse can absolutely destroy the shaft by allowing violent imbalance and whipping. It’s like a chain reaction.
Pro Tip:
Sometimes, what looks like a driveshaft failure is actually a loose U-joint strap bolt, a broken center bearing mount, or a damaged companion flange. These can mimic the symptoms perfectly but need different repairs. Always give these components a thorough inspection before you condemn the whole shaft. It’ll save you headaches.
Your Repair Options: The Straight Goods
So, you’ve got a driveshaft that’s seen better days. What you can actually do about it depends entirely on the damage once you get that shaft off and really inspect it. Let’s break down the realistic options.
Minor Bend or Dent (No Cracks) Professional Only
Weld Failure or Stripped Splines Professional Only / Replace
Cracked Tube or Severe Damage Non-Repairable
Severe Vibration (Shaft Intact) Last Resort / Limp Home
Did You Actually Fix It? How I Check My Work
A successful repair isn’t just about putting things back together; it’s about proving it actually worked. If you had a shaft straightened and rebalanced, the only acceptable outcome is zero vibration. None. Not at idle, not at 30 mph, and definitely not at highway speeds. Any reputable balancing shop should give you a readout showing the residual imbalance is within tolerance—ideally under 0.5 ounce-inches. If they don’t, or if you still feel a shimmy, it’s not fixed.
When I’m installing a new or rebuilt shaft, I check three critical things: first, smooth operation (no vibration, obviously). Second, freedom of movement—make sure there’s no binding when the suspension cycles through its full compression and droop. Third, seal integrity. Before reconnecting everything, I always clean the transfer case and differential flanges with a pressure washer. It makes it a lot easier to spot any fresh leaks later. And for crying out loud, use a torque wrench on all fasteners: U-joint straps, slip yoke bolts, and flange nuts. A loose flange bolt can feel exactly like an imbalance problem. After a few miles, I always tell my customers to come back so I can recheck the torque and inspect for any heat discoloration or movement at the joints.
The Cost and My Recommendation
Alright, let’s talk money. Repair costs can swing wildly depending on what you’re doing and who’s doing it. Here’s a realistic breakdown based on what I see in the shop and what parts typically run.
| Repair Type | DIY Cost (Parts Only) | Shop Cost (Parts & Labor) | My Success Rate Expectation | Secondary Risk (If Not Done Right) |
|---|---|---|---|---|
| Straighten & Balance Existing Shaft | N/A (Not a DIY job) | $150–$300 | High (If done by a specialist) | High—catastrophic failure if not perfectly balanced/straightened |
| Replace with OEM Shaft | $500–$1,200 | $800–$1,600 | Very High | Low |
| Custom Built Heavy-Duty Shaft | N/A (Specialized build) | $600–$1,200 | Very High | Low |
My Expert Recommendation:
Here’s how I make the call for my customers: if a new OEM shaft is going to cost you, say, 40% or more of your off-road-modified truck’s market value, you should seriously consider upgrading instead. For a similar price, you can get a heavy-duty aftermarket shaft from reputable builders like Tom Wood’s or Dana Spicer. These aren’t just replacements; they’re often stronger than stock, use better materials (like chromoly), and are built specifically to handle the increased driveshaft operating angles that come with suspension lifts. In my experience, that investment pays off big time in reliability—especially if you’re running 35-inch tires or bigger. It’s cheap insurance.
How to Keep This From Happening Again
Nobody wants to deal with a broken driveshaft twice. Prevention starts with routine inspection and maintenance. If your U-joints or slip yoke have grease fittings (zerks), you better be greasing them every other oil change. It’s a small step, but it prevents internal wear and corrosion that lead to imbalance and, eventually, failure. After any serious off-road run, get underneath your truck. Physically check for U-joint play or binding. Look for fresh dents on the shaft, missing balance weights, or any signs of it making contact with your skid plate or frame.
And pay attention to new vibrations—especially those that pop up in a specific speed range, like 45–55 mph. That’s a textbook sign of driveshaft imbalance or U-joint wear. Don’t ignore it. It’s your truck telling you something’s wrong before it completely gives up.
For lifted trucks—whether it’s a Ford Ranger or a Toyota Hilux—the real fix often isn’t just a replacement, it’s a driveline upgrade. Lifting increases the driveshaft angle, which amplifies stress on your U-joints and can cause premature fatigue. A double-cardan (CV) joint at the transfer case end helps manage those steep angles much more smoothly than a standard U-joint setup. Pair that with a thicker-wall tube or a one-piece shaft design, and you’ve significantly improved your durability. We’re talking about preventing the problem, not just fixing it.
Aftermarket brands like Tom Wood’s, Inland Empire Driveline, and Spicer are known for building shafts specifically tailored for high-angle, high-torque off-road use. These aren’t just replacements; they’re upgrades designed to prevent repeat failures. If you’re running aggressive tires or a torque-increasing tune, that’s not overkill. It’s just common sense.
