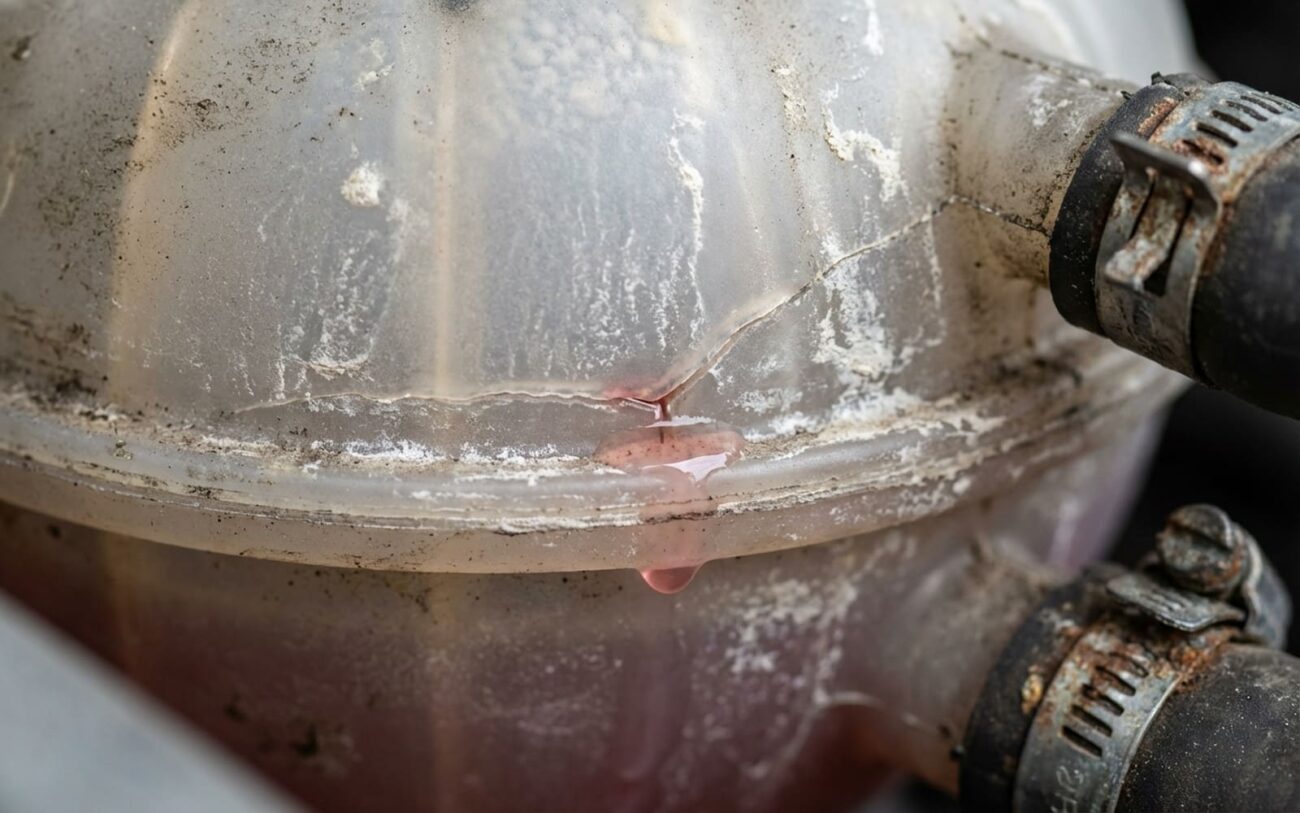
Alright, let’s talk about coolant leaks, specifically the kind that makes you scratch your head. On Lada Vestas, Renault Logans, and their Dacia cousins, I’ve seen this play out countless times: a slow, nagging coolant loss, often with a tell-tale pink, purple, or green puddle under the front-center of the car, usually near the front wheels. The tricky part? You might only see that puddle when the engine’s cold, or not at all, even as your coolant level keeps dropping.
The Sneaky Culprit: Your Expansion Tank
In my experience, when you’re dealing with those symptoms, especially in freezing conditions, the plastic coolant expansion tank is almost always the problem. It’s usually mounted on the driver’s side of the engine bay, and it’s prone to cracking. Why does it act so sneaky? Simple physics.
When temperatures drop, that plastic contracts. Any tiny micro-crack that’s already there opens right up, letting coolant seep out. But once the engine warms up, the plastic expands a bit, sometimes just enough to temporarily seal that crack. So, you drive around, everything seems fine, no visible leak, but overnight, when things cool down, that crack reopens, and you lose more fluid. It’s a frustrating cycle, but it’s a classic sign of a failing tank.
Why This Isn’t a “Top It Off” Problem
Look, I can’t stress this enough: even a small crack in that coolant reservoir is a ticking time bomb. You might think, “I’ll just keep topping it off,” but that’s a gamble you don’t want to take. A compromised tank can fail rapidly, dumping all your coolant in minutes. Once the level drops too low, your engine overheats—and it happens fast.
We’re talking less than 10 minutes from “low coolant” to serious, expensive damage. That excessive heat can warp a cylinder head, blow a head gasket, or even seize pistons or crack engine components. What starts as a few hundred dollars for a new tank can quickly become several thousand for an engine rebuild. So, please, don’t ignore this. Diagnose it right, fix it right.
My Diagnostic Approach: Don’t Guess, Test
Now, not every coolant leak near the front of the engine comes from the reservoir. Radiators, heater hoses, thermostat housings, and even water pump weep holes can all mimic a reservoir failure. That’s why a systematic approach is crucial. Just looking isn’t enough; many leaks look identical at first glance.
The Definitive Test: Cooling System Pressure Test
This is your best friend. A cooling system pressure test is the most reliable way to pinpoint the source without guesswork. Here’s how I do it:
- Clean and Dry: First, I clean and dry all the components around the suspected leak area. You need a clean slate to see the seepage.
- Cold Pressure Test: I pressurize the cold system to about 1.0 bar (14.5 psi) using a cooling system pressure tester. Then, I watch. I’m looking for any visible seepage from the reservoir body, especially around seams or mounting points. If you see it drip, you’ve found your crack.
- Thermal Stress Crack Check: If the cold system holds pressure, but you’re still losing coolant, there’s another step. Run the engine until it reaches operating temperature, then shut it off. Let it cool for a bit, then re-pressurize the system. A pressure drop with a visible leak at the reservoir after this cycle often confirms a thermal stress crack—the kind that only opens up when the plastic cools and contracts after being hot.
- Rule Out Head Gasket: If the system loses pressure but you don’t see an external leak, you need to rule out an internal issue. I’ll use a combustion leak (block) tester. This tells you if exhaust gases are getting into the coolant, which points to a head gasket failure.
- Cabin Odor? Look Elsewhere: If you’re smelling a sweet coolant odor inside the cabin, it’s highly unlikely to be the reservoir. Those tanks are external. That smell almost always points to a leaking heater core or degraded heater hose connections under the dash.
I’ve seen too many technicians—and DIYers—replace reservoirs only to find the real issue was a failing radiator seam or a degraded lower hose. Don’t skip the pressure test. It saves time, money, and prevents frustration.
Why These Tanks Fail: Root Causes
It’s not usually a mysterious design flaw. Most of the time, these plastic tanks fail in winter due to a combination of misuse and material issues. There are three main culprits I see:
1. The Wrong Coolant
This is a big one. The Lada Vesta and Renault Logan (including Dacia variants) are designed for OAT (organic acid technology) coolant—specifically Renault Type D, often labeled G12++, G13, or similar. You’ll usually see it as pink or purple. If someone tops it off with conventional silicate-based coolant (the green or yellow stuff), you’ve got a problem. Those silicates can chemically degrade the plasticizers in the polypropylene reservoir, making the material brittle over time. I’ve pulled tanks apart that looked fine on the outside but were spiderwebbed with micro-cracks on the inside from incompatible coolant. It’s not theoretical; it’s a chemical reaction slowly destroying the plastic.
2. Freezing Temperatures
This is the biggest trigger for winter failures. Water expands by about 9% when it turns to ice. If your coolant mixture has too much water—whether from improper mixing, topping off with plain water, or using the wrong concentrate—its freeze point rises significantly. Once ice forms inside that reservoir, it exerts tremendous pressure. Polypropylene plastic gets increasingly brittle below 0°C (32°F) and simply can’t handle that strain. That’s when cracks form, usually at stress points like seams, mounting bosses, or the neck where the cap seals.
3. Manufacturing Variances
Sometimes, it’s just a weak spot. Some reservoirs might have thin-wall sections or weak weld lines from the molding process. These are inherent weak spots that can give way under the normal pressures of the cooling system, especially when combined with thermal cycling or freezing. While there are service bulletins out there warning about using the correct Renault Type D coolant and not mixing types, the root issue is often user error or neglect.
Could a faulty radiator cap or a head gasket pushing combustion gases into the system contribute? Absolutely. Overpressure from either of those can stress an already weakened tank. But in freezing conditions, when I see a cracked reservoir, the primary trigger is almost always coolant that just couldn’t handle the cold.
My Fix: Replacement is the Only Real Option
Temporary Fixes? Don’t Bother. Temporary
I get it. You want to save a buck, or you’re just trying to limp home. For small, external cracks, especially along vertical seams, you can try a polypropylene-specific plastic welding kit or a two-part epoxy rated for polyethylene/polypropylene (like JB Weld PlasticWeld). You’d drain the coolant below the crack, clean it thoroughly, roughen it up, and apply the patch. But let me be blunt: these repairs almost always fail under thermal cycling. The plastic is already degraded, and the bond simply won’t last. You’re just delaying the inevitable, and risking a much bigger problem. Full replacement is always the correct long-term solution.
Full Replacement: The Right Way DIY-Feasible
For any significant crack, a split neck, or multiple fractures, replacement is mandatory. This is a pretty straightforward job for most DIYers. Here’s what you’ll need and how I approach it:
- Parts & Tools: Get the correct OEM reservoir (match the part number to your model year, don’t cheap out on aftermarket plastic), basic hand tools, a drain pan, and about 5 liters of fresh Renault Type D OAT coolant.
- Drain: Start by draining the cooling system.
- Disconnect: Disconnect all hoses attached to the reservoir. If you’re unsure, label them.
- Remove: Unbolt the mounting screws. These are usually small, so don’t overtighten when you put them back. Torque them to 3–5 Nm.
- Install New: Install the new reservoir. Reconnect all hoses, making sure the clamps are secure. If you’re using spring clamps, make sure they’re seated properly. For screw-type clamps, torque them to 2–3 Nm—don’t crank them down too hard, you’ll just cut into the hose.
- Bleed the Air (Crucial Step): This is where many people mess up. Air pockets in the system can cause overheating even with a full reservoir.
- Set your cabin heater to maximum heat and fan speed.
- Start the engine and let it warm up until the thermostat opens (you’ll feel the upper radiator hose get hot).
- Once warm, gently rev the engine to about 2,500 RPM for 30 seconds to help dislodge any trapped air.
- Let it idle, and top off the reservoir as the level drops.
- Repeat this process until the coolant level stabilizes between the MIN and MAX marks and you’re getting strong, consistent heat from the cabin vents. This might take a few cycles.
Internal Porosity: No Hope Non-Repairable
Sometimes, you’ll see coolant seeping right through the plastic wall of the tank, with no visible crack at all. That’s internal porosity, and it means the entire structural integrity of the plastic is compromised. You can’t epoxy that, you can’t weld it. Replacement is the only option here, too.
Post-Repair Validation: Don’t Skip It
Never just assume a repair is good because you bolted it back together. Validation is key, especially after a reservoir replacement. You need to confirm the system is sealed and bled properly.
- Cold Pressure Test (Again): After a full replacement, perform another cold pressure test. Seal the system and pressurize it to 1.2 bar (17.4 psi). It absolutely must hold that pressure for at least 20 minutes with no drop on the gauge and no weeping from the new reservoir. The tank shouldn’t bulge visibly either.
- Thermal Cycles: Then, drive the car through three full thermal cycles. That means: cold start, warm it up to operating temperature (make sure the cooling fans cycle on and off), and then let it cool completely back to ambient. During these cycles, the coolant level should remain stable, staying between the MIN and MAX marks. If it drops, you’ve either missed another leak, or there’s still air trapped in the system.
- Temporary Fix Vigilance: If you were foolish enough to attempt a temporary epoxy or weld repair, your validation standard is lower, but your vigilance needs to be much higher. It might hold 0.8 bar (11.6 psi) for 10 minutes cold. But more importantly, you need to check that coolant level every single morning before you start the car. Any drop means the repair is failing. At that point, stop driving and replace the reservoir. Don’t risk an overheat; you’re just asking for trouble.
Cost, Risk, and Common Sense
Let’s be honest: cost always plays a role in these decisions. But in this case, the numbers speak for themselves, and they scream “don’t cheap out.”
| Repair Type | DIY Cost (Parts) | Shop Cost (Est.) | My Success Rate Expectation | Secondary Risk if Failed |
|---|---|---|---|---|
| Reservoir Replacement (OEM) | $40–$80 | $150–$300 | 98%+ | Minimal if correct coolant and procedure used |
| Plastic Welding/Epoxy Repair | $10–$30 | $100–$200 | <30% long-term success | Complete coolant loss, overheating, engine damage |
That temporary fix might save you $50–$70 upfront, but it comes with an extremely high risk of catastrophic failure. I’ve seen too many engines ruined because someone tried to “make it last just a little longer.” For a car like a Lada Vesta or Dacia Logan, the cost of a new reservoir is a tiny fraction of the vehicle’s value, and it’s absolutely nothing compared to the cost of engine repairs. Spending $300 to prevent a $4,000 engine rebuild isn’t an expense; it’s just smart maintenance.
Prevention: Keep It From Happening Again
The best way to deal with a cracked coolant reservoir is to prevent it in the first place. Here’s what I tell all my customers:
- Use the Right Fluid, Period: Stick strictly to OAT coolant meeting Renault Type D specification—usually labeled G12++, G13, or compatible. Mix it 50/50 with distilled water. Never, ever add conventional green coolant or straight water. This ensures proper freeze protection (typically down to -37°C/-35°F) and prevents the chemical degradation of the plastic tank.
- Routine Inspection: Make reservoir inspection part of your monthly routine. Just pop the hood and give it a quick look. Check for hairline cracks, especially around mounting points and seams. Look at the coolant color, too—clear pink or purple is good. If it’s brown, cloudy, or sludgy, that means contamination and possible internal corrosion. If that’s the case, flush and refill the entire system.
- Pre-Winter Freeze Point Test: Before winter hits, test your coolant’s freeze point with a refractometer. They’re inexpensive and accurate. If the protection level reads anything above -25°C (-13°F), your mixture is too weak and at risk of freezing. Drain some out and refill with the correct 50/50 OAT mix. This one small step prevents most winter-related reservoir failures.
One More Thing…
It’s worth remembering that cooling system issues can sometimes overlap with other sensor problems. For example, a faulty coolant temperature sensor reading too cold can cause hard starts and poor fuel economy. That’s a different problem than a cracked reservoir, but both highlight why accurate temperature feedback and overall system maintenance are so important.
