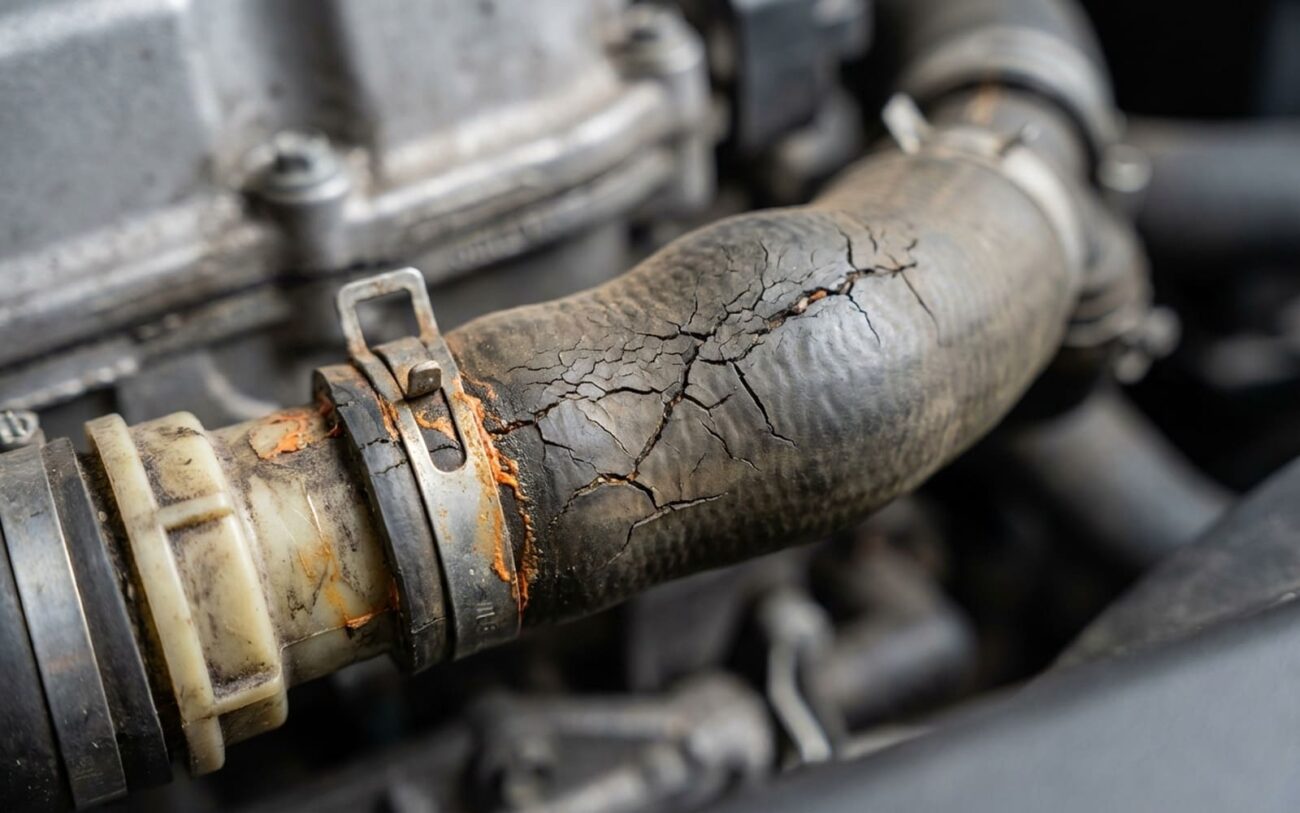
Alright, let’s talk coolant hoses. After 25 years under the hood, I’ve seen more than my share of engine failures, and a good chunk of them started with something as simple as a bad hose. People often overlook these rubber lines, but they’re the arteries of your cooling system. When one goes, it can take your whole engine with it, and usually without much warning if you don’t know what to look for.
Spotting a Failing Hose: The Early Warnings
A coolant hose doesn’t just burst out of nowhere. It gives you signs, but you have to know where and how to look. The best time to inspect them is when the engine is hot and the cooling system is under pressure. That’s when the weaknesses really show themselves.
What I typically see first is swelling or “ballooning”. This is especially noticeable on straight sections of the hose. A healthy hose keeps a consistent diameter, but a failing one will bulge out, sometimes dramatically. That’s not just soft rubber; it’s the internal reinforcement layer—the fabric or synthetic fibers—breaking down. If you see this, that hose is living on borrowed time.
Another common red flag is a network of fine cracks in the outer rubber. These usually show up near the ends, especially where the hose bends over a metal fitting. These cracks are a dead giveaway for age, heat fatigue, and sometimes chemical exposure. You might also notice a persistent damp area or even a fine mist of coolant spraying from the side of the hose. I’m talking about the hose wall itself, not the connection points. That tells you the rubber is becoming porous or has developed a pinhole.
Let me be clear: if you catch a hose that’s visibly swollen under pressure, don’t ignore it. That means the internal structure has degraded. It could burst at any moment, especially during a long drive or in hot weather. When a hose bursts, you lose coolant fast—within minutes, the engine can overheat. I’ve seen more than one engine ruined by a driver who ignored a swollen hose. We’re talking warped cylinder heads, cracked blocks, or spun bearings as the oil breaks down. This isn’t just an inconvenience; it’s about protecting a major investment.
Don’t Guess: Isolating the Real Leak Source
Just because you see coolant near a hose doesn’t mean the hose is the problem. Misdiagnosis is common here, and it wastes time and money. For example, a swollen hose might not be failing itself; it could be reacting to excessive backpressure from a clogged radiator or heater core. Cracks at the hose end? They might actually be from a cracked thermostat housing or water pump inlet just above it. And coolant running down the side of a hose could easily be dripping from a gasket higher up, like the intake manifold or a water pump seal.
The only way to be sure is with a cooling system pressure test. This is my go-to. You attach the tester to the radiator or coolant reservoir, pump it up to the cap’s rated pressure (usually 13–18 psi, which you’ll find marked right on the cap), and hold it. I typically let it sit for 10–15 minutes, sometimes longer for a slow leak. Watch both the gauge and the system. If the hose swells further, or you see coolant weeping directly from the middle of the hose wall, then yes, the hose is the source. But if the leak appears at a metal-to-plastic joint, a clamp, or near a gasket, the hose is just the messenger, not the problem.
For those really tricky leaks where coolant trails make it hard to trace the origin, I clean the area thoroughly and add UV dye to the coolant. After running the engine for a bit, I inspect with a black light. The dye will glow brightly at the exact leak point. It’s a lifesaver for those hidden drips.
Why Hoses Fail: The Root Causes
Coolant hoses fail for three main reasons: chemical breakdown, thermal fatigue, and physical damage. It’s important to understand these distinctions because it affects prevention.
First, chemical degradation. This happens most often when the wrong coolant is used. Mixing traditional green antifreeze with OAT or HOAT formulas, for example, can cause reactions that attack the hose’s inner liner. Over time, the rubber softens, swells, and loses its structural integrity. I’ve seen cases where using a “universal” coolant led to multiple hose failures within a year. Also, oil contamination is a silent killer. A leaking valve cover gasket or timing cover can drip oil onto upper radiator or heater hoses. Petroleum-based fluids break down EPDM and silicone rubber quickly, leading to soft spots and premature cracking.
Second, thermal fatigue. Hoses expand when hot and contract when cool. After years of this constant thermal cycling, the rubber hardens and becomes brittle, especially at bends where flexing is limited. That’s why cracks often appear near clamps or tight radii.
Third, physical damage. Don’t overlook simple wear and tear. A missing plastic retainer or a broken mounting clip can let a hose rub against a bracket or engine component. Over time, that friction will wear a hole right through the hose wall.
Let me be absolutely clear: a failed hose means the rubber material itself has deteriorated. A leak caused by a corroded or over-tightened clamp is a fastener issue, not a hose failure. A burst at the neck due to improper installation is user error. And a heater core leak, while connected by hoses, is a separate component problem. Accurate diagnosis matters; it affects both the repair cost and the long-term reliability of your vehicle.
Getting it Fixed: Repair Pathways
Your repair approach depends on the hose’s location, accessibility, and your experience level. Some jobs are perfectly manageable for a DIYer, while others are strictly for the shop.
DIY-Friendly Replacements
For straightforward replacements, like an upper or lower radiator hose on most modern cars, a DIYer with basic tools and a bit of patience can handle it. You’ll need a few key items: a hose pick or pry tool to break stubborn connections without damaging the radiator neck, the correct OEM-specified coolant (check your owner’s manual—don’t guess!), new high-quality clamps (constant-tension or stainless steel band clamps are best, I avoid cheap worm-drive clamps if I can help it), and a clean drain pan.
When installing, lubricate the hose ends lightly with coolant to ease seating. Then, tighten clamps to spec. For most worm-drive types, that’s typically 20–30 inch-pounds. I can’t stress this enough: over-tightening can crush the hose or damage the fitting, causing a new leak. And don’t forget to clean any old coolant residue off the fittings before putting the new hose on.
The most overlooked step? Bleeding air from the system. Many vehicles have a dedicated bleed screw, often on the thermostat housing or a high-point hose. If you skip this, air pockets form, leading to localized overheating and potential head gasket damage. Follow the manufacturer’s procedure: fill slowly, open the bleed screw until coolant flows without bubbles, then close it. Recheck levels after a few heat/cool cycles, and keep an eye on your temperature gauge for the next few drives.
When to Call a Pro: Complex Jobs
Some hoses are just buried. A heater hose that runs under the intake manifold, for example, may require removing the manifold, throttle body, and fuel rails. That job isn’t just about access; it’s about meticulous reassembly. You’ll need new gaskets, precise torque specs for everything, and specialized tools like angled hose clamp pliers and sometimes even a borescope to verify hose routing in tight spots. One misaligned clamp or a pinched hose can cause a new leak, and believe me, you don’t want to do that job twice. If you’re not confident in reassembling complex plumbing and electrical connections, this is absolutely a job for the shop.
The Emergency Get-Home Fix
If you’re stranded with a small pinhole leak and no replacement, a high-quality self-fusing silicone tape (like Rescue Tape) can get you home. Clean and dry the area thoroughly, stretch the tape as you wrap it tightly over the leak, and let it bond. It works by fusing to itself, not the hose, creating a pressure-resistant seal. But be honest with yourself: this is emergency-only. It won’t hold on swollen hoses, end splits, or high-pressure sections for long. Replace the hose properly as soon as possible.
Post-Repair Validation: Don’t Skip This!
Never assume the job is done once the coolant is topped off. Validation is critical. I always start with a cold system: use a cooling system pressure tester and pressurize to the cap’s rated pressure. Hold it for at least 20 minutes. A drop of more than 1–2 psi indicates a leak—either a bad connection, a faulty clamp, or another compromised component you missed.
Next, start the engine and let it reach full operating temperature with the heater on high. Watch closely for drips, mist, or bubbling. Feel the new hose—it should be firm and uniform, with no soft spots or swelling. Use an infrared thermometer to check temperatures across the radiator: the top should be hot, the bottom slightly cooler, indicating proper coolant flow and thermostat operation. If the bottom stays cold, you likely have an air pocket or a stuck thermostat.
If your vehicle has a coolant level sensor or dash warning, clear any codes using a scan tool if needed. A temporary low-coolant code may appear during bleeding but should clear after a few drive cycles once the system is fully purged.
Cost, Risk & The Decision Framework
Here’s the reality of coolant hose repairs. The cost and risk vary significantly depending on the job, but ignoring a bad hose is always the most expensive option.
| Repair Type | DIY Cost (Parts) | Shop Cost (Parts & Labor) | Success Rate (with proper procedure) | Secondary Risk if Failed |
|---|---|---|---|---|
| Single accessible hose (e.g., upper radiator) | $30–$80 (hose + correct coolant) | $150–$300 | 98% with proper bleeding and clamp use | Overheating from air pocket, leak at connection point, or engine damage. |
| Complex hose (e.g., heater hose under intake manifold) | N/A (Professional-Only) | $500–$1,200+ (depending on vehicle and access) | 95% at experienced shops | Coolant leak into cabin, damage to electrical modules, recurring overheating, or further engine damage. |
Keeping Your Hoses Healthy: Prevention & Monitoring
Preventing hose failure starts with using the right coolant. Always follow the manufacturer’s specification—whether that’s Dex-Cool, HOAT, or a brand-specific formula like Honda’s Type 2 or BMW’s G48. Mixing coolant types can trigger chemical reactions that degrade hoses and seals from the inside out. And don’t fall for “lifetime” claims; most hoses should be inspected every 3–5 years or on the severe service schedule, even if they look okay.
Make inspection part of your routine. Every time you check the oil or top off fluids, spend 30 seconds on the cooling system. With the engine cold, squeeze the upper and lower radiator hoses. They should feel firm but slightly pliable. If they’re soft, mushy, or bulge under light pressure, they’re done. Bend the ends gently to check for surface cracks. Inspect clamps for rust, cracks, or signs they’ve been over-tightened.
Also, check the coolant reservoir for level and condition. Milky or sludgy coolant can indicate contamination, while low levels may point to a slow leak. If you’re seeing consistent drops, investigate early—don’t wait for a breakdown.
This kind of proactive maintenance is simple, cheap, and effective. It’s far easier to replace a $15 hose on your schedule than to tow a car with a seized engine. Treat your cooling system like the engine’s lifeline—because it is.
