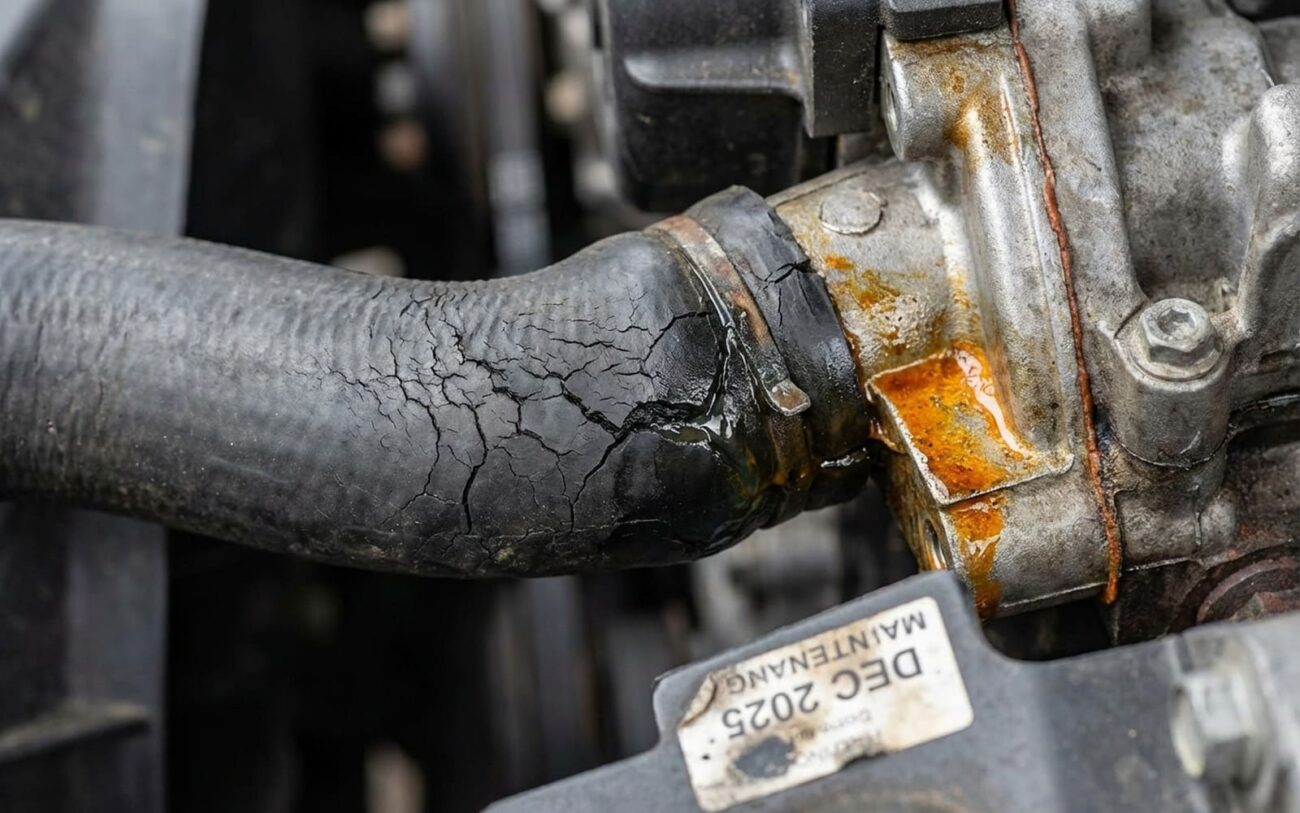
After 25 years under the hood, I can tell you this much: a blown radiator hose is one of those problems that goes from zero to catastrophic faster than almost anything else. It’s not a subtle drip you can ignore for a week. When one of these hoses gives up, it usually lets go with a bang, and if you don’t react immediately, a cheap repair can turn into a whole new engine. I’ve seen it happen more times than I care to count.
Spotting a Bad Hose: The Signs & What They Mean
A radiator hose failure rarely whispers; it screams. You’ll typically hear a sudden pop or a sharp hiss, followed by a cloud of steam and a visible spray of hot coolant shooting from under the hood. This isn’t a slow leak; it’s a pressure-driven burst, and it’ll often leave you stranded in minutes. When that happens, the first thing I look for is where the spray is coming from. If it’s right from the middle of the hose, not near a clamp, that tells me the hose wall itself has ruptured. Look for a clear split, a blister that’s blown out, or a hole.
But not all hose failures are so dramatic. Sometimes you catch them before they blow. One big red flag is bulging. If a section of the hose looks swollen or balloon-like, even under normal pressure, that means the internal reinforcement layer has separated from the rubber liner. That part of the hose can’t handle the system pressure anymore, and it’s going to fail soon – especially when the thermostat opens and the pressure spikes. I’ve seen these let go without warning.
Then there’s the slow, silent killer: degradation. You’ll see deep, visible cracks, often running lengthwise or all the way around the hose. These aren’t just surface marks; you can feel them with your fingers, and sometimes you can even see the inner fabric or cords. The hose will feel hard and brittle when it’s cold, or mushy and soft when it’s hot. That’s classic advanced rubber aging, and it’s a ticking time bomb.
Is It Really The Hose? Differential Diagnosis & Testing
Not every puddle or puff of steam means a bad hose. Misdiagnosis is common, and it’s a costly mistake. Overheating or coolant loss can stem from a dozen different places. You can’t just guess; you need to methodically rule out other components before you start replacing hoses. A visual inspection alone isn’t enough, especially for slower leaks. You need to combine observation with proper testing.
Here’s a quick guide I use to narrow down the problem:
| What You See/Feel | Points to Hose Failure | Common Mimics | How I Confirm It |
|---|---|---|---|
| Sudden coolant spray from engine bay | Aged, weakened hose wall ruptures with a visible split or blister, usually mid-hose. | Cracked plastic radiator tank (especially at the seam), failed coolant reservoir, burst heater hose, or even a leaking heater core. |
First, let the engine cool down completely. Then, attach a cooling system pressure tester to the radiator or surge tank. Pump it up to the cap’s rated pressure (usually 13-18 psi). Watch for the spray. If it’s the hose, you’ll see it burst or seep from the rubber body. A radiator crack will leak at a seam or end tank. This is safer and more accurate than trying to find a leak on a hot, running engine. |
| Coolant puddle under engine center/front | Slow seepage from a cracked, porous, or pinholed lower radiator hose, often near a bend or clamp. | Leaking water pump (look for the weep hole), thermostat housing gasket leak, or a failed O-ring on a heater inlet/outlet. |
Clean the area really well. Add some UV dye to the coolant, then run the engine until it hits operating temperature. Drive it for a bit, then let it cool slightly. Inspect with a black light. Hose leaks will glow along the length of the rubber. Water pump leaks will show at the weep hole. A static pressure test (15-18 psi held for 15 minutes) is also key here to confirm the exact spot. |
| Hose feels soft, mushy, or bulges at idle | Internal liner degradation and separation from the reinforcement fabric due to age or chemical breakdown. | Combustion gases entering the cooling system (classic blown head gasket), a restricted radiator flow, or a faulty radiator cap causing over-pressurization. |
This one needs a combustion leak tester (sometimes called a “block tester”). It checks for exhaust gases in the coolant. If that test is negative, then perform a static pressure test. If the hose still bulges under 15 psi without combustion gases present, it’s a hose failure. If the system pressurizes rapidly when hot, and the block tester turns yellow, you’re looking at a head gasket. |
Why Hoses Fail: The Real Root Causes
So, why do these hoses give up the ghost, even when the clamps are tight and everything else seems fine? It comes down to material science and the harsh environment they live in. The main culprit is something called thermo-oxidative degradation. Most modern radiator hoses are made from EPDM rubber (ethylene propylene diene monomer), which is chosen for its heat and coolant resistance. But every single heat cycle – engine on, engine off – slowly breaks down that polymer structure. Over time, the rubber hardens, loses its elasticity, and eventually cracks. It’s inevitable aging, and it’s accelerated by the high underhood temperatures, especially in today’s cramped engine bays.
Ozone cracking is another common issue I see. Atmospheric ozone attacks the rubber’s unsaturated bonds, causing small, perpendicular cracks on the surface. You’ll often spot these as a spider-web pattern, particularly in areas where the hose is under tension, like around bends.
A less obvious, but far more serious, cause is electrochemical degradation (ECD). If there’s stray voltage in the cooling system – often from a poor engine ground or a faulty alternator – electrolysis can literally eat away at the inner liner of the hose. This creates weak spots that fail under pressure, even if the outer rubber looks perfectly fine. I’ve diagnosed several cases where hoses failed prematurely due to ECD, and the root cause was always traced back to something like a corroded ground strap or a bad connection. It’s a sneaky one.
And that bulging I mentioned? That usually means delamination. The inner liner has separated from the reinforcement layer, which is typically a fabric braid or wire mesh. Once that bond fails, the system pressure pushes the soft inner layer outward, creating a weak spot. This isn’t an installation or clamp issue; it’s a material failure from the inside out. On the flip side, if the leak is right at the metal fitting, or the hose is cut by an over-tightened clamp, that’s not a hose problem itself – that’s a clamp or service issue. The hose is just the victim there.
The Only Real Fix: Replacement & How to Do It Right
Let me be blunt: the only reliable fix for a failed radiator hose is replacement. No patch, no tape, no additive will last. Period. But how difficult that replacement is depends entirely on access.
For an accessible hose, like an upper radiator hose or a visible heater hose, this can be a DIY-feasible job if you’re comfortable turning a wrench. You’ll need the correct replacement hose (OEM-spec or a high-quality aftermarket brand), new clamps – always use new clamps. If the factory used constant-tension spring clamps, I recommend replacing them with the same type. Otherwise, good quality screw clamps are fine. And, of course, the proper coolant. Never reuse old clamps; they lose tension and can corrode, leading to another leak down the road.
Here’s my process: Drain the coolant below the level of the hose you’re replacing. Remove the old hose. Take a moment to clean the metal nipple on the radiator or engine – get rid of any corrosion or old sealant. Then, install the new hose and clamp. For screw clamps, torque them to around 20–30 inch-pounds. Too loose and it leaks; too tight and you’ll crush or cut the hose. Refill with a 50/50 mix of the manufacturer-recommended coolant and distilled water. This is critical: bleed the air. Many modern cooling systems are notorious for trapping air in high points, which can cause overheating or your heater not working. You must follow the vehicle-specific procedure, which often involves running the engine with the heater on max and opening a bleed screw if your car has one.
When to Call a Pro
For a lower radiator hose tucked behind a motor mount, or a heater hose buried under the intake manifold, this quickly becomes a PROFESSIONAL-ONLY job. These repairs often require removing brackets, sensors, or even major engine components. One wrong move, and you could crack a brittle plastic fitting or shear a bolt, turning a simple hose job into a much bigger headache. You’ll need factory service information, specialized tools, and experience to do these without causing more damage. It’s just not worth the risk for a novice.
How to Be Sure It’s Fixed: Post-Repair Validation
Don’t assume the job is done once that new hose is on. You absolutely must verify the repair. Here’s how I do it:
First, a static pressure test. With the engine cold, attach a cooling system pressure tester to the radiator or surge tank filler neck. Pressurize the system to the cap’s rated pressure (typically 13–18 psi). Let it sit for at least 20 minutes. The gauge should hold steady, and there should be no drips or seepage from your new hose or connections. That’s your first green light.
Next, an operational check. Refill and bleed the system completely – take your time with this. Start the engine, let it reach operating temperature. The heater should deliver full heat, and the temperature gauge should stabilize in the normal range. I like to use an infrared thermometer to check the radiator: you should see a 15–25°F drop between the inlet (top) and outlet (bottom) tanks after the thermostat opens. Finally, take the car for a good drive, then let it cool completely overnight. Check for leaks again the next morning. Repeat this over a few heat cycles. No leaks, no overheating, consistent heat – that’s a fully validated repair.
Cost, Risk, & When to Think Twice
Replacing a radiator hose is generally affordable, but the labor can add up, depending on how buried that hose is. Here’s a realistic breakdown I use with my customers:
| Repair Type | DIY Cost (Parts) | Shop Cost (Est. Labor + Parts) | Success Rate (Properly Executed) | Secondary Risk if Repair Fails |
|---|---|---|---|---|
| Replace single accessible hose (e.g., Upper Radiator Hose) | $25 – $75 (hose + coolant) | $150 – $300 | 99% | Overheating, head gasket failure, severe engine damage. |
| Replace multiple or inaccessible hoses (e.g., All Coolant Hoses) | $100 – $250 (hose kit + coolant) | $500 – $1,200 | 98% (slightly lower due to potential for air pockets if bleeding is incomplete) | Overheating, heater malfunction, repeat visits for air bleeding. |
Here’s a rule of thumb I use: if the total cost of a full coolant hose replacement, including labor, starts to exceed 25% of your car’s current market value (check Kelley Blue Book or similar), especially if the vehicle is over 10 years old, you need to pause and evaluate. You’re investing real money into aging components. Ask yourself: are other hoses likely to fail soon? Is the water pump or thermostat due for replacement? Sometimes, replacing all hoses at once is the smart move – it’s labor-intensive, but it prevents repeat breakdowns and tow bills. Other times, it’s just the first sign of a larger maintenance avalanche. You need to balance the cost, the reliability you’ll gain, and your long-term plans for the vehicle.
Prevention & Monitoring: Keep It Running Longer
You can’t stop aging, but you can definitely manage it. The best defense against hose failure is using the correct coolant and changing it on schedule. Coolant chemistry really matters – using the wrong type can degrade hoses from the inside out. For example, older green coolants can attack certain EPDM formulations, while organic acid technology (OAT) coolants like Dex-Cool are designed for longer life but require strict adherence to their change intervals. Always, and I mean always, use the coolant specified in your owner’s manual.
For monitoring, make it a twice-yearly habit – I tell my customers to do it in spring and fall, when they’re checking their tires or oil. Do it when the engine is cold. Visually inspect all upper and lower radiator hoses, heater hoses, and their connections. Look for cracks, a shiny appearance (that’s a sign of hardening), bulges, or any wet spots. Then, feel them. A healthy hose should be firm but slightly pliable. If it’s rock-hard, cracked, or soft and spongy, it’s compromised. Don’t wait for it to fail.
Industry best practice – and what I recommend to my own family – is to proactively replace all coolant and heater hoses at the 10-year mark, regardless of how they look. Internal degradation isn’t always visible. Replacing them is cheap compared to a tow bill or, worse, an engine repair. It’s one of the best investments in reliability you can make. For even greater durability, you might consider silicone radiator hoses; they resist heat, ozone, and swelling better than standard EPDM, though they must be properly rated for your system’s pressure. Regular maintenance, proper coolant, and timely replacement: that’s how you avoid a roadside disaster.
