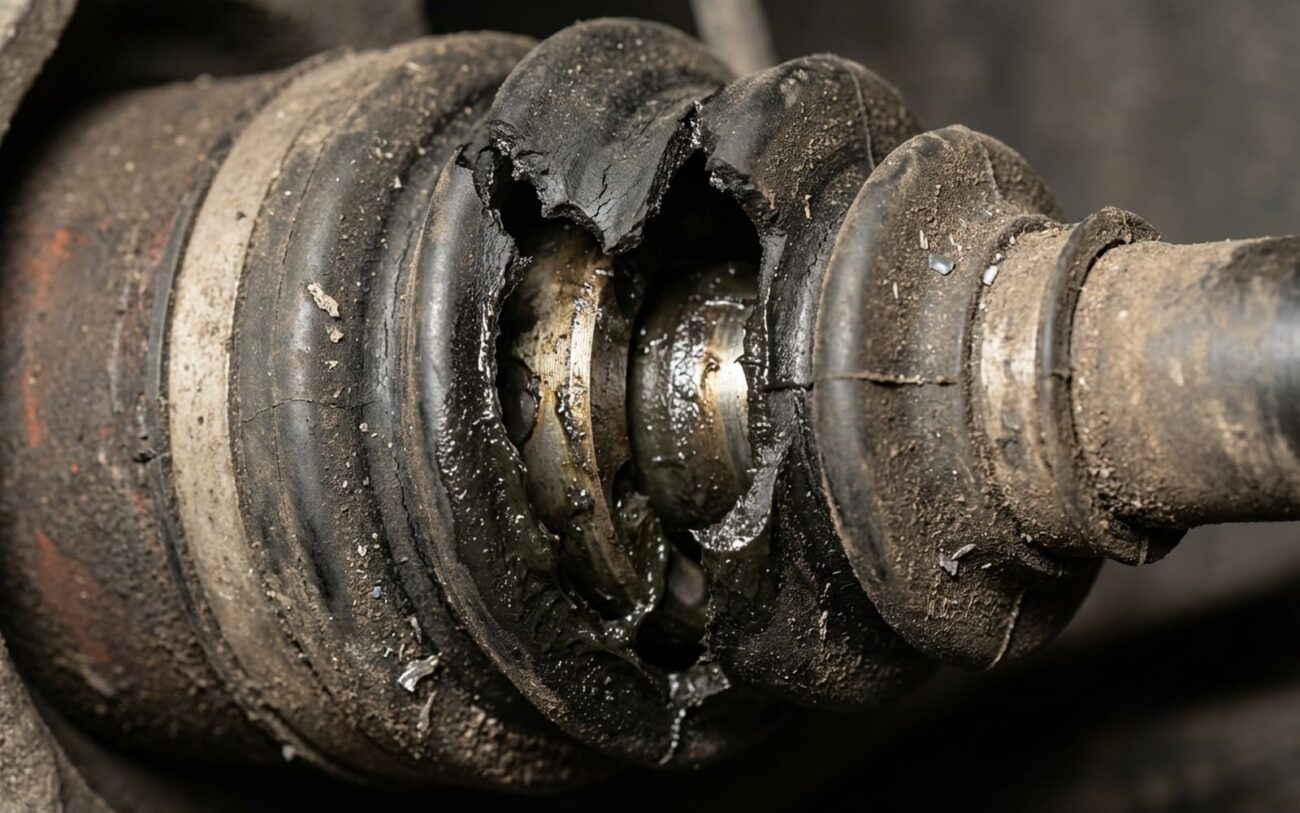
CV Boots: Your Car’s Early Warning System (Don’t Ignore the Grease!)
Alright, let’s talk about one of the most common, and frankly, most preventable front-wheel-drive headaches I’ve seen in my 25+ years in the shop: a torn CV boot. I’ve probably replaced a thousand axles because of this little rubber cover failing. The good news? Your car usually gives you a pretty clear heads-up before things go south. The bad news? Most folks miss it or just plain ignore it until it’s a much bigger, more expensive problem.
The first, and easiest, clue is usually a mess. You’ll see dark, greasy streaks — sometimes thick like tar, sometimes just a fine spray — flung all over the inside of your wheel, the brake caliper, or even the inner fender liner. That’s not brake dust, and it’s definitely not a wheel bearing leak. That’s the specialized grease from your CV joint, being spun out by centrifugal force through a crack or tear in its protective boot. It’s a dead giveaway, and it means trouble’s brewing.
Status: CONTAMINATED
So, what exactly are we talking about? CV boots are those flexible rubber or thermoplastic covers that look like accordion bellows. They live on each end of your axle shaft: one near the wheel (that’s your outer joint) and one closer to the transmission (the inner joint). Their job is simple but critical: keep the joint packed with thick, specialized grease and shield it from all the nasty stuff on the road – dirt, water, salt, grit. When that boot tears, it’s like leaving a surgical wound open. The grease gets out, and the road grit gets in. And that, my friends, is when the real damage starts.
The Concept
“Think of a torn CV boot like a surgical wound left open to the elements. It’s not the initial cut that kills the joint; it’s the infection from road grit and moisture that gets in.”
Beyond the Grease: Diagnosing Noises and Vibrations
Okay, so you’ve got grease. That’s a torn boot, plain and simple. But what if you don’t see grease, and you’re hearing noises? Or feeling vibrations? That’s where a proper diagnosis comes in. A clicking noise doesn’t automatically mean a bad CV joint, and replacing an axle based on a hunch is just expensive guesswork. I’ve seen plenty of misdiagnoses over the years, so here’s how I break it down.
| Symptom | Most Likely Culprit (CV System) | Common Imposters (Mimics) | My Go-To Test |
|---|---|---|---|
| Visible Grease Slinging | Torn or separated outer CV joint boot. Grease is literally being flung out by the spinning axle. | Sometimes a leaking wheel bearing seal, a seeping brake caliper, or even differential vent leakage can spray a bit. |
Clean the suspect area thoroughly. Drive 5-10 miles, including some turns. Re-inspect. If it’s fresh grease originating from the boot, you’ve got your answer. |
| Clicking/Popping on Turns | A worn outer CV joint. This almost always means contamination from a damaged boot has done its work. | Could be a worn wheel bearing, a loose strut mount, or a damaged sway bar link. These can make similar noises. |
With the car on the ground, turn the steering wheel to full lock (left or right). Drive slowly in a tight circle, applying light brake pressure. If you hear a distinct, rhythmic click-click-click, that’s your outer CV joint. Do it both ways. |
| Vibration Under Acceleration | A worn inner CV joint. Sometimes a severely damaged outer joint can contribute, but usually, this is the inner. | An unbalanced tire, a failing engine or transmission mount, or even a worn driveshaft (on RWD/AWD vehicles) can cause vibrations. |
Get the car on a lift. Grab the axle shaft near the inner joint and try to move it in and out. Excessive play here is a red flag. On a road test, if the vibration is only present under acceleration and smooths out when you let off the throttle, that strongly points to an inner CV joint. |
Mechanic’s Tip: Don’t Guess!
If you’re ever unsure about a noise or vibration, especially when it comes to the driveline, get an experienced tech to do a lift inspection. I’ve seen too many people throw money at CV joints when the real issue was a worn motor mount, a bad tire, or even a loose heat shield. Take the time to verify; it saves money in the long run.
Why Do CV Boots Fail? (It’s Rarely Random)
From my years under cars, I can tell you that CV boots don’t just fail for no reason. There are usually a few consistent culprits:
First up, material degradation. These boots are typically rubber or a thermoplastic, and they’re constantly exposed to the elements. We’re talking engine heat, brake heat radiating into the wheel well, UV rays from the sun, and ozone in the air. Over time, this stuff just breaks down the material, making it brittle and prone to cracking. Manufacturers have gotten better; newer replacement boots often use more durable EPDM rubber or thermoplastic elastomers that hold up longer.
Then there’s mechanical damage. This is often overlooked. A sharp rock flung up from the road, a piece of road debris, or even something as simple as a dropped control arm during suspension work can slice a boot open. And here’s a big one: improper jacking. If you place a jack under the lower control arm in a way that pinches or stretches the boot, you can damage it. Always use the proper frame or subframe lift points. I’ve seen it happen.
Crucial Distinction:
A worn CV joint isn’t the cause of a boot failure. It’s the result. The boot’s entire purpose is to protect that joint. So when the boot fails, the joint is next. Always treat a torn boot as a contamination event, even if you’re not hearing any clicking yet. That joint is already on borrowed time.
The Fix: Your Options (and My Recommendations)
This is Often Professional Territory
Look, while a boot kit can be a DIY job, replacing the entire axle assembly is often the most cost-effective and reliable solution if the joint is already compromised. We’re talking about crucial drivetrain components here, so safety and proper technique are paramount.
Boot Kit Replacement DIY Feasible (If Caught Early)
Entire Axle Assembly Replacement Professional Recommended
Emergency Sealant Last Resort ONLY
Post-Repair Validation: Don’t Skip This Step
A repair isn’t truly done until you’ve verified it. If you went the boot-only route, drive the car for about 50 miles, making sure to include some tight turns at low speed. Then, get under there and inspect that new boot. There shouldn’t be any fresh grease visible, and the boot itself should be seated properly, not twisted or sliding on the shaft.
If you replaced the entire axle, you need a good road test under load. Accelerate hard from a stop, take some sharp turns (safely, of course). You should feel absolutely no clicking, popping, or vibration under throttle. I always recommend a follow-up inspection in 100-200 miles just to ensure all the clamps and fasteners are still tight and nothing has shifted.
Cost, Risk, and Making the Smart Decision
Here’s the bottom line on what you’re looking at financially. This is where catching it early really pays off.
DIY Boot Kit
This covers the parts, specialized grease, and maybe a clamp tool. High success rate only if the joint is completely clean and undamaged. Your labor, of course, is free.
Shop Axle Replacement
This is for a complete professional replacement of the entire half-shaft. It’s usually a new or quality remanufactured unit, comes with a warranty, and has a very high success rate for a compromised joint.
Shop Boot Repair
This involves the shop cleaning, repacking, and installing a new boot. It’s labor-intensive, and frankly, I only recommend it for very early detection where there’s zero sign of contamination or wear. Many shops (including mine) prefer to just replace the axle for long-term reliability.
Prevention & Ongoing Monitoring
My Maintenance Checklist for CV Axles
-
Inspect those boots! Every time you get an oil change or tire rotation, ask them to check your CV boots for cracks, bulges, or any signs of grease weeping. This is the easiest preventative step you can take.
-
Listen for trouble. Pay attention to any clicking or popping noises, especially when you’re making sharp, low-speed turns (like in a parking lot). That’s usually your outer joint crying for help.
-
Don’t ignore vibrations. If you feel a shudder or vibration when you accelerate, get it checked immediately. An inner CV joint failing can cause significant damage to your transmission housing if left unchecked.
For more on driveline noises and how to pinpoint them, check out Why does the Lada Vesta with a manual transmission whine in 3rd to 5th gear? — different symptom, but the diagnostic mindset of “inspect, listen, verify” is always the same.
