After 25+ years wrenching on Volkswagens, I can tell you one thing for sure: if you own a first-gen Tiguan, especially with the 2.0 TSI (engine code BWA) and that O9J transmission, you’re probably going to deal with an inner CV joint at some point. It’s just a fact of life with these cars as they age. But knowing what to look and listen for can save you a lot of grief and money.
What a Failing Inner CV Joint Sounds and Feels Like
The most common thing I hear in the shop is a sharp clicking or popping sound. This usually happens when you’re turning at low speeds, especially under power – think pulling into a parking spot or making a tight U-turn. That noise comes from the worn ball tracks inside the tripod joint skipping under load. Now, an outer CV joint or even a failing wheel bearing can make similar noises, but the key difference with an inner joint is that the noise happens specifically when you’re giving it gas and turning, not just coasting.
Then there’s the vibration. This isn’t your typical unbalanced tire hum; it’s a shudder you’ll feel through the floorboard or seat, and it gets worse when you accelerate. Many drivers mistake this for an engine issue or something with the driveline balance. But if that vibration disappears as soon as you let off the gas and start coasting, you’re almost certainly looking at a failing inner CV joint. I always tell folks, “It’s like a wobbly table leg: it might seem fine when empty, but as soon as you put weight on it, the whole thing shakes.”
How I Diagnose an Inner CV Joint (and Rule Out Other Stuff)
Because so many things can mimic a bad CV joint, a proper diagnosis is absolutely critical. You don’t want to throw parts at it and still have the problem. Here’s how I approach it in the shop:
Visual Inspection: The Grease Sling
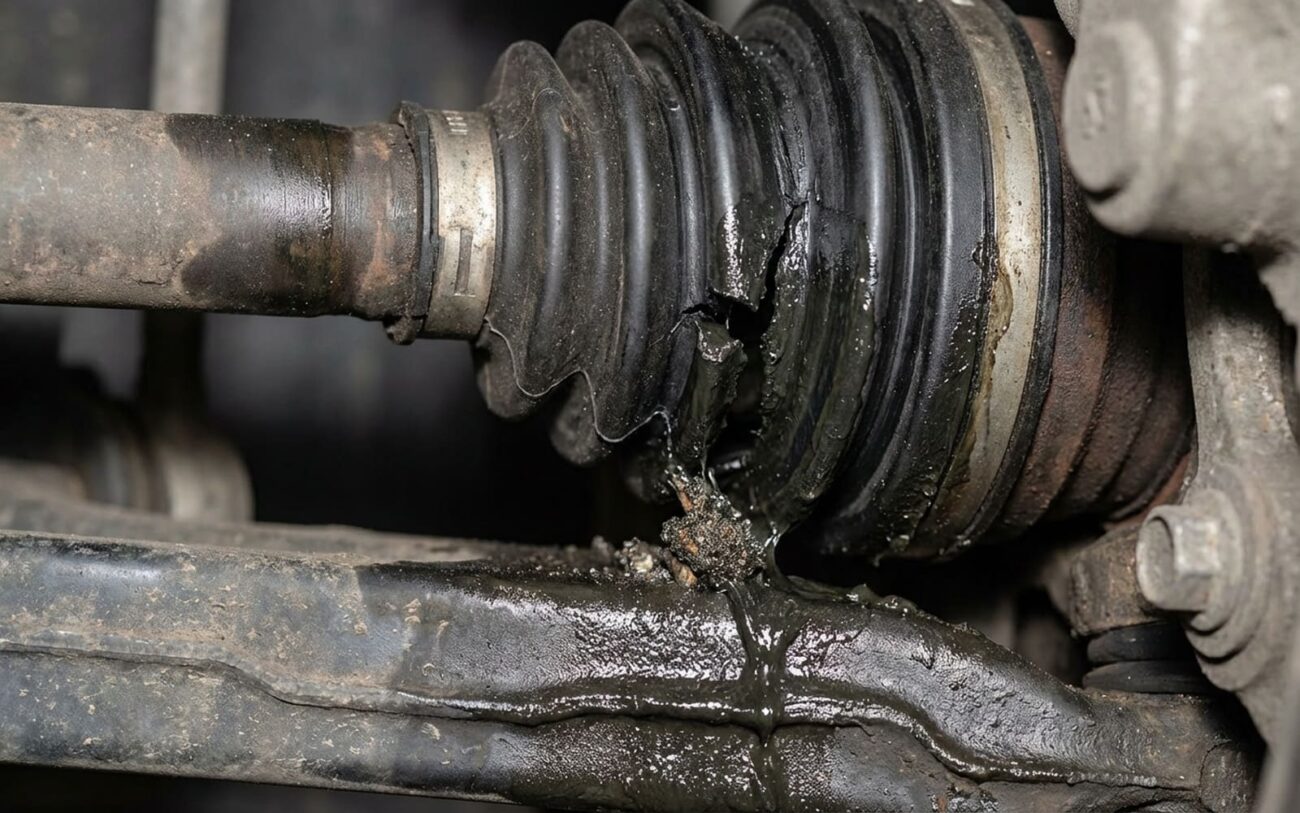
Before I even lift the car, I’m looking for grease. If you see grease flung all over the inside of the wheel well, suspension components, or even the transmission housing, that’s a huge clue. That grease comes from the inner CV boot – the accordion-style rubber cover near the transmission. When that boot cracks or its clamp fails, centrifugal force throws the lubricant outward in a radial pattern. If I see grease, I’ll clean the area thoroughly, then dust it with talcum powder. A short test drive will usually pinpoint the exact leak source, confirming it’s the inner boot.
For Clicking Noises: Driveshaft Play
If a customer describes that low-speed clicking, I get the car safely in the air and support it. Then, I grab the driveshaft near the inner joint and try to rotate it back and forth. If you feel more than a few degrees of play – a noticeable clunk or looseness – that joint’s worn. This is a pretty definitive test for internal wear in the tripod joint.
For Vibrations: The Coasting Test
When a vibration under acceleration is the main complaint, a road test is essential. I’ll get the car up to the speed where the vibration is most noticeable, then I’ll shift into neutral and let it coast. If that vibration completely disappears when you’re coasting in neutral, it tells me the issue is definitely driveline-related and under load, which points strongly to an inner CV joint. If the vibration persists while coasting, then I’m looking at other things like unbalanced tires, worn wheel bearings, or even a bent rim. And sometimes, if I’m really scratching my head, a VCDS scan can help rule out transmission or Haldex AWD system faults.
Why These Joints Give Out on Your Tiguan
On those first-generation VW Tiguans, the inner CV joint uses a tripod design. Its main job is to accommodate the suspension’s up-and-down travel (what we call plunge motion) while smoothly getting engine torque to the wheels. Over time, normal wear and tear just take their toll, especially once you get past 80,000 to 100,000 miles.
The Real Killer: Contamination
In my experience, most inner CV joint failures on these 1K chassis Tiguans aren’t due to some inherent design flaw. It almost always traces back to a boot failure. Once that rubber boot cracks, water, dirt, and grit get in there. That precision-ground metal inside the joint quickly turns into sandpaper, and the wear accelerates drastically. It’s a domino effect.
And sometimes, I see repeat failures because of poor repair practices. I’ve had cars come back where someone used a cheap aftermarket boot kit with flimsy clamps, or worse, the wrong type of grease. That VW-specified moly-disulfide grease (part number G 052 142 A2) isn’t just a suggestion; it’s engineered specifically for the high-pressure contact points inside that joint. Using anything else is just asking for trouble down the road.
Your Repair Options: From a Quick Fix to a Full Replacement
Safety First, Always.
Replacing a driveshaft requires high-torque tools and very precise procedures. That axle nut, especially, is a major safety item. An incorrectly torqued axle nut is a serious risk that can lead to wheel separation. If you’re not comfortable with this, please take it to a professional.
Inner Boot Kit Replacement DIY Feasible (If Caught Early)
Complete Driveshaft Replacement Professional Only
Temporary / Last-Resort Patch
Making Sure the Repair Actually Worked
My Post-Repair Checklist
-
Low-speed test: Turn the wheels fully left and right while accelerating gently. Listen carefully for any lingering clicks or pops.
-
Load test: Perform a few hard accelerations from 10–20 mph. This is where you’ll feel any remaining vibrations if the repair wasn’t complete.
-
Visual inspection: Get back under the car. Ensure the new boot is seated perfectly, without any kinks or twists, and that all clamps are tight.
-
Alignment check: Any time you’re disassembling suspension components, even just to get the axle out, you can affect the toe settings. A quick alignment check is cheap insurance.
The Bottom Line: Cost, Risk, and My Prevention Tip
So, what’s this going to cost you? It really depends on how early you catch it and whether you’re comfortable doing some of the work yourself.
Boot Kit (DIY)
Parts only. High success rate if the joint is currently silent and you use the correct VW-spec grease.
Full Axle (Shop)
This includes OEM parts and professional labor. It’s the most reliable long-term fix once the joint is worn.
Aftermarket Axle
DIY parts cost. Quality can be a real gamble with aftermarket axles, but they are much more affordable upfront.
My Best Prevention Tip
Every single time you’re under the car for an oil change, take an extra 30 seconds to visually inspect those CV boots, both inner and outer. A quick look can spot a crack or tear before any grease escapes. Catching it early means a $100 boot repair instead of a $1,000 axle replacement. Trust me, it’s the easiest money you’ll ever save.
