That Clicking Noise (Again): What It Means
Alright, let’s talk about one of the most frustrating repeat repairs I see in the shop: a brand-new CV axle making the same clicking noise as the old one. If you’re hearing that rhythmic click-click-click when you turn, especially at slow speeds like pulling into a parking spot, you’re not crazy. I’ve been doing this for over 25 years, and it’s a common headache, usually pointing to the outer CV joint. That noise is the internal bearings skipping over worn or pitted raceways as the joint articulates under load. It’s mechanical failure, plain and simple.
Now, if you’re getting a dull clunk when you accelerate from a stop in a straight line, that’s generally the inner CV joint. The tripod or plunge joint inside develops play, and you get that shock-load noise as torque hits it. But here’s the kicker: a new axle should never make noise. Not when it’s new, not during “break-in.” If it does, something is wrong, right out of the box or right after installation.
Before You Blame the Axle: Rule Out the Usual Suspects
Before you even think about pulling that axle again, you’ve got to confirm the noise is actually coming from the CV joint. I can’t tell you how many times I’ve seen a worn wheel bearing or a loose tie-rod end get blamed for a “bad CV joint.” That’s just wasted time and money. Here’s how I go about isolating the real culprit:
If You’re Hearing Clicking on Turns:
This is the classic outer CV joint symptom, but it has mimics. First, get the vehicle safely lifted on jack stands. Grab the tire at 3 and 9 o’clock and try to wiggle it side-to-side. Any significant play usually means a loose tie-rod end. Then, grab it at 12 and 6 o’clock and check for vertical play. Excessive movement here points to a worn wheel bearing or a ball joint. If those check out, have a helper slowly rotate the wheel by hand while you’re listening right near the CV joint. If you hear a distinct click on articulation, then yeah, it’s likely the joint itself.
If You’re Getting a Clunk on Acceleration:
This typically points to the inner CV joint or an axle that isn’t fully seated. But don’t jump to conclusions. First, check your engine and transmission mounts. You can do a “brake torque test”: hold the brake firmly, shift into drive or reverse, and gently apply a little throttle. Watch the engine and transmission. If they’re rocking more than about half an inch, you’ve got a bad mount. If the mounts are good, and it’s an inner joint issue, I’d also check the transmission fluid for any metal shavings – though that’s usually a deeper problem. For the axle seating, try to pull the inner joint out of the transmission by hand. It shouldn’t move at all. A missing or unseated circlip is a surprisingly common oversight after an axle replacement.
If You’re Feeling Vibration at Speed:
Vibration can be tricky because so many things cause it. Start with the easiest: tires and wheels. Get them road force balanced. If the vibration persists, then look at the axle. I’ll often remove the axle and inspect it on V-blocks with a dial indicator. Even 0.005 inches of runout can cause a noticeable shake. Also, rotate the joint by hand; any roughness or binding tells you there’s internal damage.
Why the New Axle Failed: Bad Part or Bad Install?
Okay, so your tests confirm the noise is definitely coming from the new CV axle. Now we get to the heart of the problem: was it a defective part, or did something go wrong during installation? In my experience, it’s usually one of these two, and I’ve seen both more times than I care to count.
Defective Replacement Part
Look, not all CV axles are created equal. Especially with aftermarket and remanufactured units, quality can be a total crapshoot. These joints rely on precision-ground, hardened steel balls and raceways. If the metallurgy is off—say, the case hardness is below HRC 58—those surfaces will pit (we call that brinelling) or flake (spalling) in no time, sometimes within days or just a few hundred miles under normal driving. I’ve cut open joints that looked fine from the outside but had visible micro-cracks inside after almost no use. Another common flaw is incorrect cage geometry, which can cause binding at full articulation, giving you a notchy feel or even that false “clicking” sensation. These aren’t wear issues; they’re manufacturing defects.
And yes, even some OEM-branded reman units have had known issues in specific model years. I’ve seen it on certain high-torque applications where the joint casting had documented porosity, weakening the housing over time. If your original axle failed prematurely, and then the replacement did too, it’s a strong hint to step up to a known high-quality brand or genuine OEM this time around. It’s an investment, but it saves you a headache.
Installation-Induced Damage
Honestly, in my 25+ years, poor installation causes more repeat failures than truly bad parts. These joints are precision components, and even small mistakes can have big consequences.
-
Contamination: This is a silent killer. If the installer didn’t thoroughly clean the hub splines or the transmission output shaft before assembly, or if they used dirty grease, grit gets into that joint. That abrasive material grinds down the raceways fast. The boot is the joint’s only protection; if it’s compromised, the joint’s days are numbered.
-
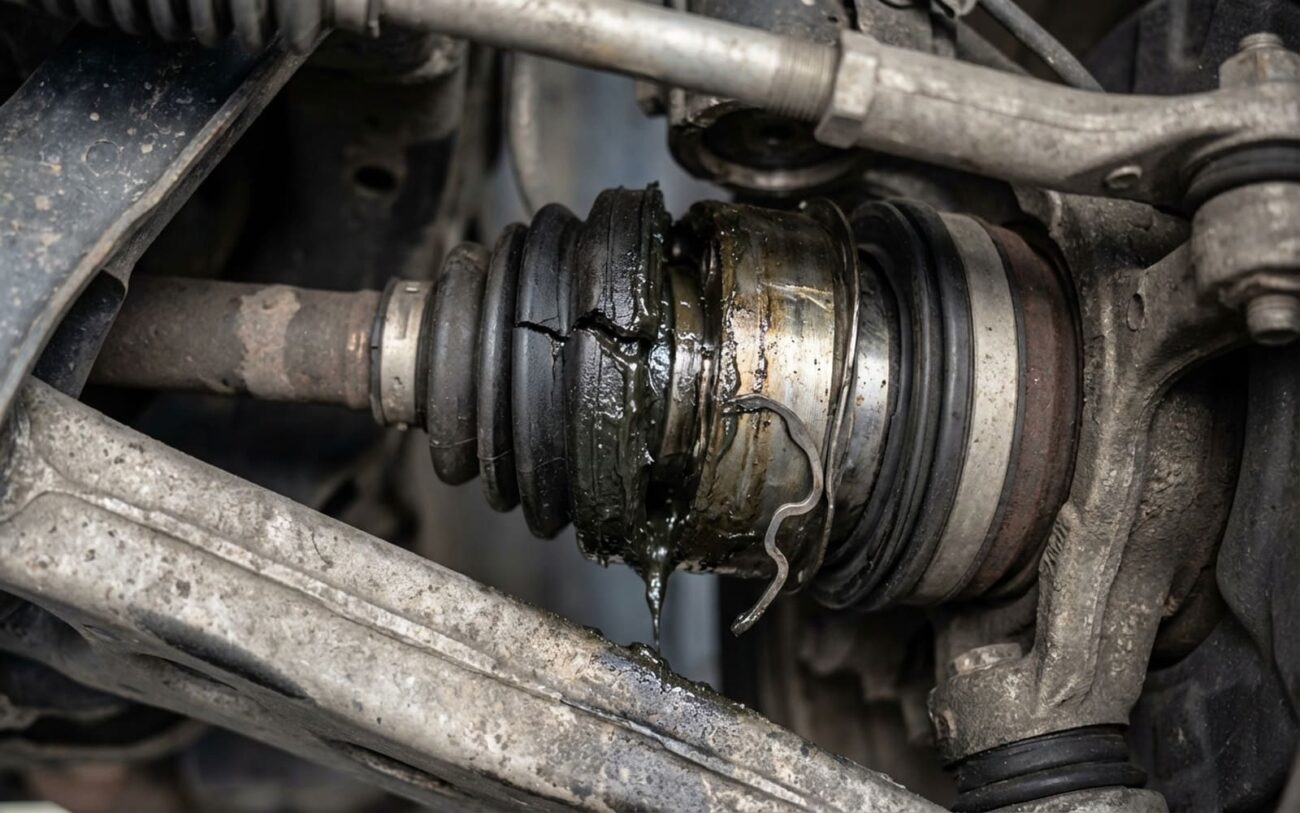
Boot Damage: This happens all the time. Using a cheap worm-gear (hose clamp style) clamp on a CV boot instead of a proper constant-tension band clamp is a recipe for failure. The screw mechanism cuts into the rubber, and vibration loosens it over time, letting grease escape and dirt in. Always, always use the correct OEM-style clamp.
-
Physical Damage During Install: I’ve seen techs hammer directly on the outer joint or axle shaft to seat it. That’s a huge no-no. It can dent the housing, misalign internal components, or damage the circlip groove. If you need to tap it, use a brass drift or a soft-faced hammer, and only on the inner joint body.
-
Incorrect Torque: The axle nut holds the shaft securely in the hub. Too loose, and the splines fret, causing play and noise. Too tight, and you crush the wheel bearing or the hub internals. You absolutely have to follow the manufacturer’s torque spec—many are 180+ ft-lbs with an additional angle turn. Guessing this torque is a guaranteed path to repeat failure.
So, What’s the Fix?
If It’s a Defective Part (and Installed Correctly):
If you’ve confirmed the installation was flawless and the part itself is the problem, your best bet is to return the defective unit under warranty. Then, replace it with a higher-tier part. I always recommend going OEM or with a trusted premium aftermarket brand. This isn’t a place to cut corners; you’ll pay for it later. When you install the new one, follow the factory torque procedure to the letter. For example, some Fords require 177 ft-lbs plus an additional 180-degree turn. Skipping that angle spec can under-load the joint, leading to premature failure. You’ll need a quality torque wrench capable of 200+ ft-lbs, the correct axle nut socket (often 32mm or 36mm), and fresh cotter pins or thread locker as specified.
If It’s an Installation Error or Boot Damage:
If the boot is torn, loose, or leaking grease, the fix depends on how bad it is. A loose clamp on an otherwise intact boot can sometimes be re-tightened with the correct band clamp—but only if the rubber hasn’t been damaged. If there’s just a small tear and the joint still has clean, full grease, a boot repair sleeve can be a temporary fix. I’ve used them in a pinch, but let’s be honest: it’s a stopgap. The seal isn’t as reliable, and if water or dirt gets in, that joint will fail again quickly.
If the boot is badly torn, or if the grease is contaminated with road grime, the joint is already compromised. At that point, professional re-packing is technically possible. It involves disassembling the joint, cleaning it thoroughly, inspecting for wear, re-greasing with NLGI #2 CV-specific grease, and installing a new boot with proper clamps. But in practice, this is rarely cost-effective. The labor alone often pushes the price close to a full axle replacement, and you still have an older joint. Most reputable shops will just recommend replacing the entire axle assembly.
Don’t Just Assume It’s Fixed: Validate the Repair
Never assume the car is fixed just because the noise stopped. You’ve got to validate every repair. Here’s my standard post-repair checklist:
-
First, with the car still lifted, do a thorough visual check. Grab a flashlight. The CV boot should be smooth, untwisted, and free of any wrinkles or gaps. Clamps must be tight and properly positioned. Spin the axle by hand—there should be zero binding or roughness.
-
Next, take it for a 10-mile test drive. Start gently, then make sure you include:
-
Slow, full-lock turns in both directions (left and right).
-
Hard acceleration from a stop to check for any clunking.
-
Driving at highway speed to monitor for vibration.
-
-
After the drive, lift the car again. Look for any grease flung onto the brake rotor, control arm, or underbody. Even a small leak will show up. If you see it, the boot or clamp failed, and you’re back to square one.
-
Finally, check for play. Grasp the inner and outer joints and try to move them laterally. There should be no detectable movement. If you’re chasing a faint noise, a mechanic’s stethoscope can help, but trust your ears and eyes first. If everything checks out, then you’re truly good to go.
Cost, Risk, and Making the Right Call
Here’s the reality check: fixing a CV axle isn’t always cheap, especially if you’re doing a repeat repair. But sometimes, it’s a necessary investment. Here’s a breakdown of what you might expect:
| Repair Type | DIY Cost (Parts) | Shop Cost | Success Rate (with OEM part) | Secondary Risk if Repair Fails |
|---|---|---|---|---|
| Replace defective aftermarket axle with OEM | $300 – $600 | $700 – $1200 | 98% | Repeated labor cost, potential tow bill, damage to surrounding components |
| Repair boot/re-grease existing joint | $50 – $100 | $200 – $400 | 95% (if joint internals are undamaged) | Joint seizes or fails unexpectedly, risking wheel lockup or roadside breakdown |
| Full axle assembly replacement (professional) | N/A | $500 – $1000 | 99% | Warranty claim process if the new part fails prematurely |
The “Is It Worth It?” Question
Here’s a reality check I give my customers: if your repair costs are approaching 40% of your car’s market value—especially on a high-mileage vehicle—you need to seriously ask if it makes sense. You’re investing in one part of an aging system. Other issues, like automatic transmission problems or engine wear, could be next. That doesn’t mean you shouldn’t fix it—but do so with your eyes wide open. Sometimes, it’s time to let go.
Preventing the Next Failure & Keeping an Eye On It
Preventing repeat CV joint failures really starts with installation discipline. If you’re doing the work yourself, treat that axle like the precision component it is—not just another suspension bolt. Here are the key steps I always follow:
-
Always thoroughly clean the hub and transmission splines before installation. No excuses.
-
If you’re re-packing a joint, use only clean, high-quality CV grease. Don’t cheap out here.
-
Never, ever use a worm-gear clamp on a CV boot. Only constant-tension band clamps will do the job right and last.
-
If you need to tap the axle in, use a brass drift on the inner joint body—never directly on the shaft or outer joint. You’ll damage it.
-
Torque that axle nut to spec. Use a torque wrench, and an angle gauge if the manufacturer calls for it. Guessing is a recipe for disaster.
For ongoing maintenance, make inspecting your CV boots part of your routine checks. When you rotate your tires or check your oil, take an extra five seconds to look at those boots. A small crack or split caught early can save you hundreds of dollars down the line. And once a month, spend a minute in a quiet parking lot doing slow, full-lock turns. Listen carefully. That first faint click is your warning sign—don’t ignore it. If you’re using aftermarket axles, stick to reputable brands. I see a lot of “budget” reman units fail within months. Spend a little more now, or you’ll definitely pay more later.
