Alright, let’s talk about that rhythmic clunk, that weird tire wear, or that vague feeling in the steering. When a car rolls into my bay with these complaints, everyone usually jumps to “bad shock” or “alignment issue.” And while those are often true, based on my 25+ years under the hood, sometimes it’s a smaller, sneakier culprit that’s causing all the grief: worn shock absorber bushings.
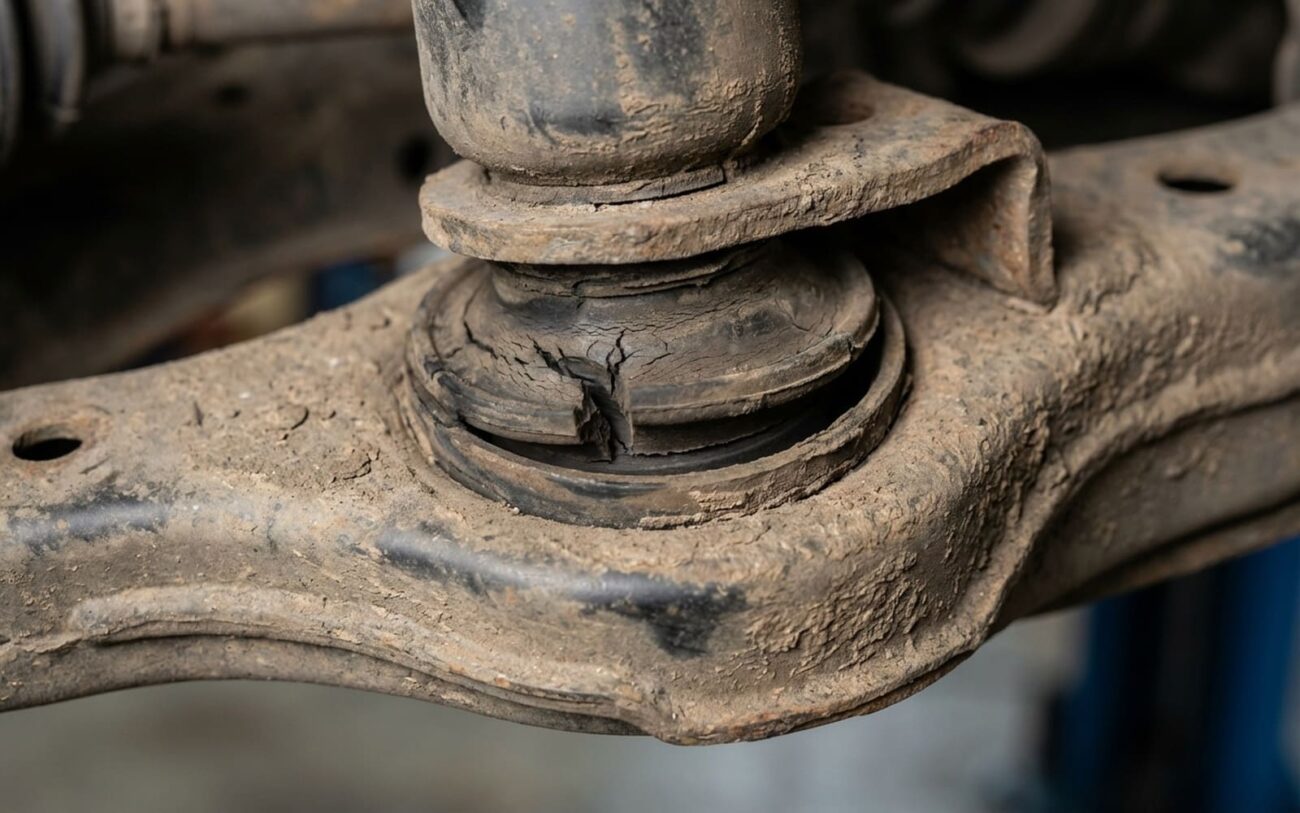
These little rubber or polyurethane donuts are what connect your shock or strut to the chassis or other suspension components. Their job is pretty simple: allow controlled flex, dampen vibrations, and keep metal from banging metal. When they start to degrade, they lose their ability to hold that shock firmly in place, allowing excessive movement. That’s where the trouble begins.
Diagnosing the Clunk, Cupping, and Chaos
Diagnosing suspension noise and wear isn’t about guessing; it’s about a process. You’ve got to distinguish between similar symptoms with very different root causes. Here’s how I typically approach it in the shop, breaking down the common complaints and how to pinpoint if those bushings are truly the problem.
The Clunking Noise
This is usually the easiest symptom to spot. That rhythmic thud or clunk you hear from a wheel area, especially when hitting bumps? That’s often the internal rubber deterioration allowing metal-to-metal impact between the bushing sleeve and the mounting bolt during suspension travel. The rubber’s gone, so there’s a gap, and things are rattling.
But hold on – a clunk could also be a worn sway bar end link, a failed strut mount bearing, or even a loose ball joint. So, how do you tell? My go-to test:
First, get the car on level ground. Push down hard and fast on the suspect corner, then release. Do it a few times. While the suspension cycles, watch the upper and lower shock mounts closely. Do you see any visible gap opening up around the bushing washer? Can you hear a distinct clunk originating right from that mount? That’s a strong indicator. If I can get it on a lift, I’ll use a pry bar directly on the shock body (with the suspension loaded, mind you – safety first!). If the shock body wiggles but the control arm or sway bar link stays put, you’ve likely found your culprit.
Irregular Tire Cupping Wear
This is that distinctive scalloped, uneven wear pattern across the tread. It happens because the shock isn’t holding the wheel steady; it’s bouncing slightly instead of rolling smoothly. That extra play changes the wheel’s alignment momentarily, leading to this wear. Now, cupping can also come from unbalanced tires, out-of-round wheels, a failing wheel bearing, or even warped brake rotors. So, how do I pinpoint it?
First, rule out tire imbalance and wheel runout – those are easy checks. Then, take it for a test drive, 45–50 mph on a smooth road, with your hands lightly off the steering wheel. If the vibration is felt primarily through the seat or floor – not so much the steering wheel – it leans heavily toward rear suspension issues or shock bushing problems. Front-end vibrations that shake the steering wheel are more often tie rods, ball joints, or front wheel bearings. Combine this with a thorough physical inspection of the bushings for visible wear.
Vague Steering & Dynamic Alignment Fluctuation
You might feel the steering is a bit floaty, especially over rough roads or when cornering. This is because excessive compliance in the shock mounting allows the wheel’s position (camber and toe) to shift under cornering or braking loads. It’s not holding its line.
Of course, this can also be caused by worn control arm bushings or loose tie rod ends. The definitive test for this, in my experience, is a bit more involved:
A loaded alignment check using slip plates on a lift is ideal. A good technician will apply lateral force to the tire while monitoring real-time changes in camber and toe. If those values shift significantly when force is applied directly to the shock body (not just the control arm), suspect the mount. Also, use a pry bar to check for movement at both shock mounts and compare side-to-side. And always inspect control arm bushings simultaneously – they’re often overlooked and can mimic these symptoms.
Here’s the big warning: don’t ignore a bad shock bushing. It doesn’t just shorten tire life. That uncontrolled motion transfers energy directly into surrounding components. I’ve seen it crack strut towers, elongate mounting holes in control arms, and accelerate wear in sway bar links and adjacent joints. Left unchecked, one failed bushing can start a chain reaction through the entire front or rear suspension corner, costing you a lot more in the long run.
Why Bushings Fail: The Root Causes I See
When a shock absorber bushing fails, it’s almost always due to material breakdown or improper installation – not an internal shock failure. It’s important to separate bushing wear from hydraulic failure inside the shock itself, though both often occur around the same time due to age and mileage.
-
Environmental Degradation: The number one killer, in my experience. Rubber hardens and cracks over time due to exposure to ozone, UV light, and temperature swings. But the biggest accelerant? Fluid contamination. Engine oil, power steering fluid, or even certain undercoatings can rapidly deteriorate rubber compounds. I’ve pulled shocks where the bushing was completely swollen and mushy from oil saturation. Heat is another factor – exhaust manifolds, hot brake components, and underhood temps bake the rubber, causing it to take a permanent set or become brittle.
-
Physical Wear: This is also common. If the dust boot on the shock is torn or missing, road grit gets into the bushing interface. Every suspension cycle turns that grit into an abrasive paste, grinding away the rubber. This is especially common on rear shocks exposed to road splash.
-
Improper Installation: This is where most early failures happen. Some bushings require lubrication during assembly; installing them dry creates high shear stress, leading to immediate tearing. More often, the issue is torque. Under-torqued bolts allow micro-movement, which causes fretting and premature wear. Over-torqued bolts can crush the rubber, distorting its shape and reducing its ability to flex properly. In my experience, incorrect torque is behind more early failures than mileage.
-
Design Flaws: And yes, design flaws happen. Some manufacturers have issued service advisories for specific models where strut isolator bushings were prone to cracking under normal use – particularly in high-stress applications like police or fleet vehicles. While I won’t cite fabricated TSB numbers, it’s worth checking if your vehicle has any known recalls or updates related to front strut mounts. Just remember: a failing control arm bushing or a completely blown shock (with oil leaking and no resistance) are separate issues, even if the symptoms overlap.
Fixing It Right: DIY vs. Pro, and What to Expect
Okay, so you’ve diagnosed a bad bushing. Now what? How you fix it really depends on where it is and how it’s built into your suspension. There are basically three paths, each with its own tools, risks, and labor.
DIY-Friendly (with the right tools and mindset)
If we’re talking about an upper strut mount, or a lower shock eye bushing that’s externally accessible – meaning it’s not pressed into a knuckle or a subframe – you can probably tackle this yourself if you’re comfortable with suspension work. This covers a lot of MacPherson strut setups and traditional twin-tube shocks mounted to brackets.
Tools you’ll need for this: A good quality strut spring compressor (I prefer the scissor-type, not those cheap threaded rods that can slip and kill you), an impact wrench, a calibrated torque wrench (yes, it matters!), penetrating oil, and the correct replacement parts. Sometimes it’s a full strut mount assembly, other times just a bushing kit.
Crucial Steps: You must follow factory torque specs and the installation sequence. On many vehicles, for example, that upper strut nut needs to be tightened with the vehicle’s weight on the suspension to prevent pre-loading the bushing incorrectly. Other cars, like some Fords, use torque-to-yield bolts on the lower strut-to-knuckle connection – that means a specific torque plus an angle turn, and you usually replace those bolts. Get this wrong, and your new bushing could be shot in a few months, or worse. Don’t forget thread locker where specified, and always replace rubber isolators and bump stops if they’re part of the assembly. This isn’t a job to rush.
When to Call a Pro (Seriously)
If that bushing is part of a sealed cartridge-style strut, or if it’s pressed into a welded knuckle, a control arm, or a complex subframe – just stop. Forget DIY. These jobs require specialized tools like hydraulic presses, specific ball joint separators, alignment fixtures, and often a lot of experience to do safely and correctly. Most home garages don’t have this stuff. At this point, replacing the entire strut or shock assembly, or even the whole control arm, is almost always the smarter, safer, and ultimately more cost-effective move. A good shop can do it right, protect your CV boots during disassembly, and ensure everything’s torqued and aligned properly.
Temporary Fixes (and why I don’t recommend them)
Look, there’s no real “fix” for a worn-out bushing other than replacing it. Period. But, in very rare cases – like a dry, squeaky bushing that has zero visible play or clunking – you might try a silicone-based rubber lubricant. It can quiet the noise temporarily by restoring a bit of flexibility. But be warned: it can also attract dirt and grit, which might actually accelerate wear in the long run. Never use grease or petroleum-based lubes; they’ll destroy rubber compounds. And if there’s any visible movement, misalignment, or tire wear, this isn’t a solution. It’s just masking a problem that’s getting worse.
Post-Repair Validation: Your Job Isn’t Done Yet
Alright, you’ve swapped out the old, tired bushings for fresh ones. Don’t pat yourself on the back just yet. The repair isn’t done until you’ve validated it. This is where a lot of people miss a critical step.
Start with a physical check. Perform that same bounce test you used during diagnosis. There should be no clunk, no squeak, and absolutely no visible movement at the mounting points. Get a pry bar under there again (suspension loaded, remember?) and apply pressure to the shock body while someone watches the bushings. Any detectable play means something’s still loose – could be incorrect torque or maybe you got a defective part. Don’t skip this.
Then, the most critical step: a full four-wheel alignment. Even if the bushings were the only worn part, your alignment angles have almost certainly drifted out of spec over time. Toe, especially, is super sensitive to suspension compliance and will eat your new tires alive if it’s off. Run the alignment on a modern computerized rack with slip plates. Those slip plates are key because they allow the wheels to move laterally, simulating real-world conditions and catching issues that a static alignment might miss.
Accept nothing less than all readings being within factory specifications. If the alignment tech tells you it won’t come into spec, don’t assume it’s the machine. Double-check for other worn components – especially control arm bushings or tie rods – that might have been masked by the original shock issue. I’ve seen it happen more times than I can count.
Cost, Risk & When to Walk Away
Here’s the honest truth: fixing worn shock bushings isn’t usually the cheapest repair, but it’s often less than a full suspension overhaul if caught early. Here’s a quick breakdown of what you might expect:
| Repair Type | DIY Cost (Parts Only) | Shop Cost (Parts & Labor) | Success Rate | Secondary Risk if Failed |
|---|---|---|---|---|
| Replace front strut assembly (includes new bushing/mount) | $200–$400 per side (aftermarket) | $500–$800 per side | Near 100% when installed correctly and aligned |
EXTREME SAFETY HAZARD: Improper spring compression or incorrect torque can lead to violent strut disassembly, causing serious injury or death. Underrated bolts or misaligned mounts can cause rapid bushing wear or even component separation while driving. |
| Replace rear shock absorber and bushing | $100–$250 per side | $300–$450 per side | Near 100% |
Lower risk than front struts, but incorrect torque can cause squeaks, bolt fatigue, or damage to the shock eye or mounting bracket over time. |
Here’s a rule of thumb I’ve used for years in my shop: if the estimated repair cost for all four corners of the suspension (because if one bushing is shot, others are probably not far behind, and the shocks themselves are likely weak) exceeds 40% of the vehicle’s private-party value in “Fair” condition (check Kelley Blue Book or NADA guides), it’s time to seriously reconsider. Suspension wear is rarely an isolated incident. If the shock bushings are gone, the shocks are probably weak, and your control arms, ball joints, and sway bar links are likely showing their age too. Replacing one component at a time can quickly turn into a costly, frustrating cycle. Factor in ruined tires, multiple alignment costs, and ongoing vibration issues – you might end up spending more than the car is worth in the long run. Sometimes, it’s just time to let go.
Prevention & Monitoring: Catching It Early
The best fix, as I always tell my customers, is catching the problem early – before you’ve ruined a set of tires and started damaging other components. Prevention starts with routine inspection.
Every oil change, every tire rotation, is a golden opportunity. Spend an extra 30 seconds looking at each shock and strut mount. Check for any visible cracks, splits, or missing chunks of rubber. Look for signs of fluid contamination – rubber that looks swollen, sticky, or discolored. Make sure those dust boots are intact; a torn boot means road grit is getting in there, turning every suspension cycle into a grinding session.
And listen closely. The first time you drive off after parking, especially if it’s been sitting for a bit, often reveals a new clunk or squeak before it becomes a constant annoyance. Address it early, and you could save yourself a lot of money and headaches down the road.
There’s solid engineering behind all this. Suspension bushings are designed to maintain precise geometry under load. When they fail, the entire system operates outside its intended parameters, creating abnormal forces. That leads to premature tire wear, reduced handling, and accelerated fatigue for other components. Maintaining bushing integrity isn’t glamorous, but it’s essential for predictable vehicle behavior and long-term component life.