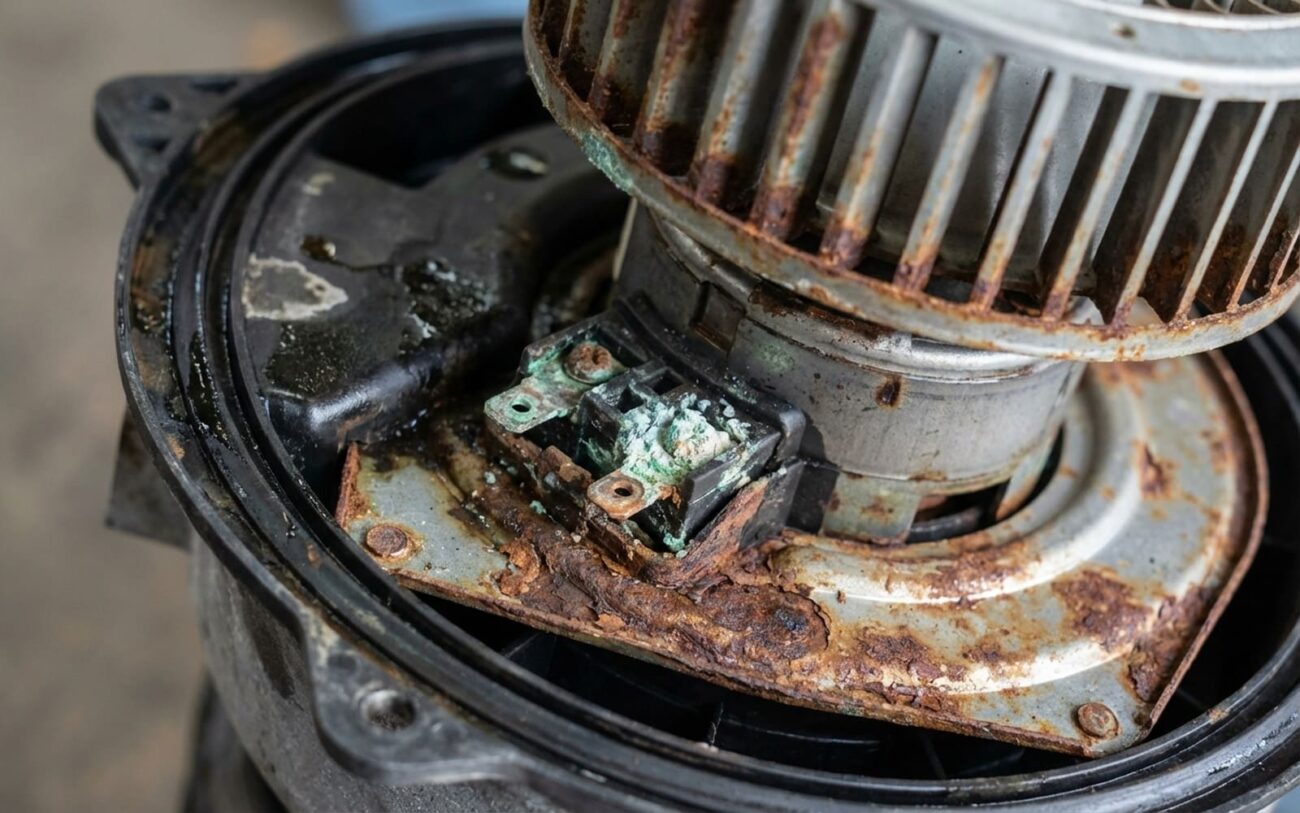
That damp basement smell the second you fire up the fan? Yeah, I know it well. I’ve pulled apart hundreds of HVAC systems in my shop over the last 25 years, and nine times out of ten, it’s not the evaporator core, not the cabin filter—though those can contribute—it’s the blower motor housing. Water’s getting in, it’s not draining, and now you’ve got mold, corrosion, and a ticking clock on your blower motor and resistor. Let’s cut through the noise and fix it right.
Smell, Noise, Weak Airflow—Here’s What Each Means
Start with the smell. Musty, like wet cardboard or a gym bag left in the rain? That’s microbial growth—mold, mildew, bacteria—feeding on leaves, pollen, and gunk trapped in the housing. And if it’s wet? That moisture came from the evaporator drain. It’s supposed to exit under the car. When it doesn’t, it pools right where the blower motor sits.
Noise—like a rustling paper or a faint scrape—is a red flag. I’ve seen steel squirrel cages flake apart from corrosion. The rust breaks off, gets caught in the fan, and wears down the motor bearings. Sometimes it sounds like a mouse in the dash. (Yes, that’s a real call I got once.)
Low airflow? Don’t jump to “weak motor.” First, check for blockages. I’ve pulled out fistfuls of leaves in Subarus and Mazdas—especially hatchbacks where the cowl intake is low and open. But corrosion scale inside the housing inlet can also choke airflow. It builds up over time, like limescale in a kettle.
| Symptom | Likely in Blower Motor Housing | Common External Mimics | Definitive Test to Confirm Source |
|---|---|---|---|
| Musty Odor | Microbial growth on organic debris trapped in housing, wet from condensate. | Mold on evaporator core; decomposing matter in fresh air intake; clogged cabin air filter. |
Remove the blower motor and inspect with a borescope. If it’s wet and smells like a swamp, that’s your source. If it’s dry, the evaporator core is suspect—pull the glove box and check the drain pan. |
| Rustling or Scraping Noise | Corrosion flakes from steel housing or squirrel cage interfering with fan rotation. | Foreign objects in HVAC intake; failing motor bearings; debris in footwell contacting fan. |
Remove the motor, spin the squirrel cage by hand. If it drags or grinds, inspect for rust. Test the motor off-vehicle—if it runs smooth, the housing is the issue. |
| Reduced Airflow | Debris or corrosion scale blocking housing inlet or outlet. | Clogged cabin air filter; obstructed fresh air intake; failed blend door actuator; weak blower motor. |
Remove blower motor, use borescope to inspect inlet. If clear, measure static pressure at max fan speed with a manometer. Below spec? Check blend doors and filter. Still low? Motor may be failing. |
Why the Housing Fails—And When It’s Not Your Fault
The housing itself isn’t supposed to hold water. But most of them have a molded drain port—usually near the firewall—that’s supposed to route condensate out. On a lot of Toyotas and Hondas from the early 2010s, that port is too narrow. Leaves, algae, and sludge clog it fast. I’ve seen them completely sealed shut with black biofilm after just two years in a humid climate.
Steel housings? They’re worse. I’ve pulled apart Fords and GMs where the entire lower half of the housing was rusted through. Salt from the road, moisture from the A/C—perfect storm. And once the drain’s blocked, that water has nowhere to go but into the blower motor. That’s when you start losing fan speeds. The resistor pack gets soaked, corrodes, and opens up.
Now—important—this isn’t always a maintenance failure. Some manufacturers screwed up. I’m looking at you, 2015–2017 F-150. Ford routed the A/C drain tube right over the blower motor housing. Condensate dripped directly into the intake. They issued a TSB—17-2206—for a repositioning kit. If you’ve got one of those trucks, check for it. Free fix if it’s still covered.
How I Fix It—Three Levels
Cleaning & Disinfecting (Most Cases)
If the housing’s intact and just full of gunk, clean it. Remove the blower motor—usually three T20 screws. Pull out any leaves, wipe down the housing with a non-foaming HVAC cleaner (I use Spectro 86-112—it kills mold without damaging plastic). Spray the evaporator fins if you can reach them. Let it dry overnight. Reinstall, replace the cabin air filter. Torque the screws to 8 Nm. That’s critical—over-tighten and you crack the housing.
And don’t waste money on those “odor-eliminating” sprays through the vents. They don’t reach the housing, and some contain solvents that degrade electrical connectors over time. I’ve seen them cause intermittent shorts in the resistor pack.
Clearing the Drain Port (If It’s Flooded)
If there’s standing water, the drain’s blocked. Start from the inside—use a plastic trim tool or a nylon brush to clear the molded port in the housing. Then go under the car. Find the drain tube exit—usually a 1/2″ rubber spout near the firewall. Blow compressed air through it. Pour a cup of water into the cowl and watch underneath. Should flow freely. If not, snake a piece of 3/16″ plastic tubing through it. Some BMWs and Audis have a secondary overflow—check the service manual.
Full Housing Replacement (Severe Corrosion)
If the housing’s rusted through or the drain port is damaged, replace it. This isn’t a DIY job unless you’ve got time and patience. You’ll need to remove the glove box, lower dash panel, and sometimes the evaporator cover. The housing comes out as a full assembly—evaporator and heater core stay in place but must be disconnected.
Transfer the O-rings, seals, and blend door linkages carefully. I label every rod and lever with tape. One misaligned door and you’ll get cold air when you want heat. OEM is best—aftermarket housings sometimes have undersized drain ports. Labor? 4–6 hours. Cost? $1,500–$3,000 at a shop. But it’s a permanent fix.
Did It Work? Here’s How to Know
Don’t just turn the fan on and call it good. Run the A/C on max for three full cycles—let it sweat, let it dry. Smell gone after 24 hours? Good. Still there? You missed a spot, or the evaporator’s moldy.
For replacements: test every fan speed. Use a multimeter on the resistor pack—should see increasing voltage as you step up. Check mode doors: defrost, floor, vent. No whistling? No air leaks? Then you’re solid.
And clear any codes. Sometimes a P0532 (low refrigerant pressure) pops up after HVAC work if the system lost charge during disassembly. Recheck pressures, top off if needed.
How to Keep It From Coming Back
-
Replace the cabin air filter every 12,000–15,000 miles. In dusty areas? Every 7,500. It’s the first line of defense.
-
Once a year, pull the blower motor and peek in. Five-minute check can save you a $600 repair.
-
Clear the drain tube under the car. A quick blast of air in spring prevents summer mold.
-
Run the A/C on fresh air mode for 10 minutes weekly, even in winter. Dries out the evaporator, kills mold spores.
Cost vs. Value—When to Walk Away
| Repair Type | DIY Cost (Parts) | Shop Cost (Est. Labor + Parts) | Success Rate | Secondary Risk if Failed |
|---|---|---|---|---|
| Housing Cleaning & Drain Clearance | $20–$50 | $150–$300 | 85% effective | Untreated corrosion can kill the blower motor or resistor ($200–$600) |
| Housing Assembly Replacement | $300–$800 | $1,500–$3,000+ | Near 100% when done right | Improper assembly can cause air leaks or damage to cores |
Here’s my rule: if the repair costs more than 40% of the car’s KBB private-party value, think hard. I’ve kept plenty of cars running with a $40 cleaning and a cleared drain. Sometimes that buys you two years. On a high-mileage Altima or Corolla, that’s often enough.
And while you’re under the dash, don’t ignore the little things. That dashboard sweep on startup? Normal. But if the cluster starts flickering? That’s a failing IPC—different job, but I’ve seen both happen on the same aging vehicle. More on that here.
