When Your Coolant Turns to Jelly: What I See in the Shop
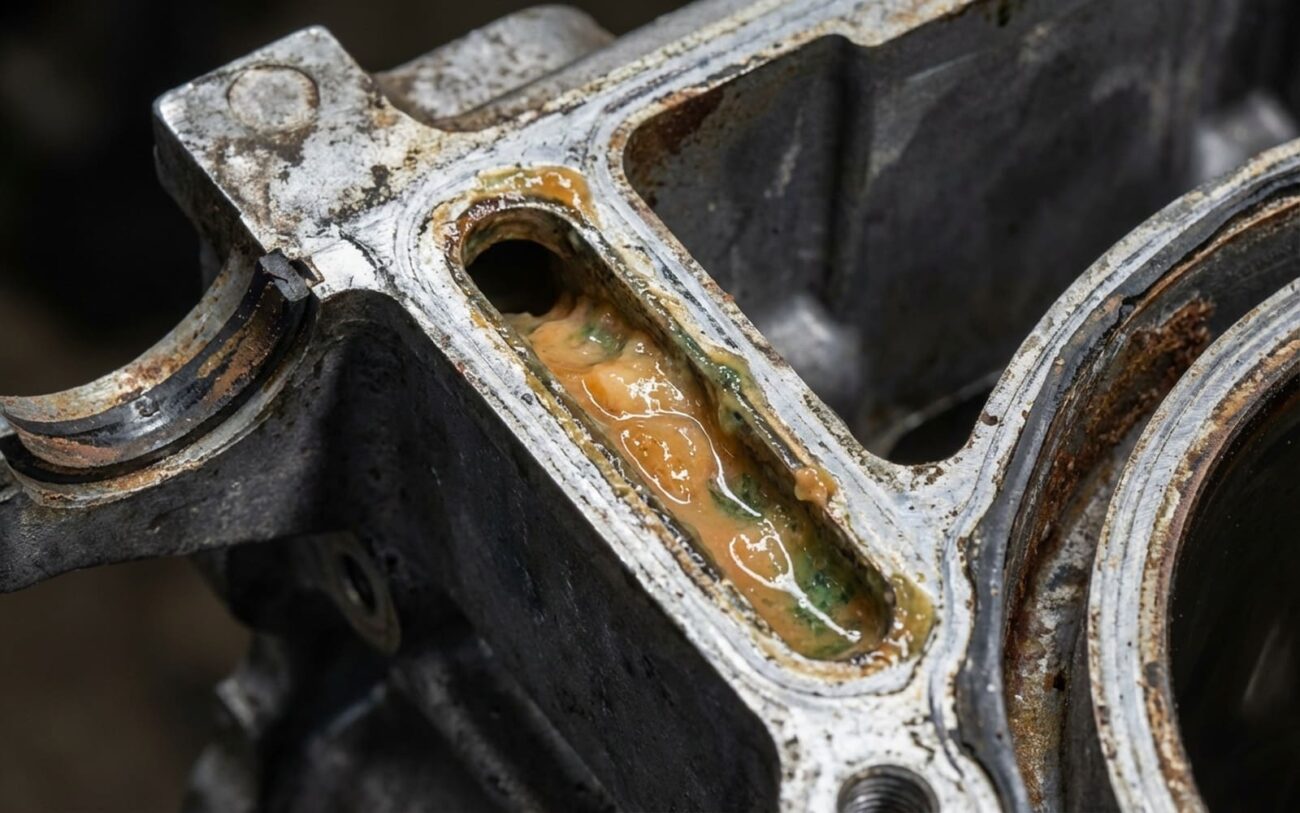
Alright, let’s talk about something that’ll really ruin your day: gelled coolant. You’re driving along, maybe towing a trailer, climbing a hill, or just stuck in rush hour, and that temperature gauge starts creeping up. You scratch your head because you just put in a new thermostat and water pump. Or, it’s winter, you crank the heater, hear the blend door actuator doing its thing, but all you get is lukewarm air, if that. I’ve seen it countless times. These aren’t just random glitches; they’re screaming warnings that your cooling system is choked. And often, it’s not a mechanical failure at all. It’s something far sneakier: your once-liquid coolant has turned into a thick, slimy jelly.
This sludge plugs up the narrow passages in your engine, especially in the cylinder heads where heat transfer is critical. I’ve seen this happen in vehicles as new as five years old, no neglect involved—just one wrong top-off with the wrong type of coolant. The result is always the same: restricted flow means heat can’t escape. You get localized hot spots, steam pockets, and before you know it, a warped cylinder head or even full-blown engine damage. And since your heater core relies on that same coolant flow, you lose cabin heat. If you peek into the overflow tank, you might find a brightly colored, snot-like gel instead of the clear, smooth liquid it should be. This isn’t just a cooling problem; it’s a chemistry issue that quickly spirals into a mechanical disaster. That excessive heat stresses your engine oil, which then increases the risk of bearing failure. It’s a cascade failure waiting to happen.
How I Diagnose Gelled Coolant (And Rule Out Other Problems)
Now, not every overheating problem or weak heater means you’ve got gelled coolant. A clogged radiator, a thermostat stuck closed, an air pocket, or even a weak water pump can all mimic these symptoms. And that sludge in your reservoir? It could be oil emulsifying from a blown head gasket—what we call the “milkshake” effect. It looks similar, but the fix is completely different. So, you need a methodical approach. The key for me is always testing flow and analyzing the gunk.
First thing I do is a visual check of the overflow tank. If it’s got that slimy, gelatinous look, that’s a big red flag. But I don’t stop there. I disconnect the heater core hoses at the firewall—this is a good access point. Then I pressure the system and watch what comes out. If it’s gelled, you’ll see little to no flow, maybe just a slow ooze of semi-solid material. If it’s just a clogged radiator or heater core, you’ll usually still get decent flow from the engine side of the hoses. Next, I grab my infrared thermometer and scan the engine block and radiator. Cold spots on a hot engine are dead giveaways for internal blockages. If I can get to it, a borescope down an accessible port, like the heater outlet, can often visually confirm gel buildup.
For that sludge, I always collect a sample. Let it sit for a while. If it’s oil contamination from a head gasket, it’ll eventually separate into distinct oily and watery layers. Gelled coolant, on the other hand, stays uniform, gelatinous, and it won’t feel greasy between your fingers. Finally, to definitively rule out a head gasket, I run a combustion leak test (often called a “block tester”). This test detects hydrocarbons in the coolant, which would indicate exhaust gases leaking into the cooling system. If that test comes back clean, and I’ve got all the other signs, I’m pretty confident it’s gel.
| Symptom | Points to Gelled Coolant When… | Common Mimics (What Else It Could Be) | My Go-To Test to Confirm |
|---|---|---|---|
| Overheating & Low Cabin Heat | You’ve got silicate drop-out or incompatible OAT/HOAT coolants forming gel in engine passages, restricting flow. | Clogged radiator, faulty thermostat, air pockets, weak water pump. |
Test: Perform a reverse flush at the heater core hoses. If it’s gel, you’ll get little to no flow from the engine side. A simple clog elsewhere will still show some flow. |
| Sludge in Overflow Reservoir | It’s a chemical byproduct from mixing incompatible coolant types (e.g., IAT and OAT). | Oil/coolant emulsion from a blown head gasket (“milkshake”), or even microbial growth. |
Test: Collect a sample and let it sit. Oil emulsion separates into layers; gelled coolant remains a consistent, non-greasy gel. A combustion leak test (block tester) rules out head gasket. |
| Poor Flow to Heater Core | Gel buildup is specifically blocking the engine’s heater core outlet passage. | Internally clogged heater core, failed heater control valve, air bubble. |
Test: Disconnect heater hoses at the engine side. Pressurize the system and observe flow from the block’s heater port. Use a borescope to inspect the port for visual gel buildup. |
Why This Chemical Reaction Happens Inside Your Engine
This isn’t about wear and tear; it’s a chemical breakdown, plain and simple. Modern engines, especially those with aluminum blocks and heads, rely on very specific coolant formulations. These aren’t just colored water; they’re packed with precise additives designed to prevent corrosion and keep everything flowing. When you mix incompatible coolants, those additive packages react with each other, forming insoluble gels or precipitates. It’s like mixing oil and water, but worse.
The most common culprit I see is mixing traditional green Inorganic Acid Technology (IAT) coolant—which uses silicates for quick corrosion protection—with Organic Acid Technology (OAT) coolants, like the orange Dex-Cool. Those silicates in the IAT coolant destabilize in the OAT environment and “drop out” of solution, forming that gritty, gel-like sludge. This stuff loves to stick to hot surfaces, especially in the cylinder head passages, where it builds up and chokes off flow. GM even put out service bulletins years ago warning about this exact issue: mixing coolant types leading to silicate gel that clogs radiators and ruins water pump seals. It’s not just silicates, either. Mixing OAT with Hybrid Organic Acid Technology (HOAT), common in many European and Asian vehicles, can also create gel or precipitates because their additive packages just don’t play nice.
And don’t even get me started on “universal” coolants. They might seem convenient, but in modern, tightly calibrated cooling systems, they can often cause pH imbalances or inhibitor issues over time. I tell my customers to stick to what the manufacturer specifies, every time. Also, be wary of aftermarket additives—excessive stop-leak or “seal conditioner” products can react with your coolant to form sludge that looks a lot like gelling. Remember, oil contamination from a blown head gasket creates a similar-looking sludge, but that’s a mechanical failure. Coolant gelling is a chemistry failure—one that starts the second you pour the wrong fluid into the system.
How I Tackle the Fix: From a Flush to a Full Swap
Cooling System Repair: Not Always a DIY Job
While you can handle some initial steps yourself, deep-seated gelled coolant issues usually need specialized tools, safety know-how, and proper disposal. There aren’t any safe shortcuts when you’re dealing with major blockages.
When I’m faced with gelled coolant, I approach it in stages. I always start with the least invasive, most cost-effective option first, then escalate if needed. Here’s how I break it down:
Chemical Flush DIY-FEASIBLE
Professional Backflush PROFESSIONAL-ONLY
Engine Block Replacement & Last-Ditch Chemical Options NON-REPAIRABLE → REPLACE COMPONENT
How I Confirm the Fix (And You Should Too)
A successful repair isn’t just about refilling the coolant and starting the engine. You absolutely have to validate that the flow and function are back to normal. For a basic flush, I always do two essential tests. First, cabin heat: with the engine at 1500 RPM and the heater on max, the air coming out of the vents should be at least 35°F (that’s about 19°C) warmer than the ambient air entering the cabin. If it’s not, you still have a problem. Second, thermal stability: I take the vehicle for a good drive under load—on a highway incline or in stop-and-go traffic with the A/C blasting—and I monitor that temperature gauge like a hawk. It needs to stay steady, no creeping towards the red zone.
For more major repairs—like after a professional backflush or, heaven forbid, an engine block replacement—my validation goes even further. I use coolant test strips to confirm the proper pH and inhibitor levels, ensuring the chemistry is balanced. I’ll always run another combustion leak test to make sure no hydrocarbons are entering the coolant, ruling out any secondary head gasket issues that might have developed from the overheating. And finally, I pressure test the system to 1.5 times its normal operating pressure (usually around 20–22 psi) and hold it for at least 30 minutes to check for any leaks. Tools like an infrared thermometer, a pressure tester, and a block tester aren’t just for diagnosis in my shop—they’re for peace of mind after the repair. You don’t want to do all that work only to find out it’s still messed up a week later.
The Bottom Line: What This Will Cost (And If It’s Worth It)
Costs for this kind of repair vary wildly, and honestly, the financial decision can be just as important as the mechanical one. You need to weigh your options carefully. Here’s what I typically see:
| Repair Type | DIY Cost (Parts Only) | Shop Cost (Parts & Labor) | My Success Rate Estimate | Secondary Risk if It Fails |
|---|---|---|---|---|
| Chemical Flush | $50–$100 (coolant, flush solution, distilled water) | $150–$300 | High for early-stage gelling (caught quickly) | Incomplete cleaning means the problem will likely come back, possibly worse. |
| Professional Backflush | N/A (requires specialized equipment) | $300–$600 | Moderate to High (depends on severity) | Aggressive flushing can dislodge a big chunk of gel, causing a new blockage elsewhere. |
| Engine Block/Head Replacement | $2,000–$5,000 (just the engine component) | $4,000–$8,000+ (labor is significant) | ~100% (assuming a quality install) | Standard engine replacement risks: new coolant leaks, wiring issues, accessory failures. |
Now, the big question I always ask my customers: is it actually worth fixing? My rule of thumb is this: if the repair cost—especially for a block replacement—exceeds 50% of your vehicle’s current market value (go check Kelley Blue Book or NADA), you really need to consider replacing the car. Spending $7,000 to fix a $9,000 vehicle that already has high mileage might not make long-term sense. Think about your future reliability, resale value, and the maintenance headaches you might be buying into.
Preventing a Repeat Performance
Here’s the good news: preventing this mess is simple, and it costs almost nothing. Always, always, always use the exact coolant type specified in your owner’s manual. Don’t assume that because it’s green, orange, pink, or blue, it’s compatible. Color doesn’t matter; the chemistry does. If your Honda calls for Honda Type 2, use that. If your Ford requires Motorcraft Orange, stick to it. Those “universal” coolants might seem like a convenient shortcut, but in modern engines with tight tolerances and specific corrosion inhibitors, they’re often a recipe for compatibility issues down the road. I’ve seen it too many times.
Make it a habit to check your coolant reservoir every few months. The fluid should be bright, clear, and free of any particles or film. If it looks cloudy, discolored, or has floating debris, investigate immediately. And every two years, or according to your vehicle’s maintenance schedule, test your coolant with dip strips. These strips measure pH and reserve alkalinity, which tells you if the corrosion inhibitors are still active. This is your early warning system for coolant degradation or contamination. Ignore it, and you’re essentially gambling with your engine—turning a $10 test into a potential $7,000 repair. Trust me on this one.
