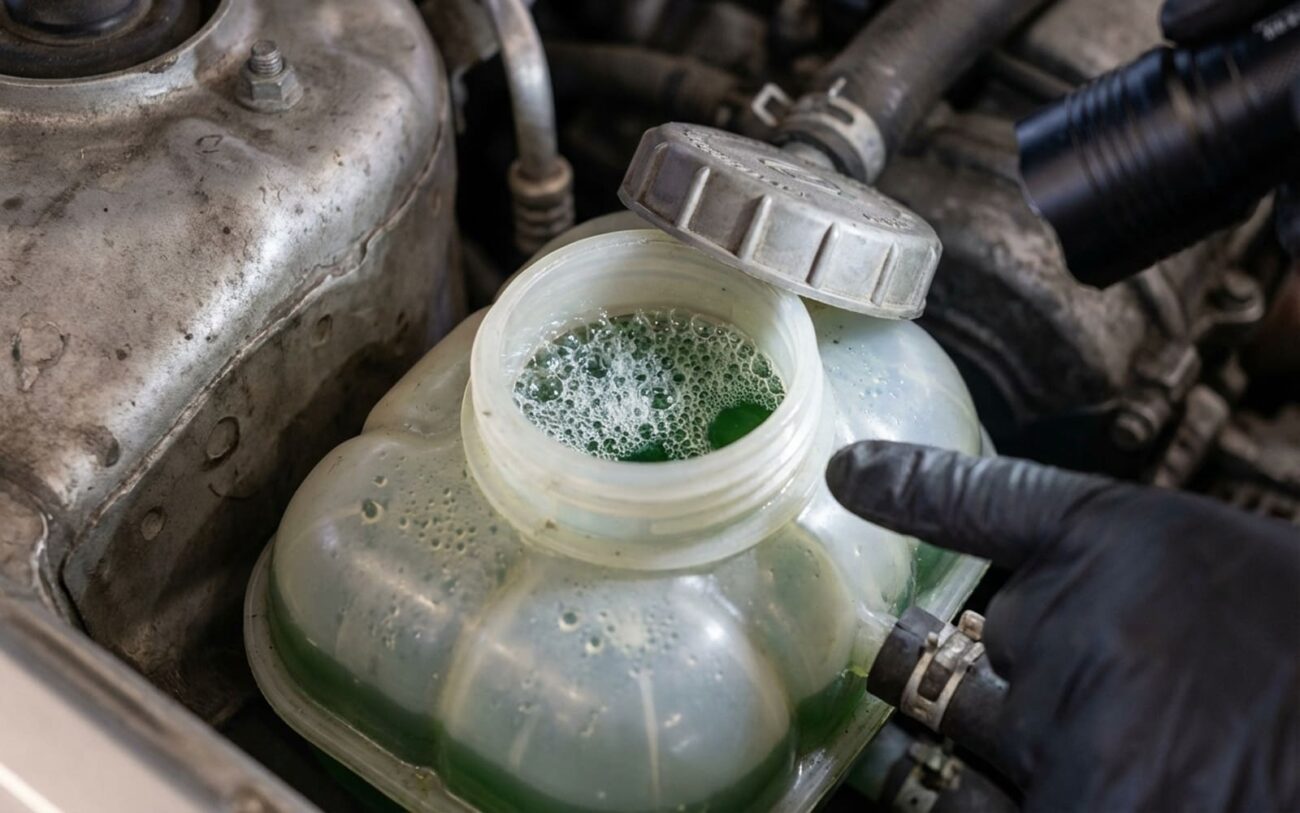
Bubbles in Your Coolant: What I See, What It Means, and What to Do
Let’s get straight to it: if you’re seeing a steady stream of bubbles rising in your coolant reservoir or radiator neck, especially right after a cold start, you’ve got a serious problem. I’ve been turning wrenches for over 25 years, and I can tell you, that’s not just “air burping out.” That’s combustion gases getting forced into your cooling system. It means there’s a breach, a direct path from a high-pressure combustion chamber into your coolant passages.
I’ve seen too many folks try to brush this off as normal, thinking it’ll just clear up. Real air pockets from a recent fill will stop bubbling after a few minutes of running. Persistent bubbles, especially on a cold engine, tell a different story. This isn’t a minor issue; it’s a ticking time bomb for your engine.
The Diagnosis: Finding the Real Source of the Problem
Bubbles tell me combustion gases are getting into the coolant, but they don’t tell me where. Is it a head gasket? A cracked cylinder head? Or even a crack in the engine block itself? All three can give you nearly identical symptoms. Guessing here leads to tearing things apart you didn’t need to, and that costs money. Here’s the systematic approach I use in my shop to pinpoint the leak.
Step 1: Confirming Combustion Gas Presence
First, we need to be absolutely sure it’s combustion gas. A simple visual check on a cold start is a good indicator, but I always follow up with a chemical test. I use a “block tester” or “combustion leak detector.” You put a special blue fluid in a test tube, place it over the radiator or reservoir opening, and draw air from the cooling system through it. If the fluid changes color—usually to yellow or green—it means exhaust gases are present. This confirms the problem isn’t just an air pocket.
Step 2: Static Cooling System Pressure Test
With the engine cold, I’ll pressurize the cooling system to the cap’s rated pressure, usually 13-18 psi. Then I watch the gauge. If it drops, you’ve got a leak. This test tells me there’s a leak, but it doesn’t tell me if it’s external (like a hose or radiator) or internal (into a cylinder). That’s where the next step comes in.
Step 3: Cylinder Leak-Down Test
This is a critical test. I bring each cylinder to top dead center on its compression stroke. Then, I introduce regulated shop air (around 100 psi) directly into the spark plug hole. While the air is flowing, I monitor the gauge on the leak-down tester. More importantly, I listen. If air is escaping into the cooling system, you’ll hear it hissing through the coolant reservoir cap, or you’ll see bubbles in the coolant. This test isolates the faulty cylinder and confirms a direct path from the combustion chamber to the coolant passages.
A good leak-down test will show minimal leakage (under 10%) for a healthy cylinder. If you’re seeing 20% or more, and hearing air in the coolant, you’ve found your cylinder.
Step 4: Post-Disassembly Head Pressure Test (Head vs. Block)
Once we’ve identified the cylinder, the head has to come off. This is the only way to definitively tell if the crack is in the cylinder head or the engine block. After removal, I’ll take the cylinder head to a machine shop or perform the test myself if I have the right setup. The head is sealed at all coolant ports and then submerged in a tank of warm water. We pressurize the coolant passages in the head, and any bubbles that appear pinpoint the exact location of the crack. If the head passes this test, then the issue is almost certainly a warped or cracked engine block deck surface. This precision saves a lot of headaches and prevents replacing a perfectly good head when the block was the real culprit.
Why Cylinder Heads Crack: What I’ve Seen Over the Years
A cracked cylinder head isn’t just a blown gasket; it’s a failure of the metal itself. Most modern heads are aluminum, though older engines used cast iron. From my experience, the main reasons these things fail come down to a few key factors:
- Thermal Fatigue: This is the big one. The areas around the exhaust valve seats get incredibly hot during operation and then cool down rapidly when you shut the engine off. Over thousands of these cycles, tiny micro-cracks form and grow. If the engine ever severely overheats—even once—that process accelerates dramatically. I’ve seen aluminum heads crack like an eggshell after a single bad overheat.
- Manufacturing Defects: Some engine designs, especially certain aluminum V6s or Ecotec engines from specific years, had known issues with casting porosity. These are tiny voids in the metal that act as stress risers. Over time, they can open up, allowing coolant to seep through. It’s not common, but it happens.
- Chemical Degradation: This is often overlooked. Using the wrong type of coolant, skipping coolant changes, or just topping off with tap water can lead to electrolytic corrosion in aluminum heads. The wrong chemicals literally eat away at the metal, creating pathways between coolant and combustion areas.
- Detonation/Pre-ignition: If your engine is “pinging” or “knocking” under load, and you ignore it, you’re asking for trouble. Severe detonation creates pressure spikes inside the cylinder that are high enough to shock-crack a head. It’s like hitting the head with a hammer from the inside.
While a blown head gasket shares some symptoms—white exhaust smoke, coolant loss, misfires—a cracked head is usually a much more serious and costly repair. The head gasket is designed to be a sacrificial seal; the head itself is not.
Repair Options: What Can Be Done (and What Can’t)
This is Professional Territory. No Shortcuts.
Your repair options depend entirely on where the crack is, how bad it is, and what kind of engine you have. There’s no magic bullet, and some “fixes” are just temporary delays. Working on cylinder heads requires specialized tools, proper safety, and a lot of precision. If you don’t know what you’re doing, you’ll make it worse.
Cylinder Head Welding (External Cracks Only) Professional / Conditional
Internal Crack Repair Non-Repairable → Replace Head
Cracked Valve Seat Inserts Professional Only
Temporary Sealant Fixes Temporary / Last-Resort
Verifying the Fix: Don’t Skip This Step
Putting everything back together and just hoping for the best? That’s gambling, and it’s how you end up with repeat failures. You absolutely need to confirm the repair holds up under real operating conditions. Here’s my post-repair checklist:
- Static Cooling System Pressure Test (Again): After reassembly, I’ll pressurize the system to spec and let it sit for at least 30 minutes. No drop on the gauge? Good start.
- Thermal Cycles: Run the engine through at least three full thermal cycles. That means a cold start, letting it warm up to operating temperature, shutting it off, and letting it cool completely. Check the coolant level and look for any leaks after each cycle. This stresses the new gaskets and components.
- Combustion Gas Check (Block Tester): This is non-negotiable. Use that block tester fluid again. If it stays blue, you’re good. If it turns yellow or green, you still have combustion gases getting into the coolant, and the repair failed.
- Cylinder Leak-Down Test (All Cylinders): I’ll perform a leak-down test on all cylinders, especially the one that was problematic. This confirms proper sealing, correct head bolt torque, and that no other issues popped up during reassembly.
The Hard Truth: Cost and Your Options
Let’s talk money, because this isn’t a cheap fix. The cost varies wildly depending on your vehicle, engine type, and where you get the work done. Here’s a general idea of what you’re looking at:
| Repair Type | DIY Cost (Parts Only) | Shop Cost (Parts & Labor) | Success Rate (My Experience) | Risk if Repair Fails |
|---|---|---|---|---|
| Cylinder Head Welding (External Crack) | Not Applicable (PRO-ONLY) | $800 – $1500 (plus head R&R labor) | 60–70% for simple external cracks, if done perfectly |
Coolant loss, overheating, potential for catastrophic engine failure |
| Cylinder Head Replacement (New or Remanufactured) | $1200 – $3000 (parts only) | $2500 – $5000+ | 98% if diagnosed and installed correctly |
Minimal if procedure is followed; risk if underlying cause (e.g., clogged radiator) isn’t addressed |
Keep in mind, that shop cost includes labor for removing and reinstalling the head(s), which alone can be $800–$1,500. You’ll also need new torque-to-yield head bolts, a full gasket set, and fresh coolant. It adds up fast.
Here’s my rule of thumb: if the total repair cost is going to exceed about 60% of your car’s private-party value in “Fair” condition (check resources like KBB or Edmunds), you need to seriously consider whether a used engine swap or replacing the vehicle makes more financial sense. Especially on high-mileage cars, pouring thousands into a repair that might not last is a tough gamble.
How to Keep This From Happening Again
Prevention is always, always cheaper than repair. The biggest thing you can do to avoid a cracked head is to properly maintain your cooling system. I can’t stress this enough:
-
Use the Right Coolant: Don’t just grab generic green stuff off the shelf. Modern aluminum engines often require specific OAT, HOAT, or phosphate-free formulations. Using the wrong type can accelerate corrosion and lead to cracks. Check your owner’s manual.
-
Change Coolant on Schedule: Coolant isn’t “lifetime.” It loses its anti-corrosion and anti-cavitation additives over time. I’ve seen radiators on 8-year-old cars with gel-like sludge inside—no wonder they overheated.
-
Monitor Your Temperature Gauge: If that needle starts creeping up, pull over safely and shut the engine off. One severe overheat event is all it takes to warp a head or start a crack. And if you do overheat, don’t just refill and drive off. Get a cooling system pressure test and a combustion gas test done afterward. A small crack might not show immediate symptoms but can worsen fast.
-
Check Coolant Levels Monthly: Do this when the engine is cold. Any unexplained loss—no visible external leaks, no puddles—should raise a red flag. It could be going into a cylinder. Also, if you notice white exhaust smoke at startup or milky oil, get it checked immediately.
-
Address Root Causes: A failing thermostat, a clogged radiator, a weak radiator cap, or even a faulty cooling fan can all contribute to overheating. Don’t just fix the symptom; fix the underlying problem.
Cost-Saving Tip from My Shop
If you’re out of warranty, an independent engine specialist or a reputable machine shop can often offer cylinder head repair services, including welding or replacement estimates, that are 30–50% below dealership pricing. Just make sure they have a solid reputation and experience with this kind of work—this isn’t a job for a general mechanic.
